Corn Tortillas Recipe
Making Corn Tortillas at home is much easier than you think! Here is a comprehensive guide to help you learn how to make Homemade Corn Tortillas with step-by-step photos along with all the information you need including technique, ingredients, and equipment.
Servings 15 corn tortillas
Calories 49kcal
Ingredients
- 1 3/4 cups masa harina for tortillas, (I used the Maseca brand) (9.5 ounces)
- 1 cup hot tap water plus 2 tablespoons
- 2 tablespoons water at room temperature
Instructions
- Using a wooden spoon, mix masa harina and 1 cup plus 2 tablespoons hot tap water in a large mixing bowl. Cover it with stretch film and let it sit for 30 minutes.
- Begin working the masa harina and water mixture with your hands. Add 2 more tablespoons of cool water (one at a time) for the dough to reach an ideal texture, where it is still soft without being sticky (similar to Play-Doh). If, for some reason, it is dry (looks like it is cracked), add a little more water. Or if it is too wet (or sticky), let it sit on the kitchen counter uncovered for it to dry out for a little bit or add more masa.
- Divide the dough into 15 equal pieces (for this recipe, it was 1.4 ounces each) for 6-inch corn tortillas. Cover the dough with a clean kitchen towel.
- Cut each sides of a Ziploc bag to make it a large rectangular piece. Lay it on the tortilla press, making sure it covers both the upper and bottom parts of the press. (See the pictures in the blog post)
- Roll each piece by placing on the bottom part of the press lined with the Ziploc bag. Cover it with the top of the Ziploc bag, close the press and push it down. Gently peel back the top layer of the bag, and transfer it to your hand. Place it on a baking sheet and cover it with a kitchen towel. Continue with pressing the rest.
- In the mean time, heat a cast iron skillet in medium heat for 10 minutes. You want to make sure it gets really hot.
- When you are ready to bake, place a tortilla on the skillet and let it cook for 15 seconds. At first it will stick, but then, if your temperature is right (read the blog post for more information on the temperature), it will come off easily for you to flip it. Let it cook for another 30-45 seconds or until it is lightly browned.
- As tortillas are cooked, transfer them in a basket cloth lined with a kitchen towel. Allow them to continue cooking with the steam (from their own heat) inside the basket for at least 10 more minutes before serving.
Notes
- It is optional, but if you want you can swap some of the water with chicken/vegetable stock and add salt into your dough.
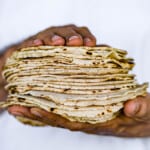
- How to get soft tortillas: One thing that is so important to note here is that the cast iron skillet (or griddle) only cooks the outside of the tortilla. In order for it to cook thoroughly, you need to cover them with a clean kitchen towel and place it in a bowl with a lid. As it sits, the heat from the growing sack will continue the cooking process resulting in softer and completely cooked corn tortillas. So, as you can imagine, the softest one is the one at the very bottom. Therefore, when you are ready to serve, it is best to start from the very bottom of the stack.
-
How to Store: I think these DIY corn tortillas are best on the day that they are made. That is why I usually make just the amount that I plan to serve. However, to find out the best way to store tortillas, we made two batches of this recipe. You have two options when it comes to storing corn flour tortillas. They both work with a caveat:
- At room temperature: Keep them wrapped with a clean kitchen towel and let them sit on the kitchen counter. It will be fresh for up to two days but if you leave it longer it will start developing mold.
- In the fridge: Bring them to room temperature, wrap them tightly with a kitchen towel, and store them in the fridge. They should keep fresh for up to 4 days. However, as they sit in the fridge they get hard so I recommend a quick warm-up on the skillet before serving.
Nutrition
Calories: 49kcal | Carbohydrates: 10g | Protein: 1g | Fat: 1g | Saturated Fat: 1g | Sodium: 2mg | Potassium: 35mg | Fiber: 1g | Vitamin A: 28IU | Calcium: 18mg | Iron: 1mg