Blanched Kale Recipe
This step-by-step guide for making blanched kale is the perfect solution for transforming this sometimes bitter vegetable into a tender, mild-flavored addition to salads, soups, and smoothies. The blanching process also prepares kale leaves for freezing, which will allow you to enjoy this leafy green for up to 6 months.
Servings 1 bunch
Calories 20kcal
Ingredients
- 1 bunch kale
- 1 tablespoon of salt optional
Instructions
- Boil the water: Fill a large pot with water and salt (if using). Bring it to a boil. Meanwhile, have a large bowl of ice water ready.
- Prep the kale: Remove kale leaves from their stems. Give them a rough chop or tear them to small pieces by hand.
- Blanch the kale: When the water comes to a boil, add the kale leaves into the pot and let them cook for 1 - 2 minutes or until it is softened to your liking.
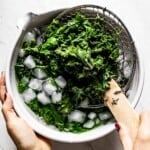
- Chill the kale: Using tongs or a spider strainer, pull the leaves out and immediately place them in the ice bath. Let leaves chill for 10 seconds or so and then drain.
- Use or store: Use them in your recipe, or thoroughly dry and freeze them for later.
Notes
- To blanch kale stems: If you want to blanch kale stems, I recommend blanching them separately from the kale leaves. To do so, bring a pot of water to a rolling boil before adding the stems. Then, let the stems cook for 4-5 minutes before transferring them to a bowl of ice water.
- Store: Once dry, place the excess kale in an airtight container or a Ziploc bag with as much air removed as possible. Your kale will remain fresh for up to five days in the fridge.
- To freeze blanched kale:
- Squeeze the excess water out of kale leaves as much as you can. Line a baking sheet with a kitchen towel. Spread the kale onto the sheet and pop it into the freezer for 2-3 hours to flash freeze it.
- Remove from the freezer and place the now-frozen blanched kale in an airtight container or a freezer bag. Label, date, and store for up to 6 months.
Nutrition
Calories: 20kcal | Carbohydrates: 3g | Protein: 2g | Fat: 1g | Saturated Fat: 0.1g | Polyunsaturated Fat: 0.4g | Monounsaturated Fat: 0.1g | Sodium: 7007mg | Potassium: 200mg | Fiber: 2g | Sugar: 0.5g | Vitamin A: 5694IU | Vitamin C: 53mg | Calcium: 149mg | Iron: 1mg