
Today we are sticking to tradition and baking up Ina Garten’s recipe for Irish soda bread. It’s fast, fun, and allows us to celebrate one of the traditional quick breads of Ireland.
We are big fans of Ina Garten, so if you love Ina Garten recipes as much as we do, be sure to make her Pot Roast, Chicken Stock, and Butternut Squash Salad.
If you make many Ina Garten bread recipes, keep in mind that this is her Irish Soda Bread with orange zest and currents, which is not the same as her Guinness Bread. That recipe is more of a brown bread and includes Guinness beer.
Ingredients
The traditional Irish soda bread has 4 simple ingredients, including flour, baking soda, salt, and buttermilk. The baking soda is used as the leavening agent instead of traditional yeast. When mixed with the lactic acid in buttermilk, it creates tiny bubbles of carbon dioxide, which gives the bread a crusty exterior while also promoting lift and structure.
The original recipe of yeastless bread was created by the Native Americans, and then adopted in Ireland in the 1840s when baking soda was introduced to Ireland. They originally used pearl ash (potash or potassium carbonate) as the leavening agent for quick bread.
The famous Ina Garten soda bread has the basic ingredients and a few untraditional (but welcome) additions to the original recipe. We will need the following ingredients:
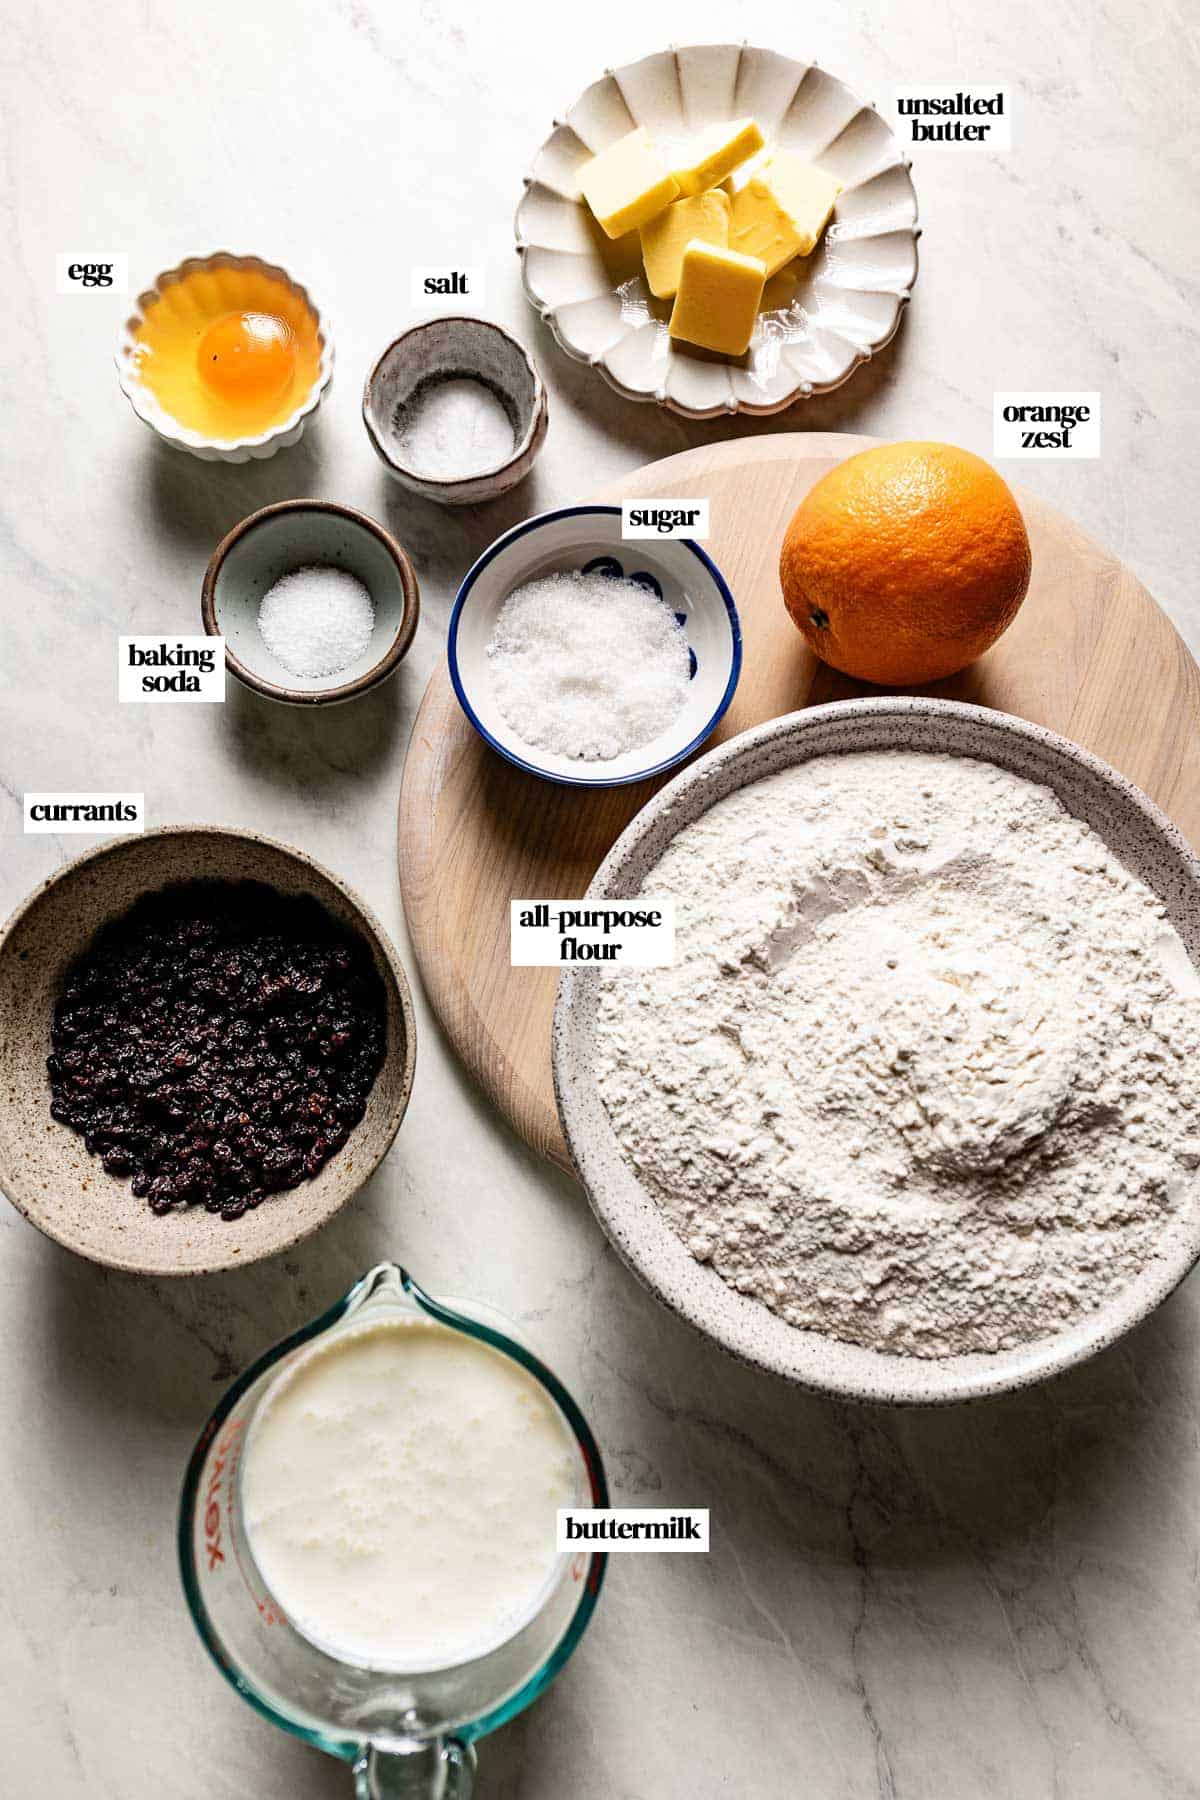
- All-purpose flour: The original Irish soda bread recipe used soft wheat flour, which is the same as modern-day all-purpose flour. If you’d like a bit more flavor and fiber, replace one cup of white flour with whole wheat flour instead.
- Sugar: Ina uses ¼ cup (4 tablespoons) granulated sugar, but I reduced it to 2 tablespoons. You can use regular granulated sugar, organic cane sugar, coconut sugar, or brown sugar.
- Baking soda: The key ingredient and where Irish soda bread gets its name. For best results, make sure your baking soda is fresh and not expired.
- Kosher salt: Kosher salt enhances the tangy, sweet flavors in this quick bread recipe.
- Cold Unsalted butter: It is crucial that the unsalted butter is cold. I like to cut it into small pieces and keep it in the fridge until I am ready to mix.
- Buttermilk: Buttermilk (the modern-day version of sour milk) is essential to the rise. Thanks to the cultured aspect of this dairy drink, the buttermilk also contributes to the flavor, acidity, and moisture.
- Egg: One egg helps make the loaf more cohesive and dense. You can make it without the egg, but I recommend keeping it in the recipe. Barefoot Contessa’s recipe uses an extra-large egg, but I used a large egg and didn’t notice a difference in texture.
- Orange zest: Although untraditional, orange zest adds a special sharpness that truly sets this orange soda bread apart.
- Currants: Dried currants add a pop of sweetness and color. You can replace them with raisins or dried cranberries, but if you go with those larger pieces of dried fruit (compared to currants) chop them up a bit before mixing. For even more flavorful additions, you can experiment with the addition of caraway seeds, fresh herbs, or shredded cheese.
How to Make Barefoot Contessa’s Irish Soda Bread?
The Barefoot Contessa Irish soda bread recipe is super fast and reliable. And the best part, you ask? It only takes a few minutes of prep time. Here’s how to do it:
- Preheat oven: Preheat the oven to 375 degrees F. Line a large baking sheet with a sheet of parchment paper.
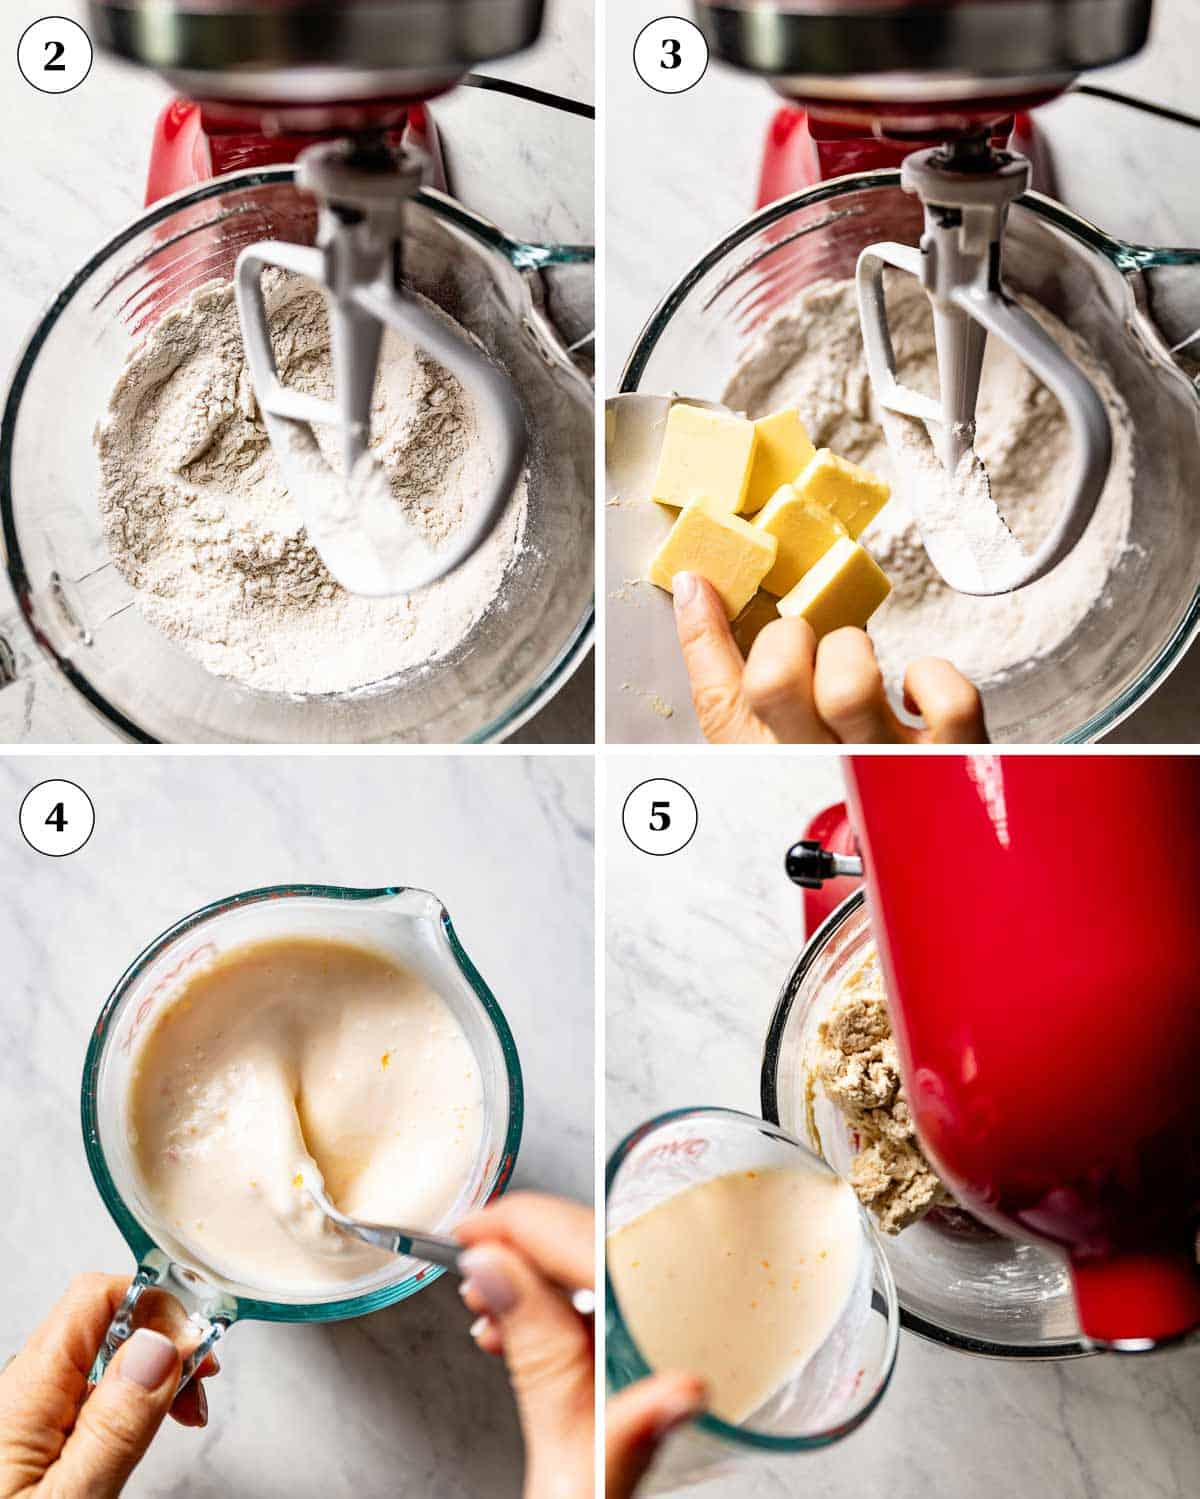
- Mix dry ingredients: In the bowl of an electric mixer with the paddle attachment, mix the flour, sugar, baking soda, and salt on low speed until combined, about 10 seconds.
- Cut in butter: Mix the cold butter pieces into the flour mixture at low speed until the butter is roughly the size of peas, about 1 minute.
- Mix wet ingredients: In a large measuring cup, whisk together the cold buttermilk, egg, and orange zest using a fork.
- Make dough: With the machine running on low, slowly add the buttermilk mixture. Keep mixing on low until everything is combined, about 1 minute. You may have to stop the machine once to scrape the bottom and sides of the bowl. Do not overmix.
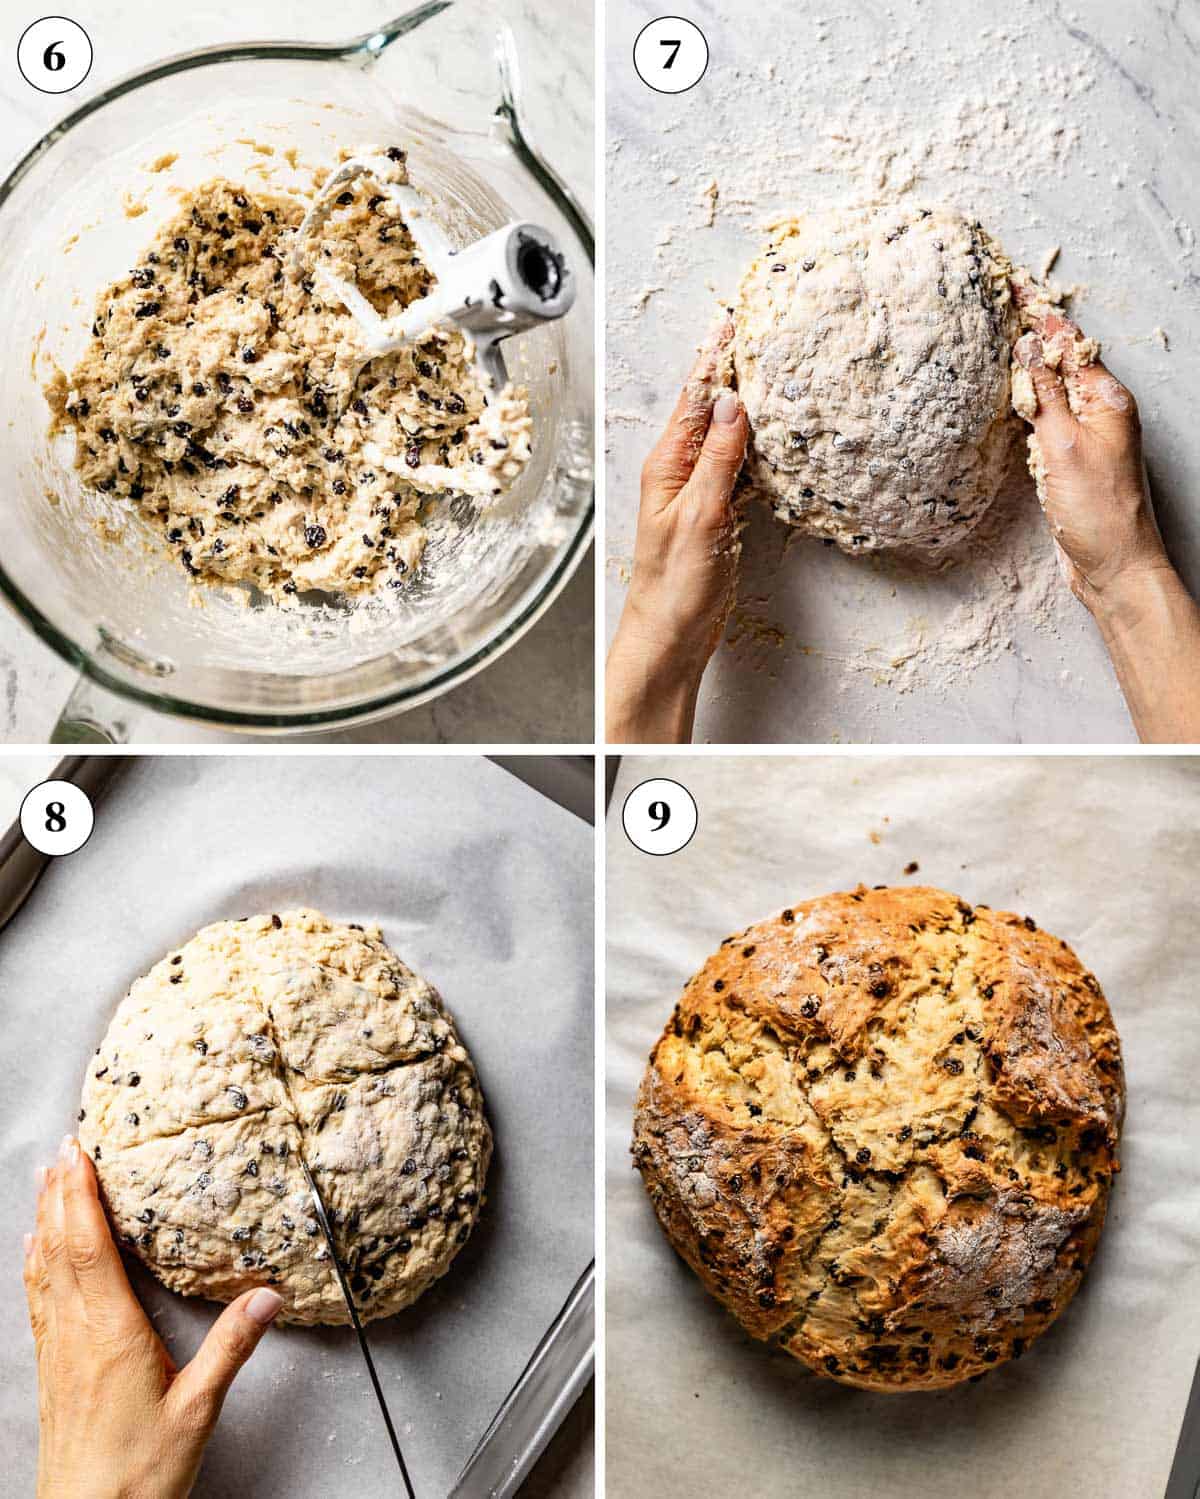
- Add currants: In a separate bowl, toss the currants with about 1 tablespoon of flour. Turn the machine on low speed and add the currants. Mix until they are evenly distributed within the dough, about 1 minute. The dough will be very sticky.
- Knead: Dump the dough onto a well-floured board or surface. Knead for 1-2 minutes and shape it into a round loaf.
- Cut an X: Transfer the dough onto the prepared sheet pan. Cut an X on top with a large serrated knife.
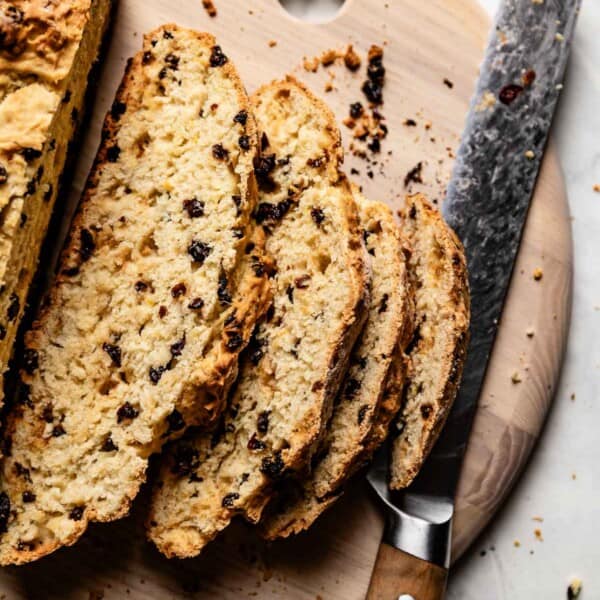
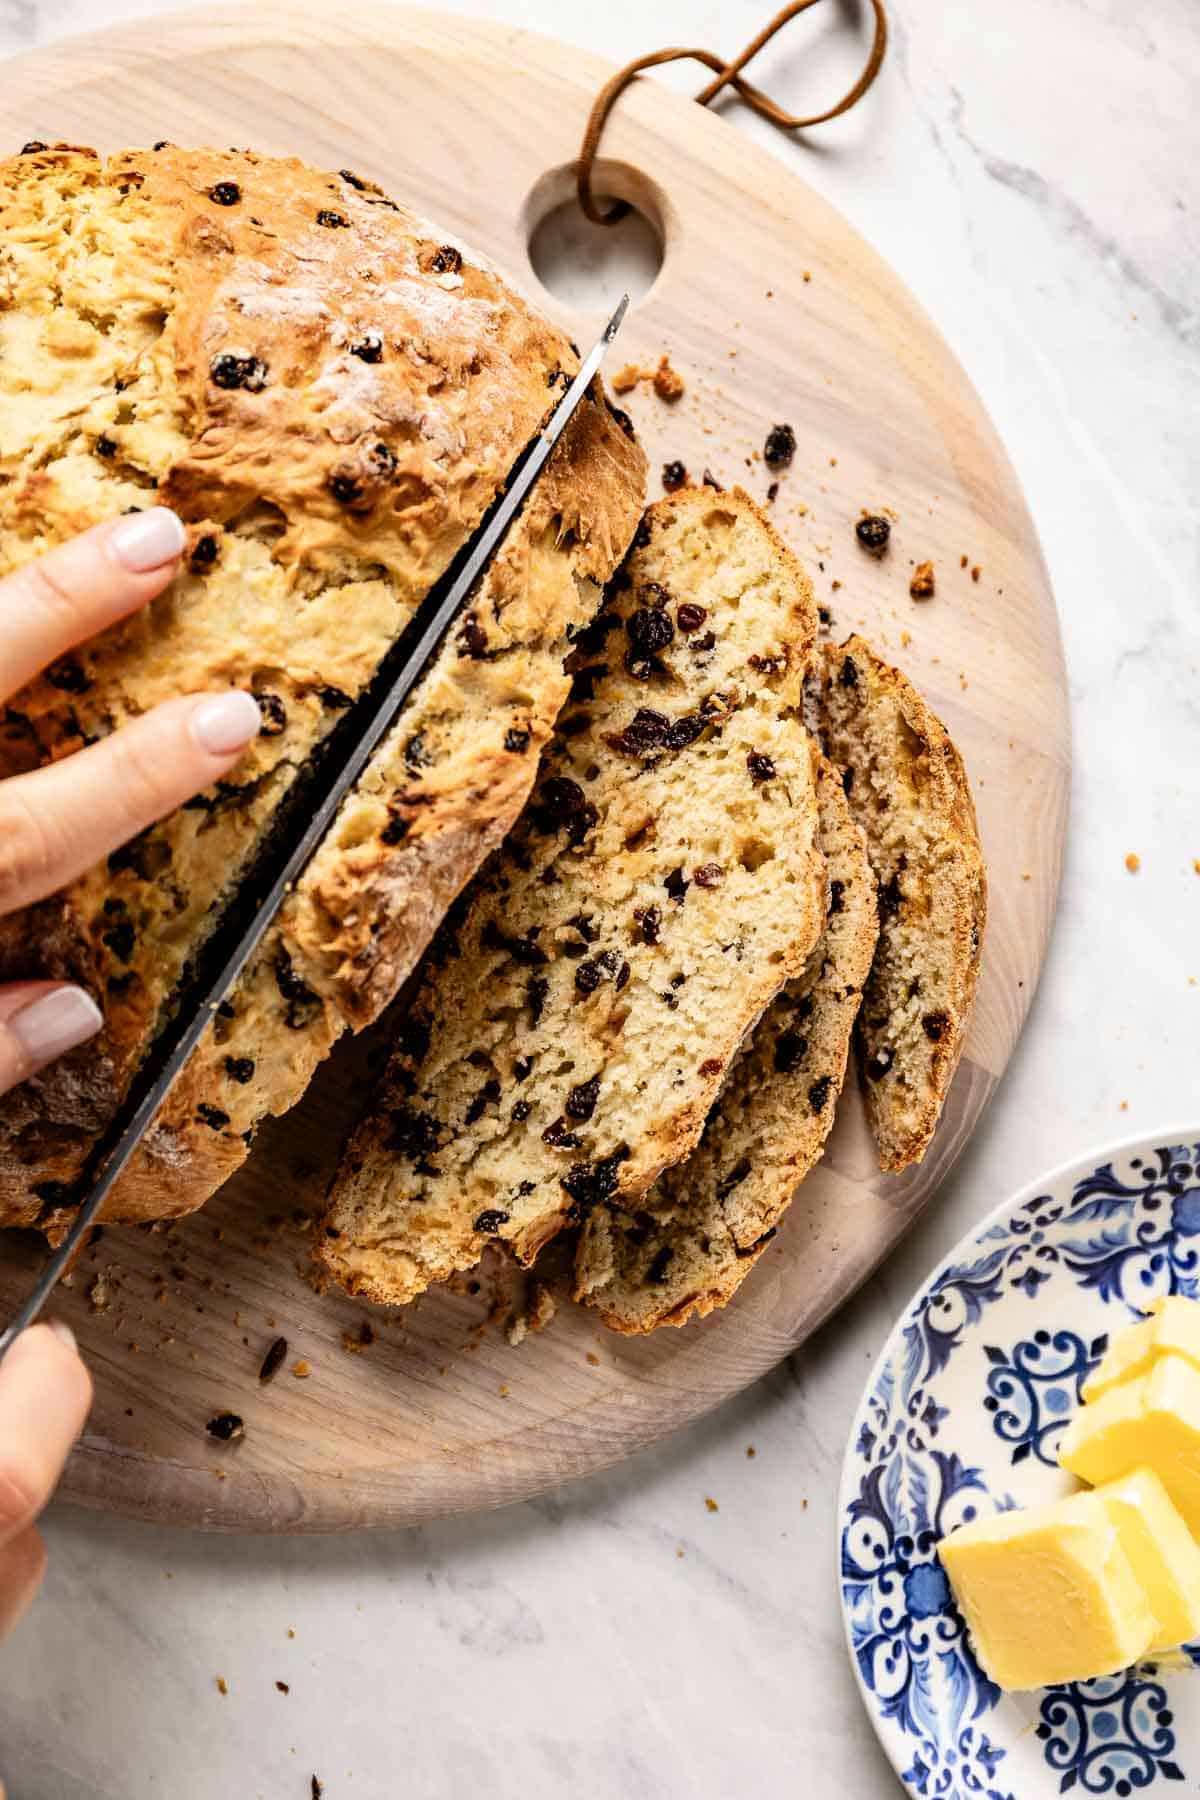
- Bake: Bake for 40-45 minutes or until it turns lightly golden brown. When tapped on the bottom, the loaf should make a hollow sound.
- Cool: Cool on a baking rack. Slice and serve warm or at room temperature.
How to Store, Freeze, Thaw & Reheat?
Irish soda bread with currants tends to dry out quickly, so it’s best to store it properly for maximum freshness. Here’s how I like to do it:
- Storage: Wrap it in foil or store it in an airtight container at room temperature for up to 3 days.
- Freeze: If freezing the whole loaf, double wrap in plastic wrap, then in a layer of aluminum foil. If freezing individual slices (recommended), seal them tight in a zip-top freezer bag. Whichever method you choose, freeze for up to 2 months.
- Thaw: Thaw the loaf overnight in the refrigerator. If you have frozen slices, thaw them to room temperature.
- Reheat: Reheat the entire loaf in a low—medium oven (300 – 325 degrees F) for 10 minutes or until warm. Reheat slices in the toaster oven or following the same oven method, but for only 3-5 minutes.
What is the Best Way to Eat Irish Soda Bread?
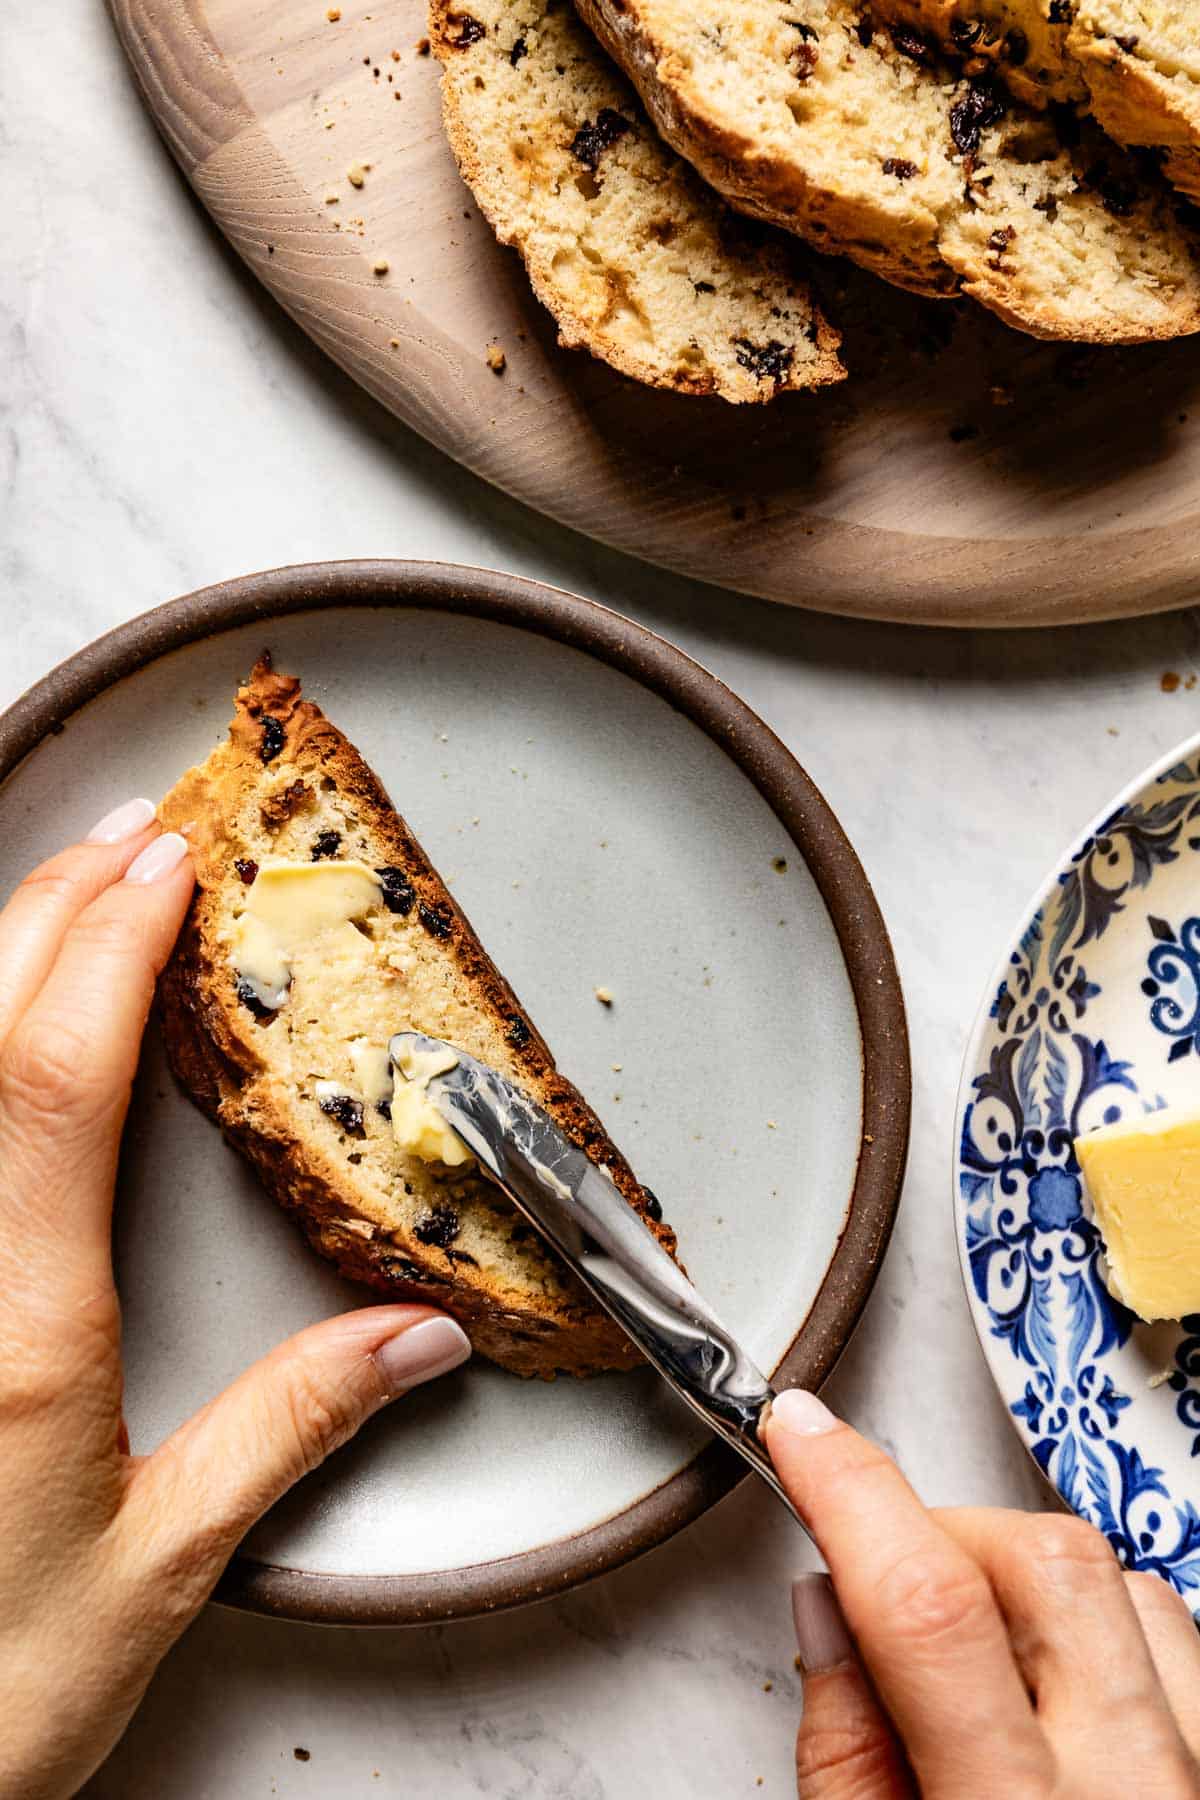
Once Ina’s Irish soda bread comes out of the oven, you will have to practice your patience skills. Your kitchen will smell wonderful, and you’ll want to eat it right away. However, it is best to allow the bread to cool for at least one hour before slicing, or it will crumble. Trust me, your patience will be rewarded when you cut your first slice, and it will remain sturdy, dense, and delicious.
Whether you want to serve it like the Irish or give it your own unique touch, here are my best-serving suggestions:
- Butter and Jam: Slather it with good Irish butter and your favorite flavor of jam for a delicious treat alongside hot coffee or tea.
- Soups and Stews: Because Irish soda bread is so dense (in the best way), it does a good job of soaking up delicious broths. Pair it with hearty soups or stews, like Stuffed Cabbage Soup or Vegetable Beef Soup. Or, treat yourself to a feast by serving it with our Beer Braised Beef Short Ribs for a dreamy St. Patrick’s Day dinner.
- Cheese: Give it a savory bite with Irish cheddar cheese, Dubliner, or Brie.
- Smoked Salmon: For a nontraditional approach, lighten it up by topping it with cream cheese, smoked salmon, and fresh dill.
- Corned Beef and Cabbage: Nothing says Happy St. Patrick’s Day more than Corned Beef and Cabbage.
Expert Tips
Creating an Irish currant soda bread worthy of celebration requires a few key techniques. Here are my expert tips on how to make the best Irish soda bread recipe:
- Keep the butter and buttermilk cold. The pockets of butter in the dough create steam in the oven, creating a tender, crispy loaf.
- The dough will be sticky: A wet dough is normal, so do not be afraid to add a generous amount of flour to your work surface. Additionally, it is okay to knead the dough for a minute or so. It will still be sticky (even after kneading), so don’t be alarmed.
- Do not overwork the dough: Handle it gently, and do not knead excessively. Overmixing can make the loaf tough and rubbery.
- Cast Iron Skillet: Try baking it in a seasoned cast iron skillet. The extra heat conduction creates a crisp crust that is heavenly. A preheated baking stone can also work.
- Listen for the hollow sound: A key characteristic of soda bread is the hollow sound you hear when it’s tapped on the bottom of the loaf. When you hear it, you know it’s ready. If this is your first time making Ina’s recipe, you can also insert a cake tester into the center, which should come out clean.
- Do not slice it when it is hot: Patience is key. Slicing the bread while still piping hot can cause it to crumble. Wait at least 30 minutes – 1 hour for the bread to rest and set its structure.
FAQs
Irish soda bread gets its name from the use of baking soda (bicarbonate of soda) as the leavening agent rather than traditional yeast. The reaction of the baking soda with an acidic ingredient, in this case buttermilk, creates a rise and is much faster than using yeast, which requires time and fermentation.
No, actually, plain Irish soda bread without raisins or currants is commonly eaten in Ireland. The inclusion of dried fruit is more about regional preference or family tradition.
Irish bread is the broader term for bread made in Ireland that can be made with baking soda, baking powder, or yeast, along with additional components such as oats or wholemeal flour. Irish soda bread is bread that is exclusively made with baking soda and an acidic ingredient to make the bread rise.
If you try Ina Garten’s Irish Soda Bread recipe or any other recipe on Foolproof Living, please take a minute to rate the recipe and leave a comment below. It helps others who are thinking of making the recipe. If you take some pictures, be sure to share them on Instagram using #foolproofeats so I can share them on my stories.

Ina Garten’s Irish Soda Bread Recipe
Ingredients
- 4 cups all-purpose flour, plus more for currants and the counter
- 2 tablespoons granulated, or cane or coconut sugar
- 1 teaspoon baking soda
- 1 ½ teaspoons kosher salt
- 4 tablespoons unsalted butter, (1/2 stick) cold, cut into ½-inch small pieces
- 1 ¾ cups buttermilk, cold
- 1 large egg
- 1 teaspoon orange zest
- 1 cup currants
Instructions
- Preheat oven to 375 degrees. Line a baking sheet with parchment paper and set aside.
- Place flour, sugar, baking soda, and salt in the bowl of a stand mixer fitted with the paddle attachment. Mix on low speed until combined for 10 seconds or so.
- Add the butter pieces and mix on low speed until butter is mixed with flour, about a minute.
- Place the cold buttermilk in a large measuring cup and add the egg and orange zest. Whisk to combine.
- While the machine is running on low, slowly add the buttermilk mixture. Run the machine until everything is combined for about a minute. You may have to stop the machine once to scrape the bottom.
- Mix the currants with a tablespoon of flour in a bowl.
- Turn the machine on low speed and add the currants. Mix until they are evenly distributed within the dough for about a minute. Don’t be alarmed, it should be a very sticky dough.
- Sprinkle your kitchen counter with flour and transfer the dough on top. Knead for a minute or two and shape it into a round loaf.
- Transfer the loaf onto the prepared sheet pan. Using a serrated knife, cut an X on top of the bread.
- Bake for 40-45 minutes, or until it turns lightly golden brown. When tapped at the bottom, it should make a hollow sound.
- Remove from the oven and cool on a wire rack. Serve warm or at room temperature.
Video
Notes
- Yields: This recipe makes 1 loaf that can be cut into 8 slices. The nutritional values below are per slice.
- Don’t have a mixer? Mix it by hand: Ina makes it in an electric stand mixer, but if you don’t own a mixer, make it by hand with a large bowl and wooden spoon. Just make sure to work fast to prevent the butter from melting.
- Dried fruit: Ina uses currants in her recipe. However, if you don’t have currants, you can use cranberries or raisins. I recommend chopping them up a bit before adding them to the better so they resemble currants.
- Sticky dough: Even after kneading on a floured surface the dough will be sticky. Simply follow the recipe; it is normal for it to be sticky.
- Wait for it to cool down: I know it is not ideal to wait for an hour when your kitchen smells amazing, but if you slice it too early, it will stick to your knife and will lose all its moisture.
- Storage: Store leftovers in an airtight container at room temperature for up to 3 days.
- Freeze: If freezing the whole loaf, double wrap in plastic wrap, then in a layer of aluminum foil. If freezing individual slices (recommended), seal them tight in a zip-top freezer bag. Whichever method you choose, freeze for up to 2 months.
- Thaw: Thaw the loaf overnight in the refrigerator. If you have frozen slices, you can reheat them in your toaster right away.
- Reheat: Reheat the entire loaf in a low—medium oven (300 – 325 degrees F) for 10 minutes or until warm.
Nutrition
Nutrition information is automatically calculated, so should only be used as an approximation.


I have been trying every recipe that I could get my hands on for Irish Soda bread! I make this once a year- at St. Patrick’s day. I really like this recipe- it is easy ( I am not a bread maker) and the bread is delicious! After years ( really) of searching, I think that I have found the recipe for perfect Irish Soda bread. It is really satisfying somehow to gently knead this bread. I like the idea that I am making some homemade bread for my family. I recommend this bread recipe to everyone. Follow her detailed instructions, and you will have a delicious loaf of Irish Soda bread in just minutes.
This is music to my ears Bea. Thank you so much for taking the time to share your experience and rate the recipe.
Loved it, it just was not sweet enough for me. Next time, I’ll use more sugar.
I am happy to hear that you enjoyed this recipe Violet. Thanks for sharing your experience and taking the time to rate the recipe.