
A Foolproof Solution For A Super Juicy Turkey

Growing up in Türkiye, we didn’t celebrate Thanksgiving, so I learned how to cook a turkey as an adult after moving to the U.S. more than 20 years ago.
Over the years, I tried every roasted turkey method I could find: brining, basting, covering it in butter, but none gave me a bird that was quite as moist and well-seasoned as the ones I made after discovering turkey injection.
How I Discovered the Trick:
A couple of years ago, a friend invited us to her house for Thanksgiving dinner, and when I tasted the turkey she made, I couldn’t believe how juicy it was. Come to find out, her mother-in-law, a true Southern belle, apparently only makes her Thanksgiving turkey this way.
Some melted butter, a few pantry spices, and flavoring agents were injected all over the bird. The difference was night and day. The meat was moist, seasoned all the way through, and every bite had that richness I had been chasing for years.
Why It’s So Effective:
Injecting a turkey before cooking works because it delivers seasoning and moisture directly into the thickest parts of the turkey that need it most (hello, breast meat). The fat from the butter helps the turkey stay juicy during roasting, while the liquid evenly distributes the seasoning throughout in as little as four hours of resting.
The Result:
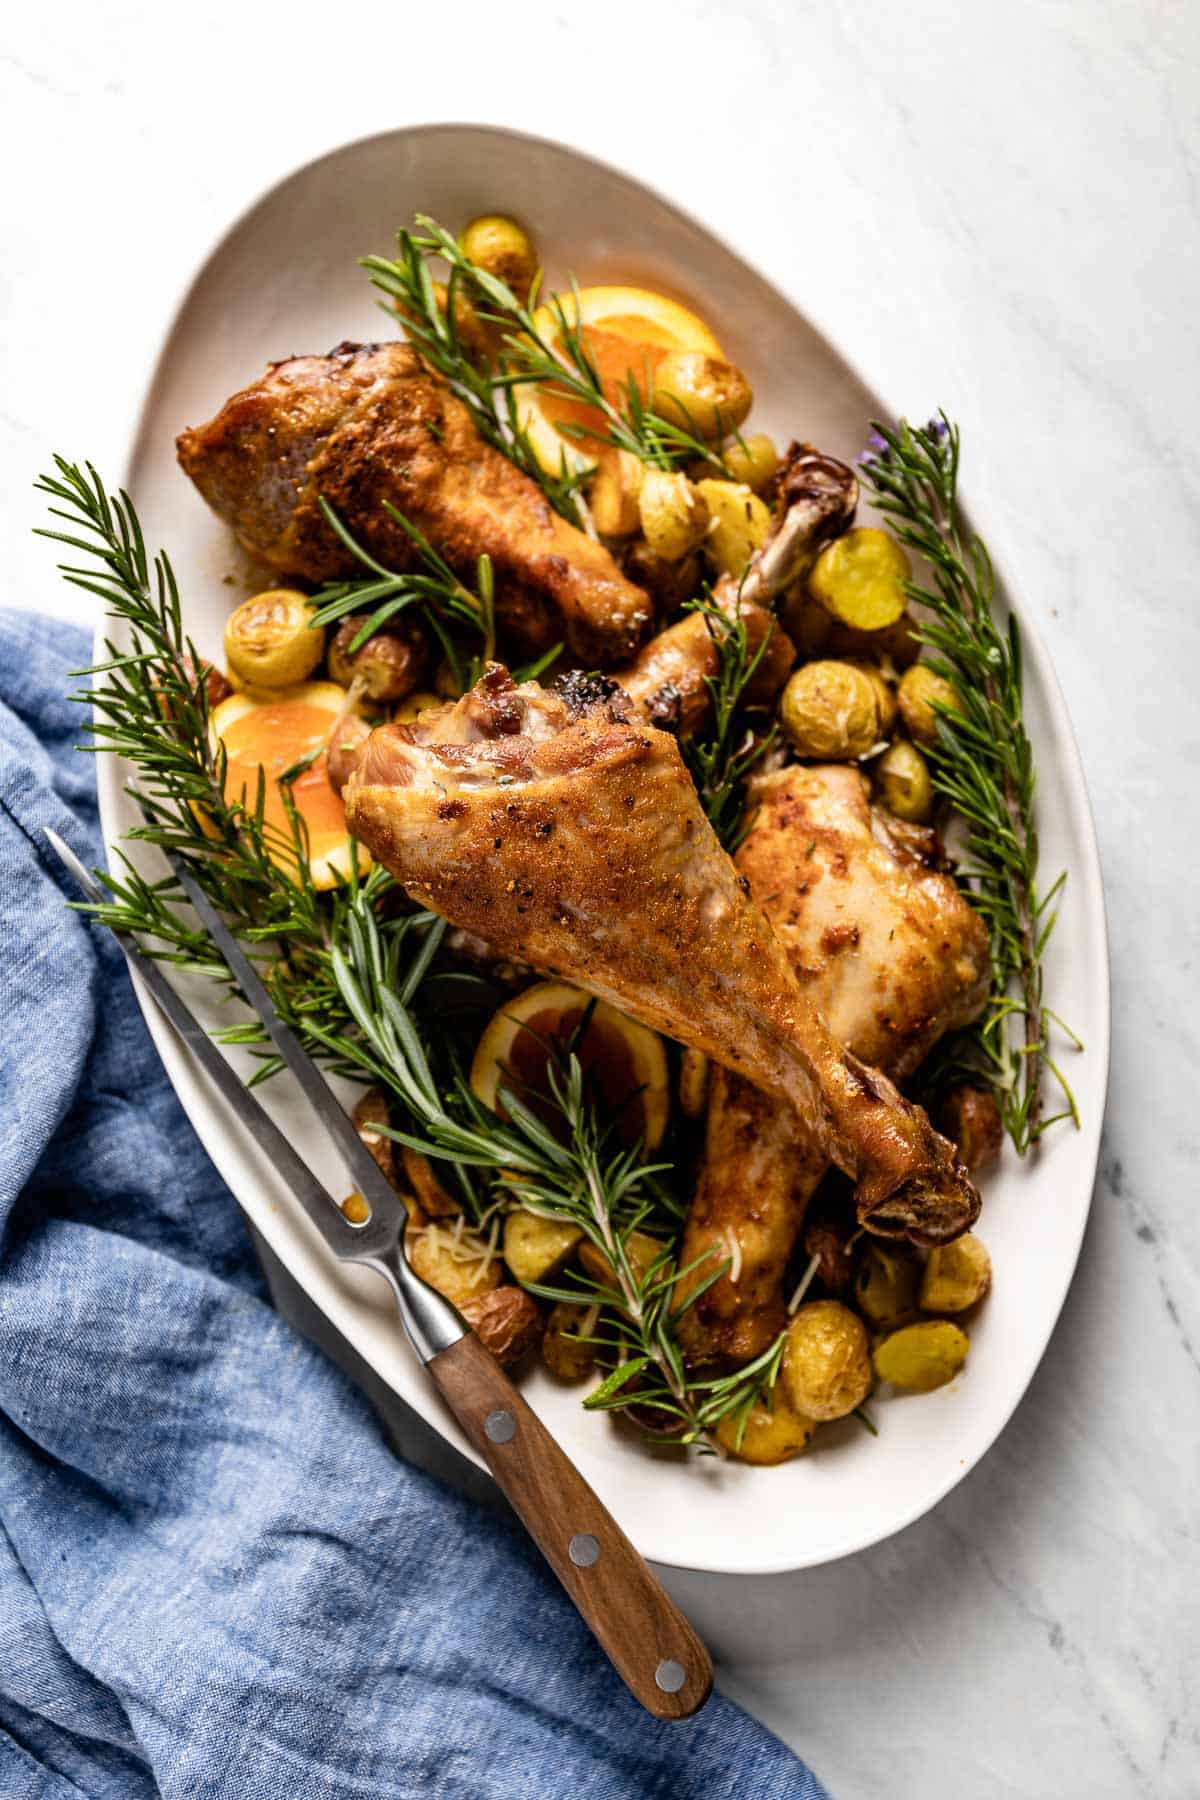
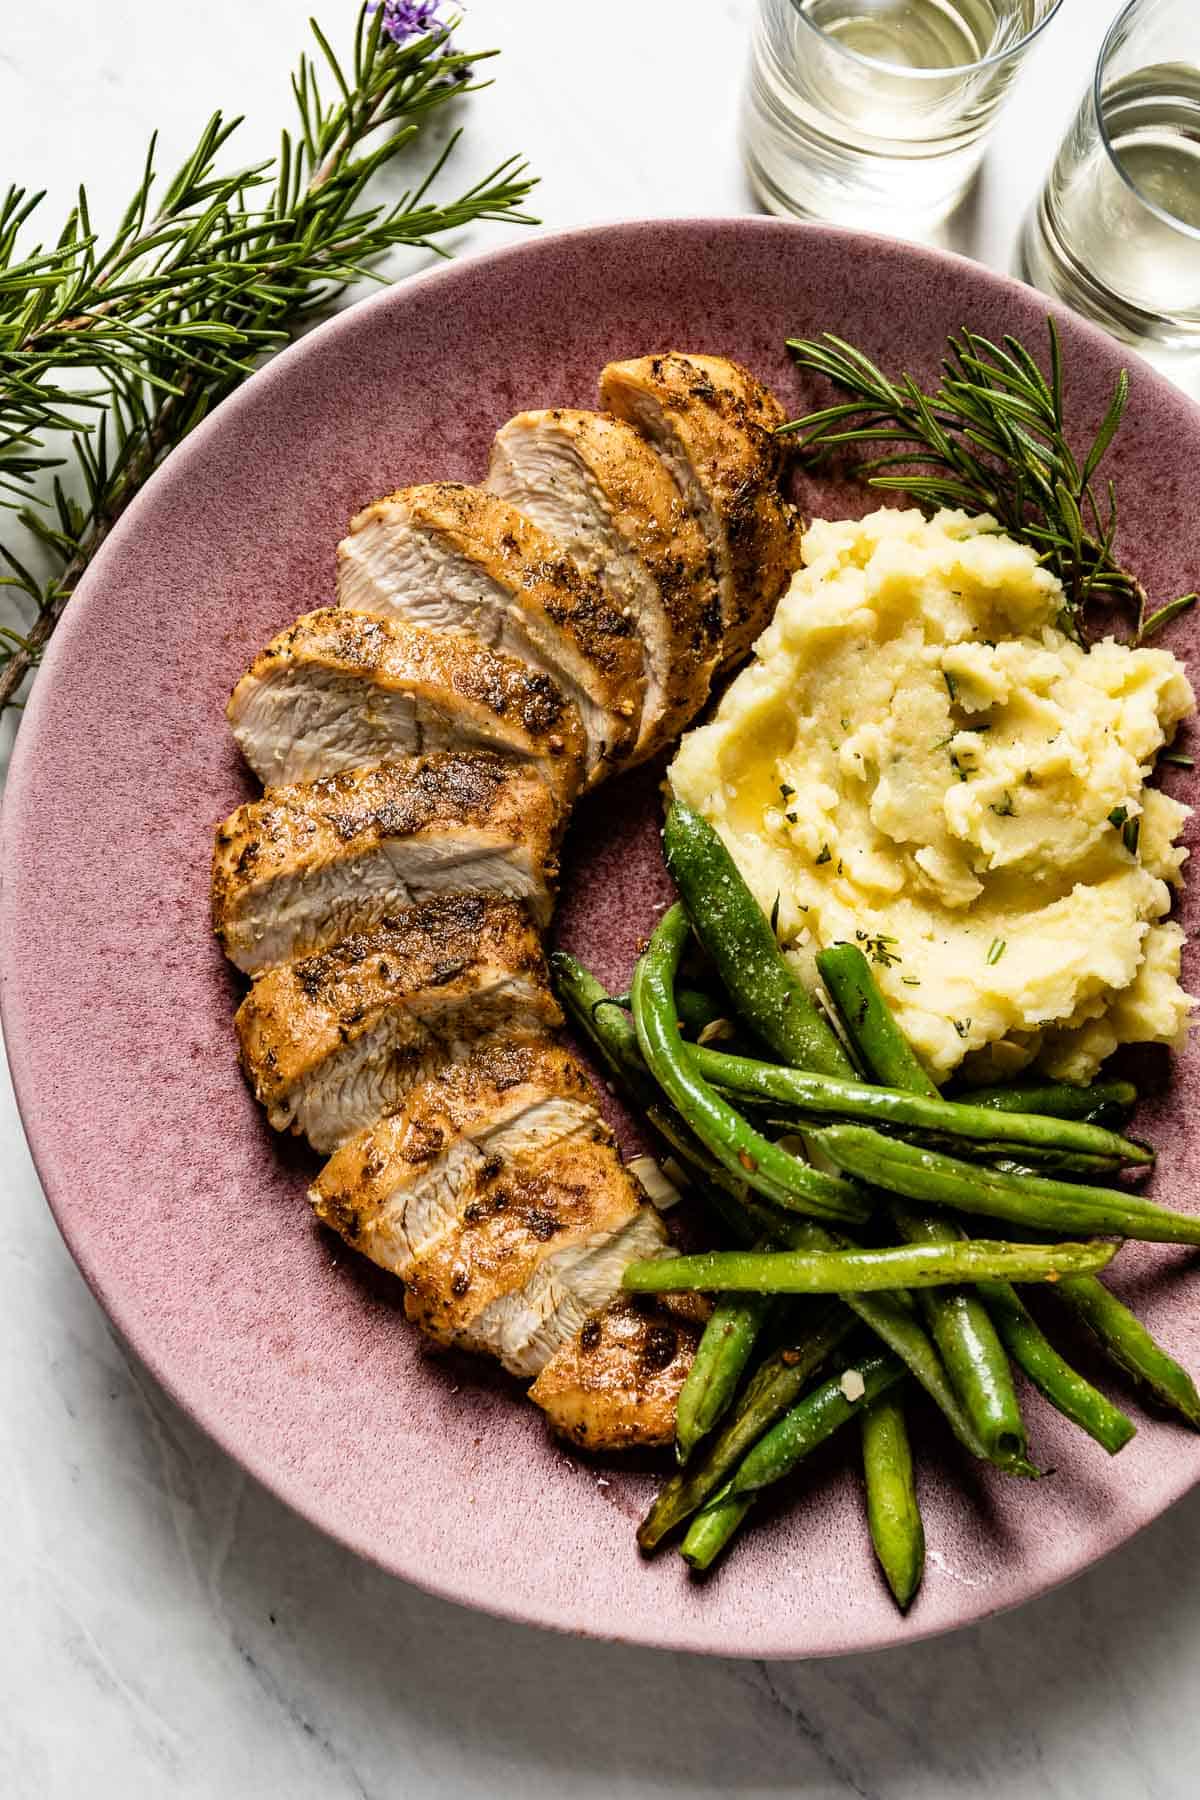
A juicy bird that is consistently tender, buttery, and, dare I say, moist. Since that day, I have tested this recipe four different times and learned a thing or two.
Don’t let the fancy word “injection” or the need for an injector (which can be found in most grocery stores) deter you from trying this recipe.
I tested it on four different turkeys, so I can share every detail, from equipment and seasoning ideas to how to inject the turkey correctly, ensuring your mixture does not escape and pool at the bottom of the roasting pan.
Equipment You Will Need
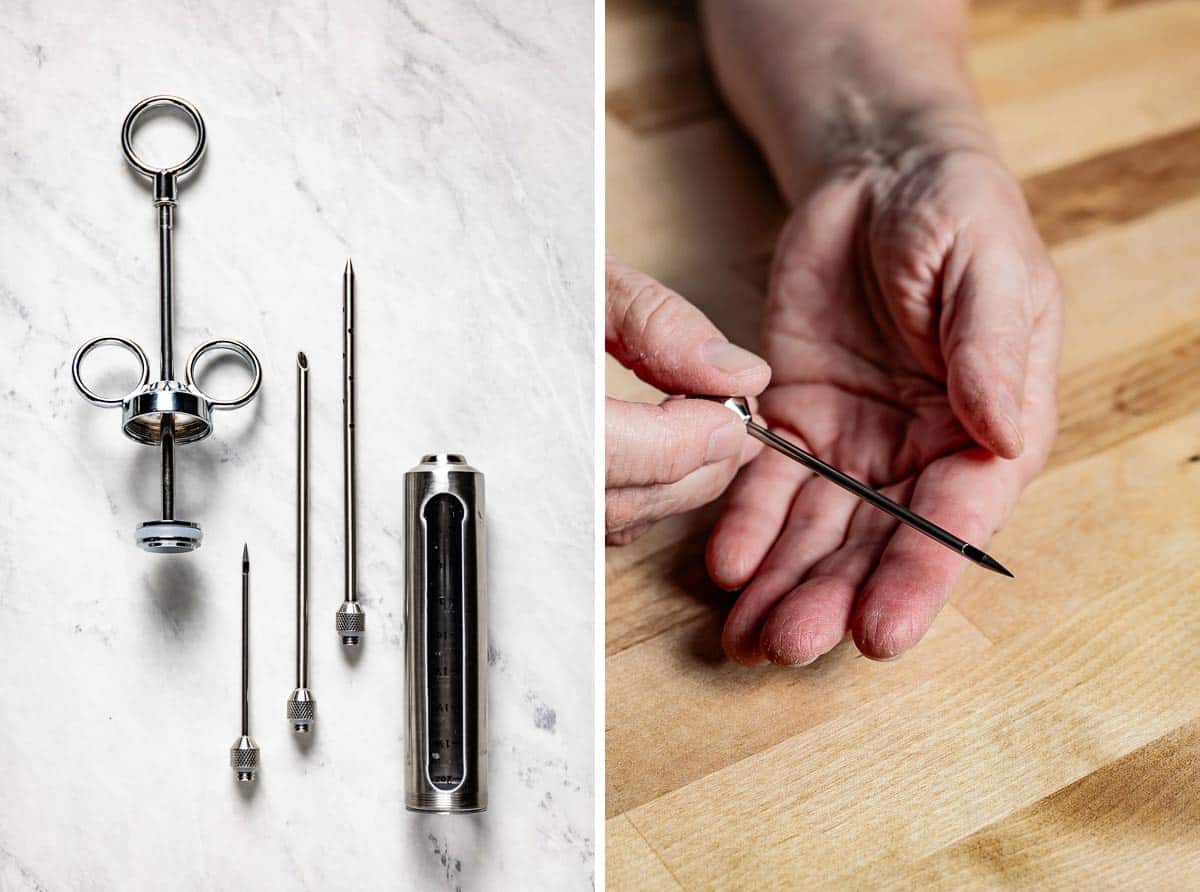
While I usually refrain from using special equipment in my recipes, this one is different, as you will need a meat injector (or a syringe) to inject the mixture into the turkey.
Luckily, it is not hard to find. Most grocery or hardware stores sell turkey seasoning injection kits during the holiday season. And once you make the investment, you can use it for injecting other types of meat as well.
For this recipe, you will need:
Baking sheet or large plate: It may seem like you need something to catch leaks, like a roasting bag, but through my recipe testing, I found that the leakage from the injected areas was minimal. So, you do not need anything other than a baking sheet or a large plate when injecting the bird.
Meat injector: I recommend purchasing a stainless steel syringe with a needle that has one opening at the tip. I’ve found it gives you better control over the flow of the mixture as you inject it, and prevents it from leaking out. If you are in the market for one, this Stainless Steel Meat Injector Kit is the one I recommend.
Ingredients You’ll Need & Why They Work
The beauty of this homemade turkey injection blend recipe is that it uses basic, everyday ingredients. I shared the exact measurements in the recipe card, but below are some detailed notes from my recipe testing to help you customize this recipe to your own preferences.
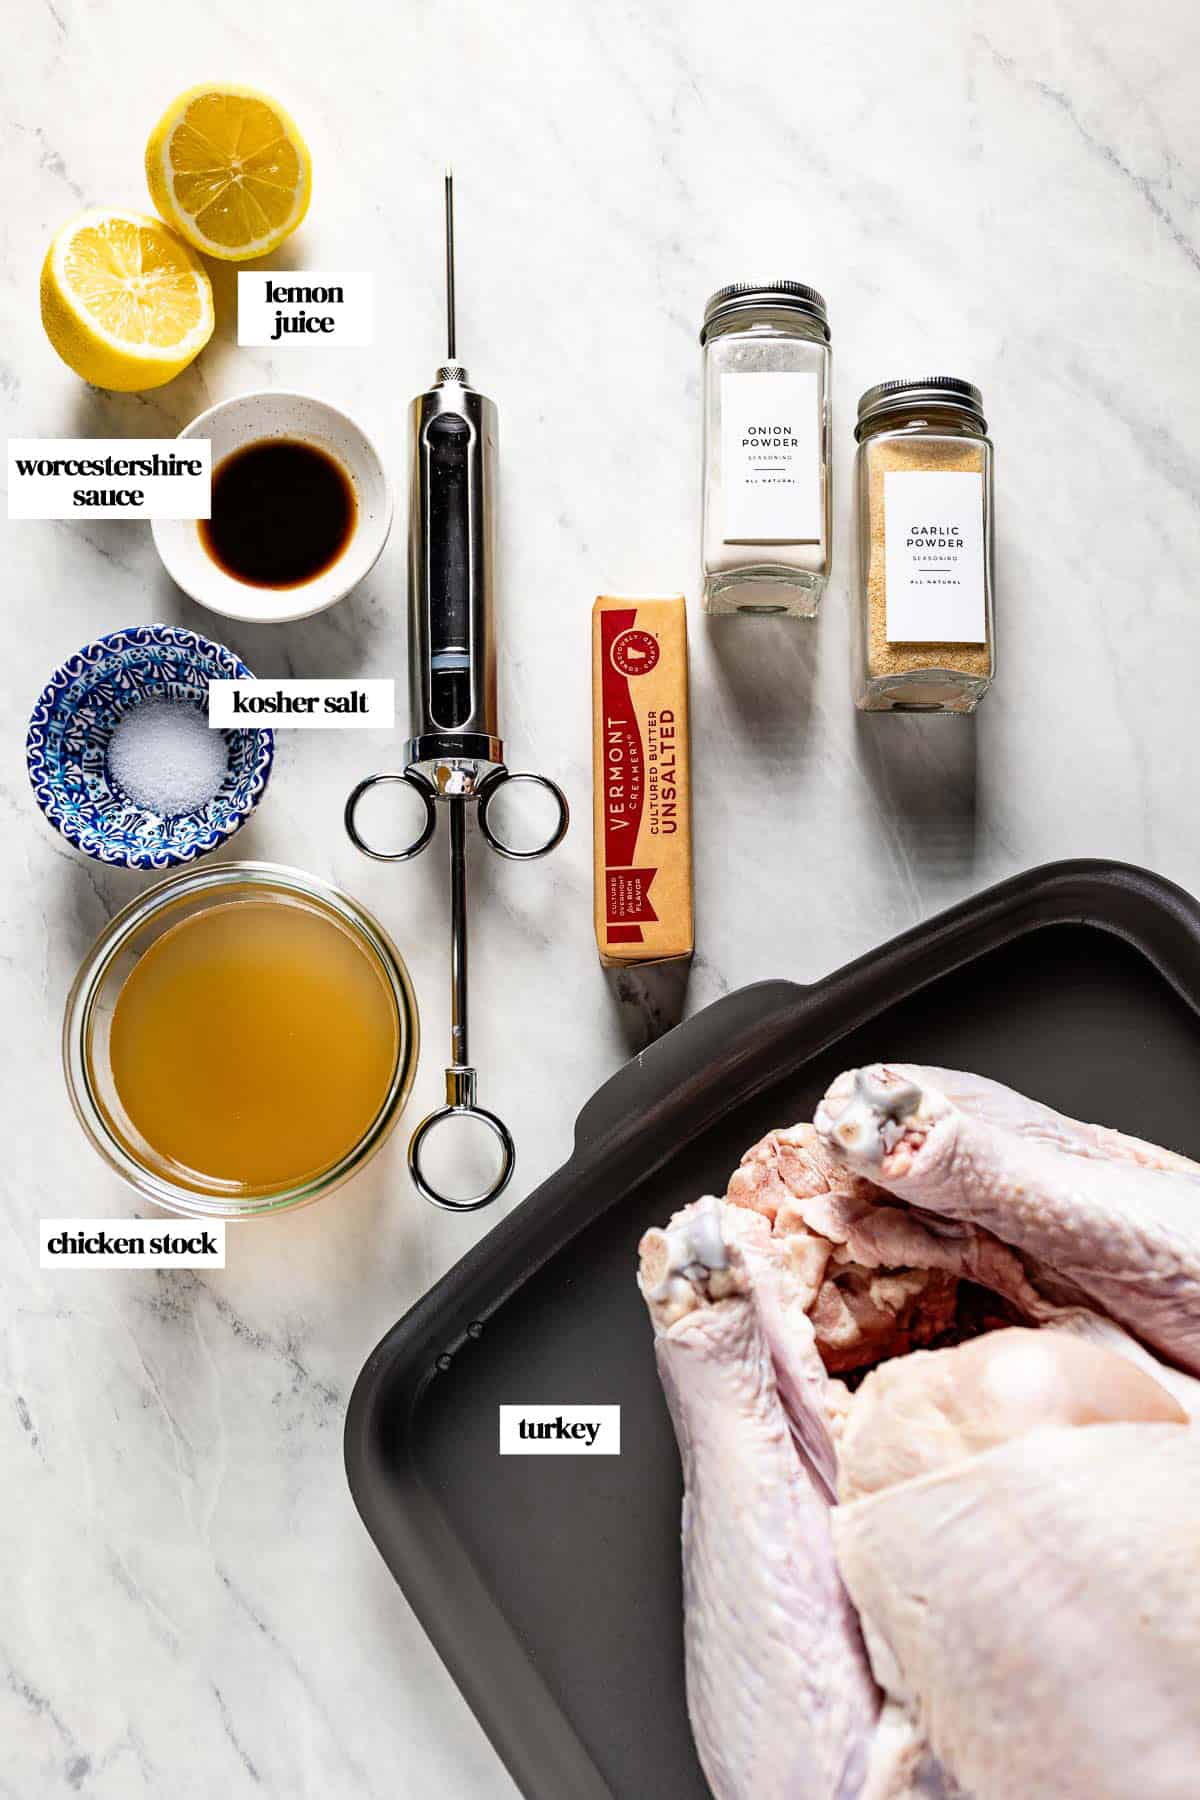
Butter: I prefer using unsalted butter so I can control the amount of salt in the injection. However, salted butter can be used if that’s all you have; simply adjust the amount of seasoning accordingly.
You can also substitute half (or all) of the butter with olive oil or another mild oil, such as avocado oil.
Chicken stock: I use my homemade chicken stock, but a store-bought low-sodium chicken stock can also be used. Ensure it’s at room temperature before use.
Alternatively, you can use turkey stock for a richer taste.
Pro Tip: For a deeper, savory taste, whisk in a teaspoon of Better Than Bouillon (roasted chicken flavor) or a pinch of MSG/Umami Powder. It’s a simple way to get that restaurant-style turkey right at home.
My turkey injection seasonings: When it comes to seasoning your injection, you have a few options:
- Keep it simple: In my version, I kept the seasonings simple by using basic ingredients, such as lemon juice, Worcestershire sauce, onion powder, garlic powder, and Kosher salt.
- Add more spices: You can add other spices, like as paprika, black or white pepper, cayenne pepper, or even poultry seasoning.
- Enrich with fresh herbs: You can also use fresh herbs like chopped rosemary, sage, or thyme. Instead of adding them directly to the mixture, it is best to steep them in melted butter. This way, the flavors are transferred to the injection without clogging the injector.
Special Note on Brining and Salt: You can brine and inject your turkey. If you do both, omit the salt from your injection mixture entirely to prevent oversalted meat.
Turkey: This recipe yields 12 oz (355 ml) of turkey injection, ideal for a 14- to 16-pound bird. It is essential that the material is fully thawed before beginning the injection process.
How to Make an Injection for Turkey
Once you have all the ingredients, making this DIY turkey injection takes just 10 minutes. Here’s how I make it:

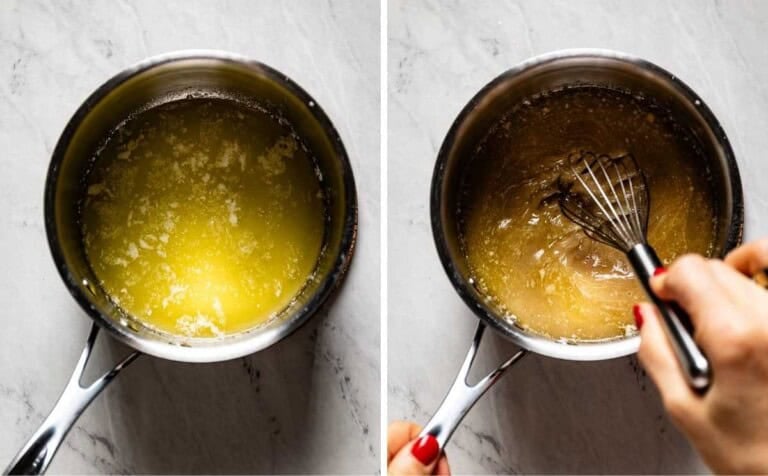
Step 1 – Melt the butter: Place the butter in a saucepan over medium heat and cook until just melted. There is no need to bring it to a boil, as we do not want the mixture to be too hot.
Step 2 – Add the remaining ingredients: Remove the melted butter from the heat and add the chicken stock, lemon juice, Worcestershire sauce, onion powder, and Kosher salt.
Step 3 – Let it (slightly) cool: Whisk the ingredients until thoroughly mixed, then let the liquid cool for a few minutes.
Pro Tip: The temperature of the mixture is important here. We do not want to inject a cold turkey with very hot liquid. However, if you let it cool for too long, the butter will solidify, and it will clog the injector.
How to Inject Turkey With Butter
The method below works whether you are injecting turkey for roasting, smoking, or deep-frying.
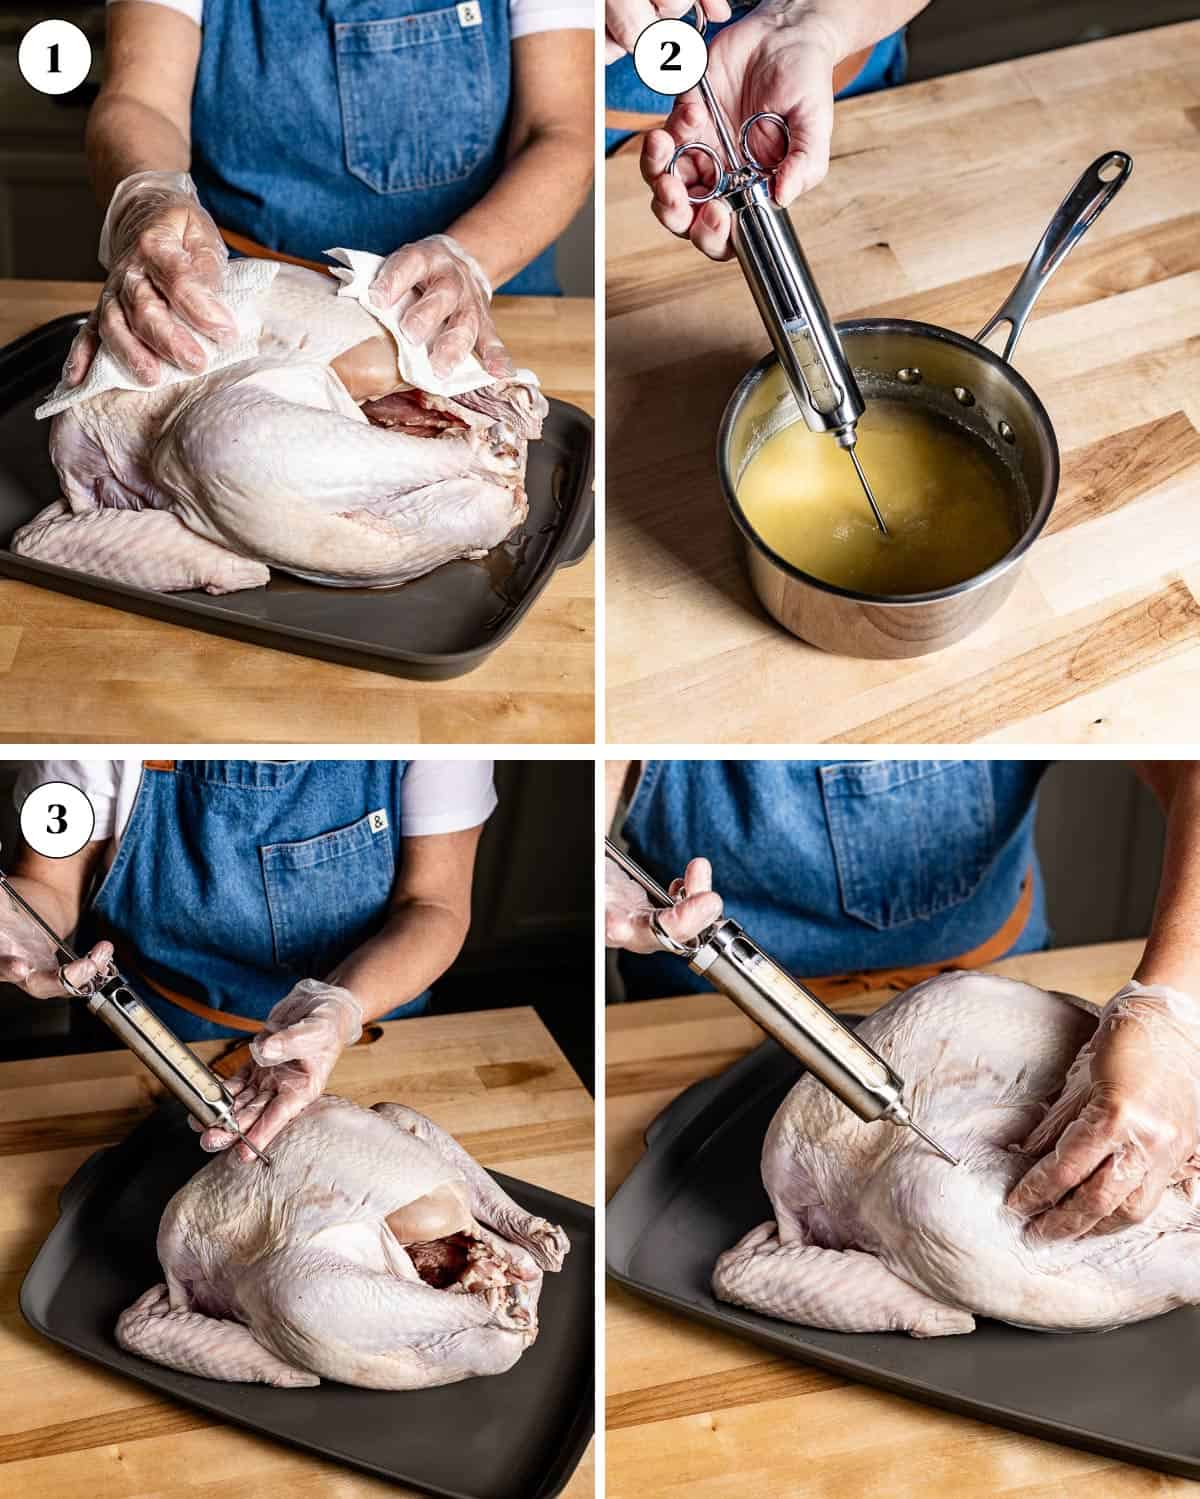
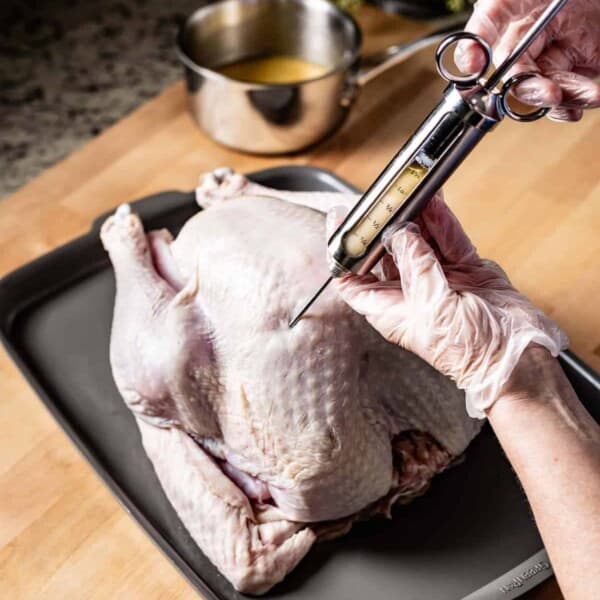
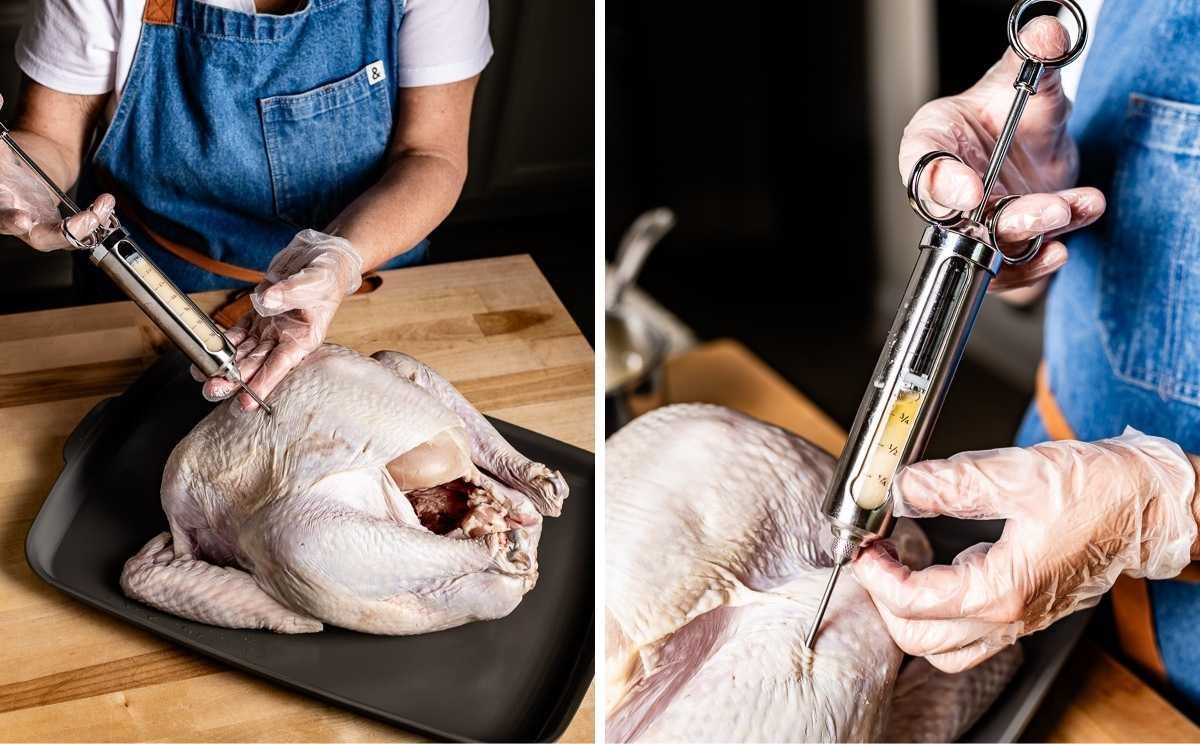
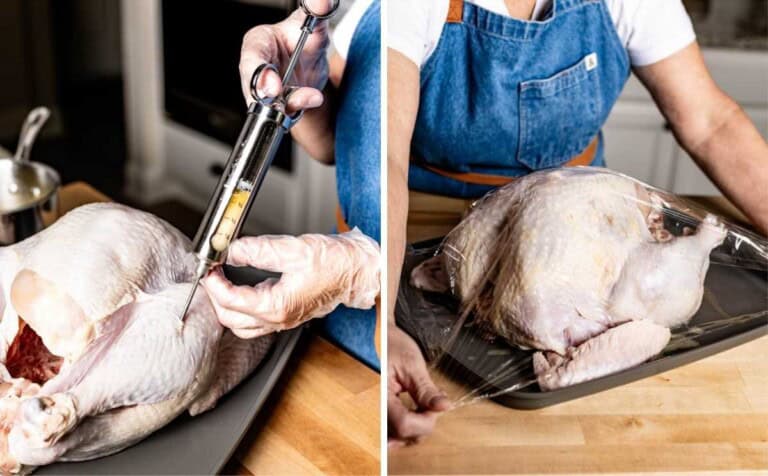
Step 1 – Dry the turkey: Before beginning the injection process, place the turkey on a sheet pan or a large enough plate and dry thoroughly on all sides using paper towels. A dry turkey will be easier to manage and will not slide off as you are injecting.
Step 2 – Fill the injector: Place the injector tip into the injection liquid and pull the plunger back until the syringe is filled. If the butter separates, gently plunge back and forth until everything re-incorporates and emulsifies.
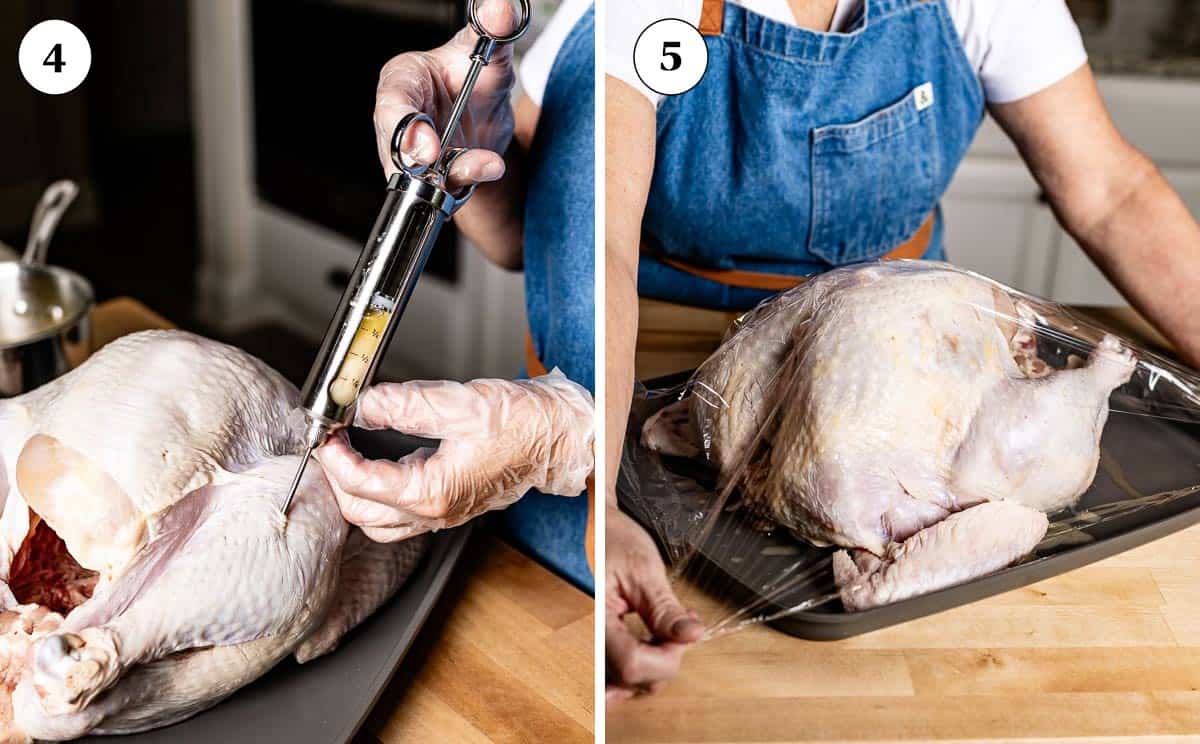
Step 3 – Inject turkey with seasoning: Insert the tip of the turkey injector into the thickest parts of the turkey meat, starting from the breast and moving down to the thighs.
Pro Tip: As you are injecting the turkey injection, go in at least one inch deep at a 45-degree angle, pushing about ½ ounce per site.
You may begin pulling the tip out as you slowly inject the liquid, but don’t force it.
Stop your injection just before reaching the turkey’s skin. If you hit a bone with your injector, pull the needle back slightly and continue the injection process.
Step 4 – Inject evenly throughout the bird: Work your way around the wings, breast, thighs, and legs, 20-24 times in total. Try not to massage or distribute the liquid after injecting, as the solution will naturally flow into the meat as it rests in the fridge. If any solution drips from a puncture, gently press the spot with your finger and move on to another nearby spot.
Step 5 – Let it rest: Place the turkey onto a large cooking pan, cover it with plastic wrap or aluminum foil, and refrigerate it at least 4 hours or overnight.
When to Inject Turkey?
The best time for injecting a turkey depends on your cooking method and the amount of time you have for preparation. Unlike a traditional brine, an injection works from the inside out, so the flavors start infusing the moment the liquid is added.
- Roasting or smoking: Inject the turkey at least 4-6 hours before cooking, overnight, or up to 36 hours in advance.
- Deep-frying: Inject the seasoning 30-60 minutes before cooking. This short rest is enough for the flavors to settle without drawing out excess moisture.
- Short on time? While the turkey will benefit from a couple of hours of resting, in a pinch, it is okay to inject it right before cooking; the mixture will still baste the turkey internally as it cooks.
Seasoning Variations
As I worked on this recipe, I came across numerous flavor combinations for this simple turkey injection recipe. It makes so much sense because you can use this basic recipe and flavor your turkey from the inside out with just a few additional ingredients.
Below are a few flavor variations that you can try:
- Beer and butter poultry injection: Beer adds a tender texture and rich flavor to the turkey. If you want to go for it, omit the lemon juice and chicken stock, and use six ounces of beer (such as brown ale or lager) instead. I think this combo makes the best turkey injection recipe for smoking or grilling.
- Sweeter injection: For a slightly sweeter injection, melt a teaspoon of honey in the hot butter mixture. This will give you a mild, caramelized-like taste. You can also make an apple cider turkey injection recipe or an apple juice turkey injection by replacing the lemon juice with apple cider, apple juice, or orange juice (without pulp).
- Creole or Cajun turkey injection recipe: For a bold, spicy twist, swap the Worcestershire, garlic powder, and onion powder for a tablespoon of Cajun or blackening seasoning, a pinch of cayenne pepper, and a teaspoon of hot sauce for extra heat.
- Garlic Butter Injection: Yes, this recipe contains garlic powder, but the garlic flavor is mild. If you prefer a more pronounced garlic flavor, you can steep a clove (or two) of fresh, minced garlic in melted butter for a couple of minutes, then drain it before mixing it with the remaining ingredients.
Everything I Learned After Testing This Recipe on Four Turkeys
I learned a great deal while working on this recipe. Turns out there’s more to injecting a Thanksgiving turkey than one might think. It is no rocket science, but paying attention to a few things makes a big difference. Below are my notes from all my recipe testing:
Thaw your turkey completely: If you are using a frozen turkey, ensure it’s fully thawed before starting the injection process. Otherwise, the injection will not spread evenly throughout the meat.
Let the butter cool slightly: Your liquid injection shouldn’t be boiling. If it’s too warm, it may begin cooking the meat, resulting in overcooked or unsafe turkey after the final cooking process. I recommend letting the mixture cool for about 10 minutes.
Work quickly: Butter tends to solidify as it sits. So if it thickens and stops flowing through the injector, run the syringe and needle tip under hot tap water for 15-20 seconds, which will help loosen it.
Practice makes perfect: One of the reasons why I had to test it four times was that I had never injected a turkey before. If you are a newbie like me, start injecting on the less meaty parts (such as wings and drumsticks) of the bird to practice and get a feel for it before injecting the more tender portions, like the breast meat.
Avoid the cavity: When injecting your bird, try not to penetrate beyond the meat and into the turkey’s inner cavity, as it won’t infuse the meat unless the needle lands within its fibers.
Ensure food safety by refrigerating the injected turkey immediately after preparation: Always inject the turkey while it’s chilled, never frozen, or at room temperature. Allowing the turkey to heat and cool repeatedly can allow unwanted bacteria to grow, making the meat unsafe to eat. After injecting, refrigerate it immediately to allow the flavors to absorb and prevent bacterial growth. Be sure to discard any leftover turkey injection that has come into contact with raw meat.
FAQs
Yes, injecting adds moisture and flavor directly into the meat, helping the turkey stay juicy and evenly seasoned as it cooks.
While an injector works best, you can use a sharp knife to make small slits or pockets in the turkey and spoon the injection into them. The flavor won’t spread as evenly, but it will still add moisture and taste to the meat.
Absolutely! All the juices from an injected turkey make an excellent base for turkey gravy, adding rich, savory depth to every bite.
Yes! This turkey injection recipe works perfectly for Butterball turkeys and other poultry cuts, such as turkey breast, thighs, or drumsticks. Simply adjust the amount of injection based on the size of the meat. You can refrigerate any leftovers in an airtight container and gently reheat before using again.
Yes, you can do both. Brine the turkey for 12-24 hours first, then rinse and pat it dry before injecting. Simply omit the salt from your injection mixture to prevent over-seasoning.
Other Ways To Flavor Turkey
It is no secret that turkey meat needs more seasoning and flavoring than most other meats, but the good news is that there are so many ways to flavor it. Below are a few of my go-tos:
- If you prefer a quicker method with a similar promise, try my Compound Butter for Turkey recipe. Spreading your bird generously with seasoned butter is yet another good way to make it juicy.
- For smaller cuts, such as turkey tenderloins or breast, I always use my Turkey Loin Marinade. It is an easy way to season the turkey inside out.
- From now on, you no longer need to spend money on store-bought turkey seasoning, as it is easy to make at home with my Turkey Dry Rub recipe, which uses basic ingredients like dried herbs, spices, and brown sugar.
This post may contain affiliate links. If you purchase through these links, I may earn a small commission, at no additional cost to you.

Turkey Injection Recipe
Equipment
Ingredients
- 8 tablespoons unsalted butter, One 4 oz. stick
- 1 cup chicken stock, at room temperature (or turkey stock)
- 2 tablespoons lemon juice
- 1 tablespoon Worcestershire sauce
- 1 teaspoon onion powder
- 1 teaspoon garlic powder
- 1 teaspoon Kosher salt
- 1 turkey, 14-16 pounds – fully thawed if frozen, cleaned and dried with paper towel
Instructions
- Place the butter in a saucepan over medium heat and cook until just melted. Do not let it turn brown.
- Off the heat, add the chicken stock, lemon juice, Worcestershire sauce, onion powder, garlic powder, and Kosher salt. Whisk until everything is incorporated. Let it cool for a few minutes. It doesn’t have to be cold, but rather just close to room temperature.

- Place the injector tip into the butter mixture and pull the plunger back to fill the syringe. If the mixture separates, you can “agitate” the butter solution by plunging back and forth a couple of times to emulsify and incorporate all the ingredients.
- Prior to injecting the bird, make sure that any air pockets in the syringe are removed. To do so, point the syringe upwards and gently push the plunger until all the air is extracted.
- Inject the marinade into the bird (you can start from anywhere) by inserting the tip at a 45-degree angle, distributing ¼ ounce per site at least 1 inch deep. You can start to pull the tip out as you slowly inject, but do not force it. Stop the injection just before you reach the skin.
- Continue this process throughout several areas of the turkey, including the wings, breast, thighs, and legs, for a total of 20 to 24 times. Don't be tempted to massage or distribute the liquid because it will self-absorb as it rests in the fridge. If you notice the solution escaping from a different pierced area, apply slight pressure using your finger to prevent the solution from oozing out while injecting it into an adjacent area.
- Once your turkey is fully injected, loosely cover it with stretch film and refrigerate it for 4 hours or overnight (no more than 36 hours).
Notes
- Yields: This recipe yields 12 ounces (1 1/2 cups) of injection fluid, which is ideal for a turkey that is between 14-16 pounds. The nutritional values below do not include turkey, and they are for the whole injector recipe.
- Make-Ahead: You can technically make this recipe ahead of time, but if you do, you still need to warm it up on the stove. Therefore, I do not recommend making it ahead.
- Storage: If you decide not to use the whole marinade, be sure to discard the rest to prevent contamination.
Nutrition
Nutrition information is automatically calculated, so should only be used as an approximation.