

Why I Swear by the Reverse Sear?
I still remember the first (and last!) time I ruined an expensive prime rib. I followed a recipe I found online that started by cooking the meat in a high-temperature oven, then turned the heat off and finished the rest with the residual heat.
Well, even though it sounded good, I ended up with a raw interior and an overcooked exterior. It was a costly and embarrassing lesson.
Determined to find a reliable method, I discovered the concept of reverse searing, popularized by one of the most curious cooks of our time, Kenji López-Alt. This technique instantly delivered a perfectly roasted rib roast on my first try, so nowadays it’s the only method I trust.
Here is why the Reverse Sear method is the key to perfect results:
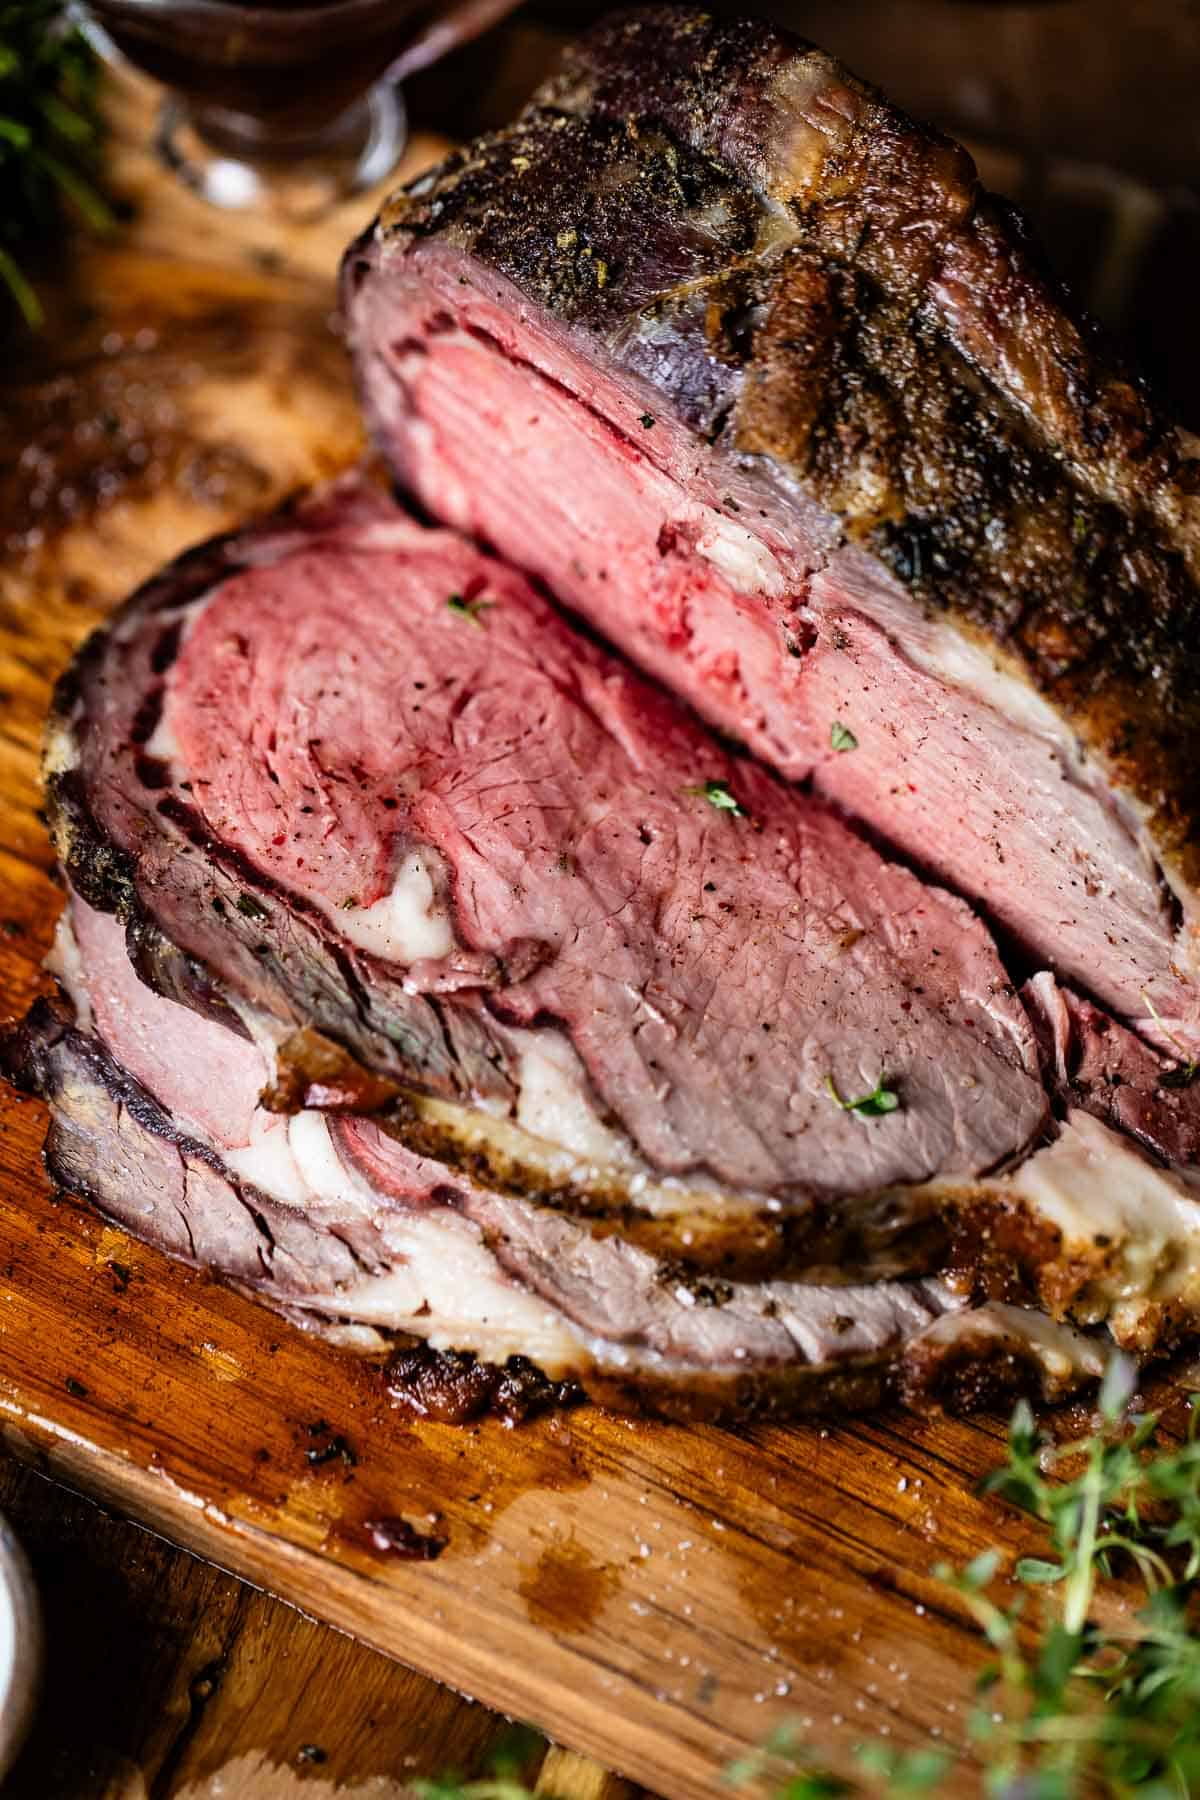
- Uniformly Cooked Meat (The “No Gray Band” Promise): Unlike traditional methods, our signature low-and-slow approach starts by cooking the entire roast, from center to edge, in a low-temperature oven (250°F/120°C), eliminating the unappetizing gray outer ring most people face.
- Maximum Control Over Doneness: Cooking low and slow gives you a wide margin of error, reducing the stress of timing. I pull the meat right before it reaches its final temperature, knowing the final high-heat sear will carry it over to perfect doneness.
- The Perfect Texture and Flavor: Controlled, low-heat cooking allows the beef’s internal fibers to break down slowly, and the fat’s moisture is reabsorbed into the meat, which ensures maximal tenderness and juicy flavor in every slice.
And since I cannot, in good conscience, publish a recipe without my own creative spin on it, I used my own custom Prime Rib Seasoning to elevate the herb crust and paired it with the easiest 5-Minute Prime Rib Au Jus (you’ll use the roast drippings!).
So, if you are ready to learn how to reverse sear a prime rib and get the perfect results every time, consider this post your ultimate guide. I made sure to cover everything you need to know, from how to buy the right cut of beef to my tested times, temperatures, and serving suggestions for a flawless dinner.
Ingredients You’ll Need:
This reverse-sear rib roast recipe uses a short list of everyday ingredients you already have on hand. You can find the full list of ingredients with exact measurements in the recipe card below, but here you can find some helpful notes from my recipe testing:
Prime Rib
Shopping for this cut can be intimidating (and expensive!), but here is what you need to know to pick the perfect roast:
Don’t let the name confuse you: If you are new to buying prime rib, it might be confusing at first because it goes by other names, such as rib roast, standing rib roast, ribeye roast, or prime rib roast. They are essentially all the same thing.
The Grade (Prime vs. Choice): When you’re shopping for prime rib, look for cuts labeled “prime” or “choice.” Prime is usually more expensive but has more marbling and guarantees the tenderest texture.
Choice is a great option, too, if you want something a little more budget-friendly. I buy my prime rib from Whole Foods or Costco, both of which often carry prime or choice cuts.
Look for heavy marbling: A lot of the flavor in this slow-roasted prime rib recipe comes from its intermuscular fat, also called marbling. This fat melts as the roast cooks, keeping the meat juicy and full of flavor. So, when shopping for it, look for one with plenty of marbling rather than a cut that looks mostly red throughout.
The cost (look for the sale): Prime rib is one of the priciest cuts of beef, usually anywhere from 11 to 20 dollars per pound. The good news is that it often goes on sale around the holidays, which makes it a great option for big seasonal gatherings.
Bone-in vs. boneless roast: When possible, I prefer cooking a whole prime rib, including the bones. Not only does bone-in prime rib look extra fancy, but the bones are also great insulators, helping the beef cook more evenly at both low and high temperatures. The bones also help keep the meat upright in the oven, with the fat cap facing up. However, boneless prime rib would also work for this reverse-sear recipe.
Look for “Frenched” prime ribeye: This refers to the style in which the meat and fat are trimmed from the bottom inch or two of the bone. It gives the roast that elegant, restaurant-style look and makes it much easier to carve later. While you can do this yourself, it requires some serious knife skills. I highly recommend buying it pre-Frenched or asking your butcher to do it for you.
How to Tie a Prime Rib: Tying your prime rib with butcher’s twine is essential to maintain its shape for even cooking and keeping the bones intact throughout the cooking process. You can always ask your butcher to tie it for you, but it’s also simple enough to do at home. Simply:
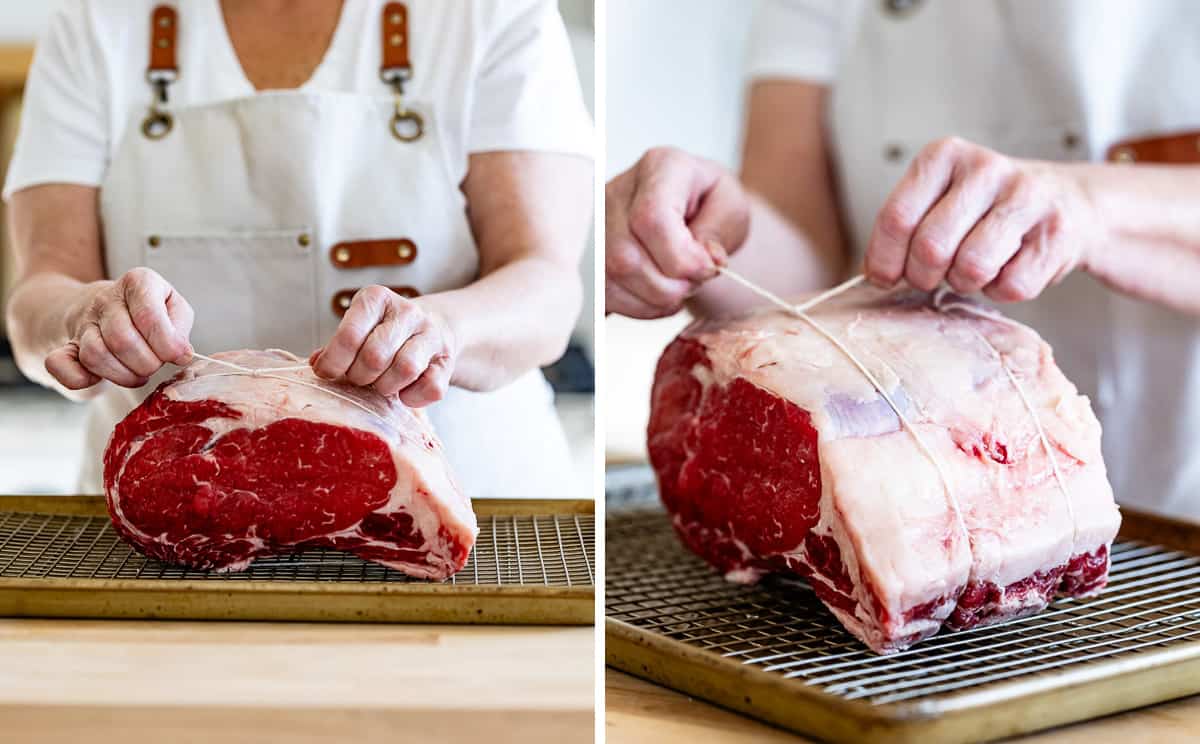
- Line up your string at the center of your prime rib so that it lies between the innermost bones.
- Wrap the string around the body of your meat and double-knot it close to the flesh.
- From there, you can tie 2-4 more strings (depending on the size and weight of your meat), moving outward from the beef’s center until you secure the entire cut in a uniform shape.
Helpful Tip: For this recipe, I used a 7-pound bone-in roast, but you can use any size you like. Just keep in mind that cooking time depends on weight, so be sure to refer to my “Cooking Time Chart” below.
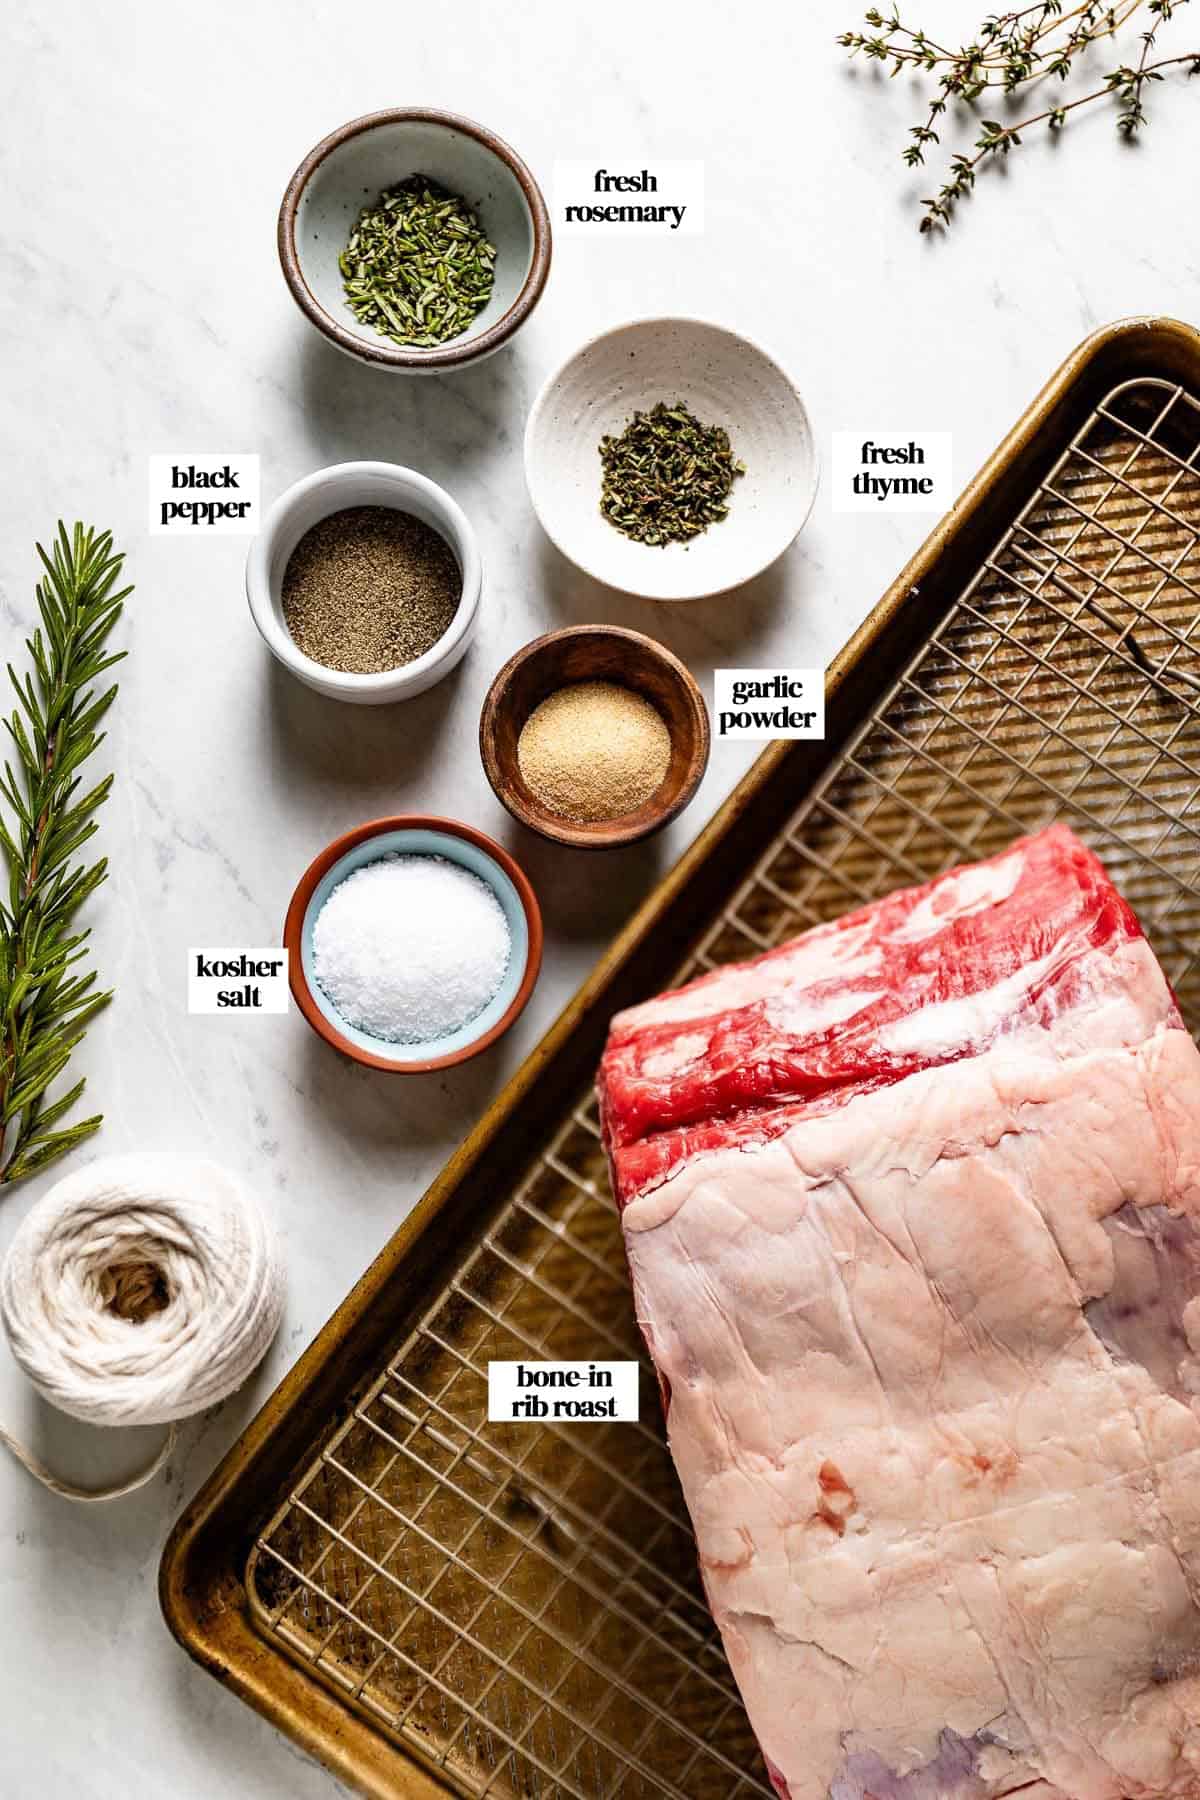
Seasonings
You don’t need to spend extra money or time making a fancy seasoning blend for a rib roast reverse sear. This cut already has such a rich, buttery flavor, so my simple Prime Rib Seasoning is all you need to bring out its natural deliciousness.
Here is what you will need:
Kosher salt: I prefer Diamond kosher salt for its coarse yet delicate texture and mild flavor. If you use Morton kosher salt, which has a more concentrated flavor, I recommend using half the amount to avoid over-salting your beef.
Fresh herbs: Fresh thyme and rosemary help brighten the richness of the meat. If you prefer dried herbs, I suggest using half the amount as they are a little stronger.
Garlic: Garlic powder adds a nice savory boost to the roast. You can use fresh garlic if you prefer, but I find that the powder is easier to spread evenly over the meat. Plus, fresh garlic can burn easily during roasting, especially during the final (high-heat) searing.
Optional Add-Ins
Other seasonings: If you want a hint of smoky spice, you can mix in a little paprika or smoked paprika. Onion powder is another easy add if you want extra savory-sweet depth.
Oil/Ghee: If you prefer a glossier finish or if your roast has a very thin fat cap, you can rub the meat with a neutral oil. However, since we are blasting the roast at 550°F (288 °C) in the end, I recommend using an oil with a high smoke point, such as ghee (clarified butter), avocado oil, or canola oil.
Butter is not ideal for cooking at these high temperatures. If you go in that direction, I recommend using around 4 tablespoons for a 6-7 lb. bone-in prime rib.
Why I Skip the Butter? You might be wondering why I did not slather my roast in butter as many other recipes do. The short answer? I tested it, and honestly, it was just too much.
Don’t get me wrong, I’m usually the first person to say “butter makes everything better.” But prime rib is already the king of rich, fatty cuts. When I added butter during my recipe testing, I found it masked the natural beef flavor and made the final dish feel greasy rather than succulent.
Plus, with the high heat and the natural fat melting off the cap, I think the butter (or any other oil for that matter) was unnecessary.
Equipment You’ll Need
One of the best ways to get perfectly cooked prime rib is to begin with the right equipment. Luckily, you only need a few basic tools to ensure your roasting is as simple as possible:
- Kitchen Twine: This is a small investment that pays off big time by keeping your meat intact and uniform. I have been using this brand for years; it is sturdy and handles high-heat cooking perfectly.
- Sheet pan fitted with a wire rack: If possible, I recommend cooking your reverse-sear prime rib on a wire rack set over a sheet pan. The holes in the rack will help circulate hot air, allowing the meat to cook more evenly and letting any drippings from the meat (which will give you a stellar base for making Prime Rib Au Jus later) fall into the pan. You can also roast your prime rib on a baking sheet or a V-rack roasting pan.
- Meat thermometer: The secret to this method’s success is knowing the exact temperature of the meat, and the best way to do that is with a probe thermometer, which will alert you exactly when the beef reaches your preferred temperature. You can still get good results using an instant-read thermometer following the timing guide I share in the temperature chart below.
How To Reverse Sear a Prime Rib
There is something so comforting about knowing that a truly foolproof method will yield great results even on your first try.
Follow the simple steps below to take all the guesswork out of making a standing prime rib roast and treat your family and friends to a restaurant-quality prime rib that is perfectly juicy, tender, and cooked to perfection from edge to edge.

Step 1 – Dry brine the prime rib: One day before cooking, place a wire rack on a sheet pan and place your meat on top. Use a paper towel to dry the meat on all sides, then sprinkle two tablespoons of kosher salt over its entire surface, firmly pressing it into the flesh to help it adhere.
Transfer the salted prime rib to the refrigerator and let it sit, uncovered, at least overnight or up to 48 hours.
Short on time? If you can plan ahead, I highly recommend the longer overnight dry brining. However, I tested this recipe with only an hour of sitting in the fridge after it was salted, and it worked well.
Step 2 – Remove the prime rib from the fridge: Two hours before roasting, remove the meat from the refrigerator and let it come to room temperature. Dry the excess moisture with paper towels right before coating it with the spice rub.

Step 3 – Make the seasoning: While the rib roast warms up, add the black pepper, rosemary, thyme, and garlic powder to a small bowl. Mix the spices until thoroughly combined.
Step 4 – Prepare the oven: Preheat the oven to 250°F (120°C).
Step 5 – Season the meat: Rub the prime rib with the seasoning mixture, making sure it covers all sides. Firmly press the seasoning into the meat so it adheres, then place the rib roast on the wire rack with its fat side (fat cap) facing up.
If you are using a thermometer with a probe, insert it lengthwise into the center of your beef, avoiding the bones.
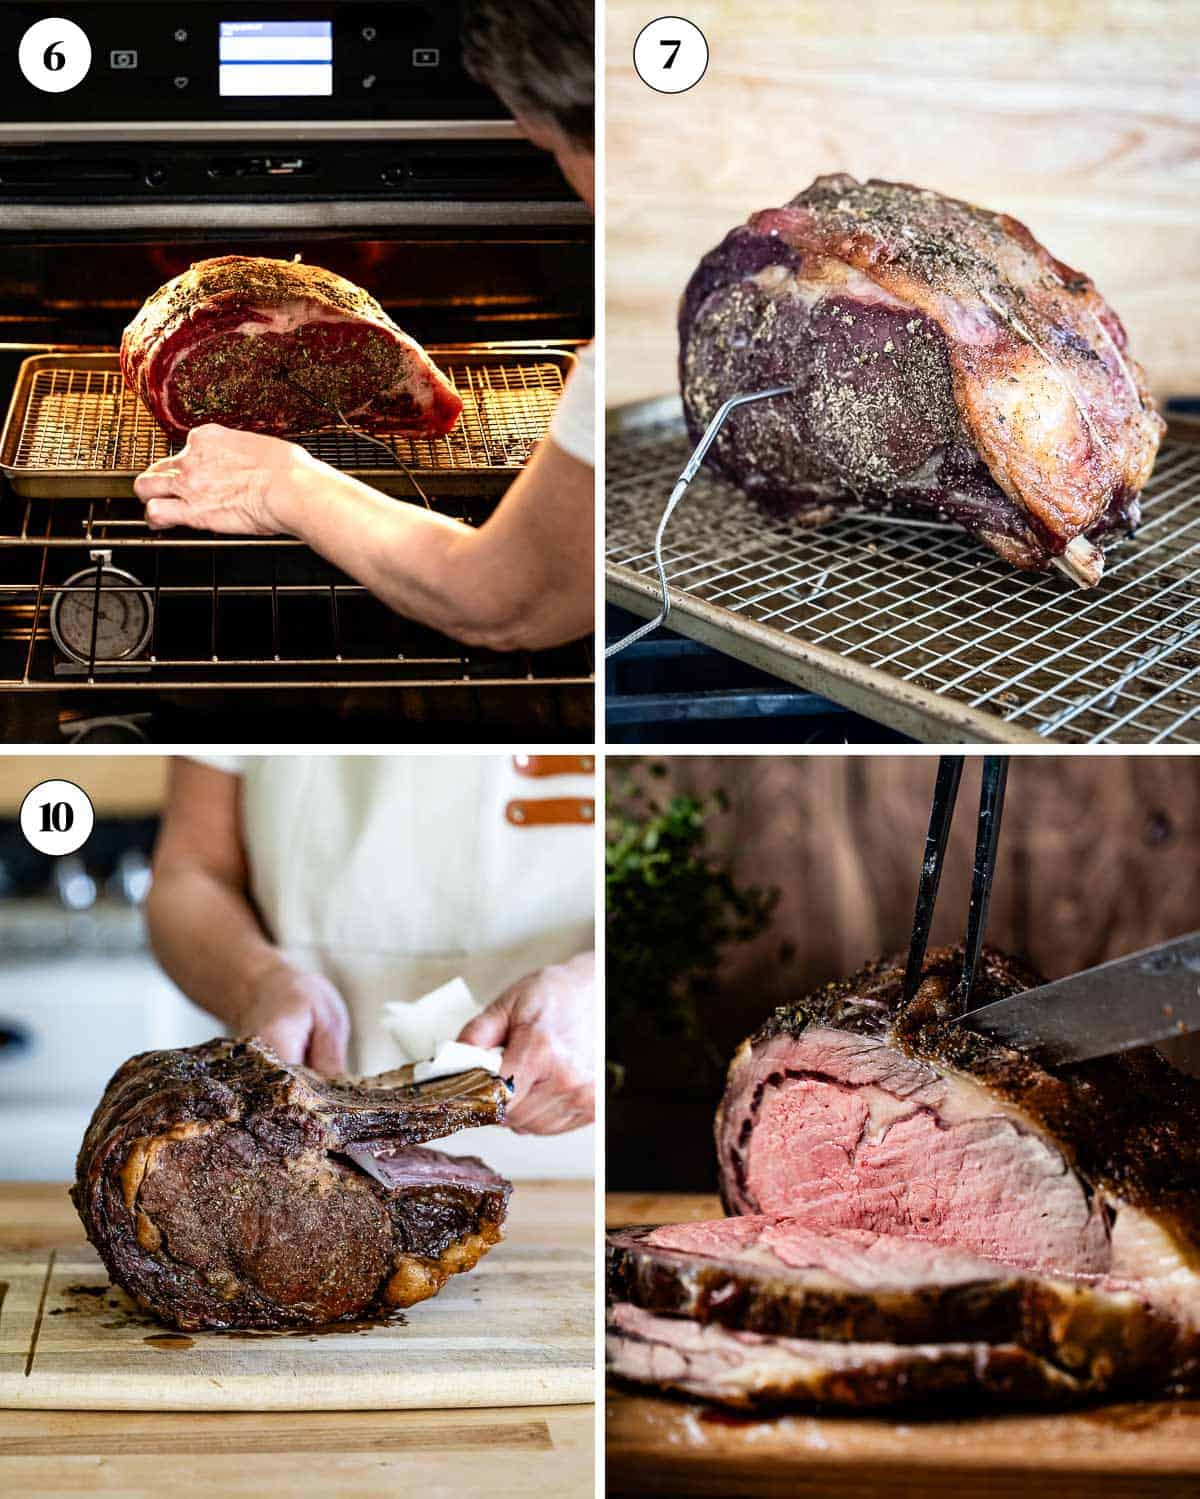
Step 6 – Cook the prime rib low and slow: Transfer the beef to the oven and roast it for 3 to 3½ hours or until it reaches your desired doneness. Use the roast time chart below to help you choose the right cook time for your preferred level of doneness.
Pro Tip: I recommend roasting it 5-10°F degrees below your preferred doneness, as the meat will continue to cook once you remove it from the oven due to carry-over cooking. For a medium-rare prime rib, I recommend roasting it until it reaches 115°F (46°C).
Step 7 – Let the meat rest: When ready, remove the prime rib from the oven and tent it loosely with aluminum foil. Let the beef rest on the counter for 30 minutes (up to 45 minutes).
Step 8 – Heat the oven: Increase the oven’s temperature to 550°F (288°C) while the meat rests. If you want, this is also a great time to make the Au Jus for Prime Rib.
Step 9 – Oven sear the prime rib: Add the rested rib roast to the preheated oven and let it roast for five minutes or until a nice crust forms.
Pro Tip: Watch the meat closely! At that high temperature, things happen fast, so it is imperative that you keep a close eye on it to avoid burning the exterior of the meat.
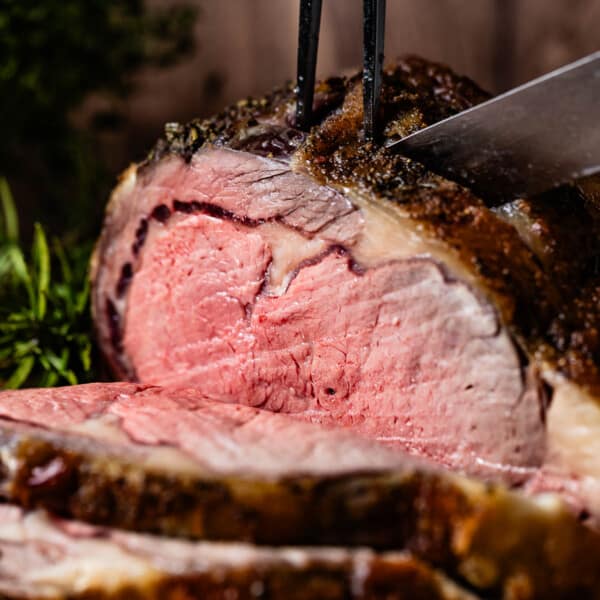
Step 10 – Serve: Once the cooking time finishes, you can enjoy your reverse sear rib roast immediately, as there’s no need to let it rest first. To carve, cut the meat off the bone by following the curve of the rib and slicing against the grain, cutting the beef into your desired thickness.
Reverse Sear Prime Rib Temperature Chart
Learning how long to cook a standing rib roast is the key to getting the most tender, delicious roast with an edge-to-edge pink center.
The simple chart below walks you through each level of doneness and shows you the temperature to pull the roast from the oven, along with the final temperature it will reach as it rests.
The “Carry-Over” Factor: It’s also important to know that prime rib will continue to cook after you remove it from the oven, increasing its internal temperature by 5 to 10°F (3 to 6°C) while resting.
For example, if you want a perfect medium-rare prime rib, remove your beef from the oven when it reaches an internal temperature of 115°F (46°C). While resting, the meat’s temperature will rise to 125 to 130°F (52 to 54°C), yielding a juicy, pink center after the final roasting.
| Doneness Level of Prime Rib | Internal Temperature (When Removed From the Oven) | Final Temperature |
|---|---|---|
| Rare | 110°F (43°C) | 120°F (49°C) |
| Medium-Rare (recommended) | 115°F (46°C) | 125°F (52°C) to 130°F (54°C) |
| Medium | 120°F (49°C) | 130°F (54°C) to 135°F (57°C) |
| Medium-Well | 130°F (54°C) | 140°F (60°C) to 145°F (63°C) |
| Well done | 140°F (60°C) | 150°F (66°C) to 155°F (69°C) |
My recommendation: For the tenderest results, I highly recommend staying in the Medium-Rare to Medium range. Cooking beyond 145°F can toughen the meat.
How Long to Reverse Sear Prime Rib? (Cooking Time Per Pound Chart at 250°F (120°C))
One of the most challenging parts of cooking prime rib is knowing how long to cook it. To ease any stress, I’ve created a simple guide to help you estimate your cooking time, whether you’re cooking a large or small prime rib.
The General Rule of Thumb: Plan for approximately 25 to 30 minutes per pound at 250°F.
Keep in mind, however, that these are only approximate times. How long you roast your beef may change depending on your desired level of doneness and the temperature of your meat before putting it in the oven.
Pro Tip: The temperature of the meat before placing it in the oven is often overlooked. You never want to put prime rib in the oven right after taking it out of the fridge when it is very cold.
The cooking times below assume you take your prime rib out of the refrigerator 2 hours before putting it in the oven.
| Weight | Cooking Time |
|---|---|
| 4-5 lbs. | 2½ – 3 hours |
| 6-7 lbs. | 3 – 3½ hours |
| 8-9 lbs. | 4 – 4½ hours |
| 10-12 lbs. | 5 hours |
What to Serve with Prime Rib
Making reverse sear prime rib in the oven is one of the easiest ways to impress your guests with tender, perfectly cooked beef.
How much prime rib per person?
As a general rule, plan for about 1 pound of bone in rib roast per person. If you are using a boneless ribeye roast, you can scale it down to about ¾ pound per person.
Once your roast is ready, you can round out the meal with a few simple sides and sauces.
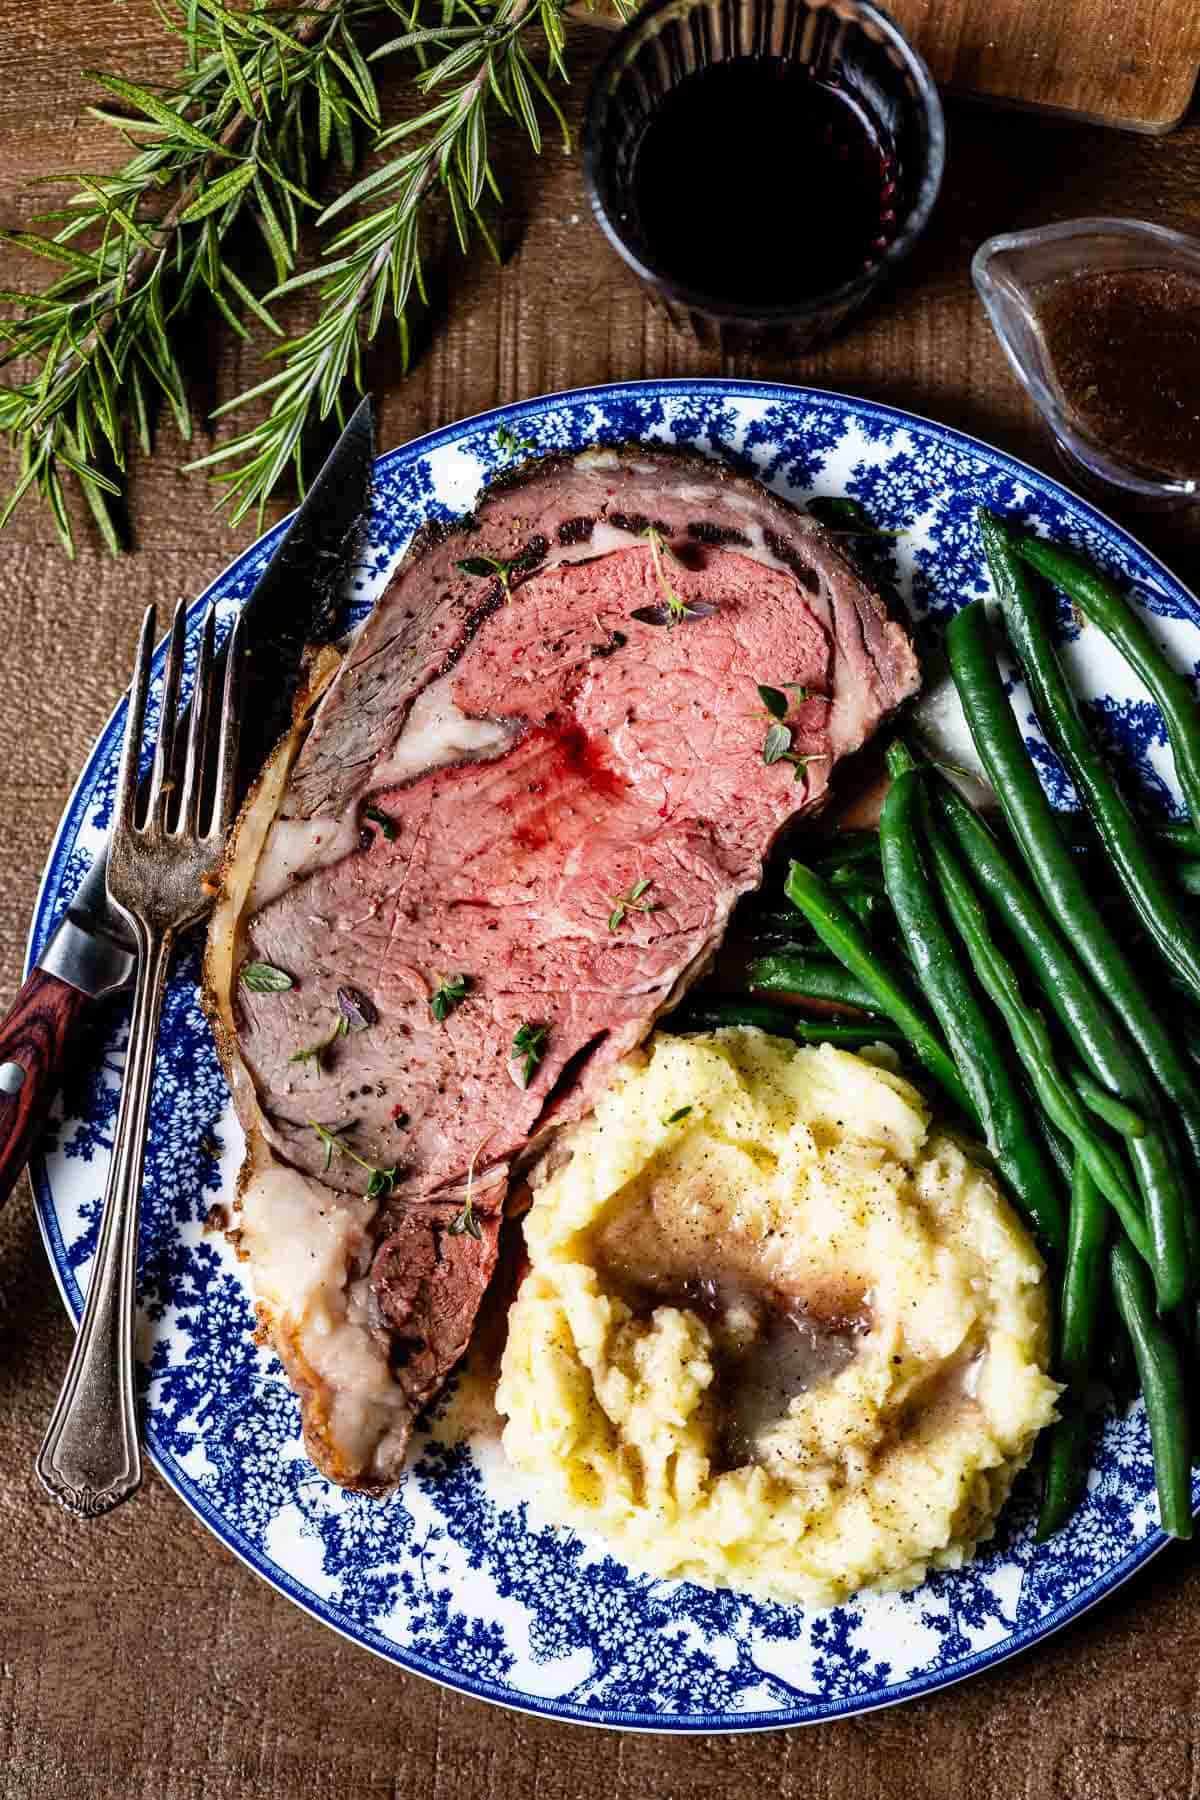
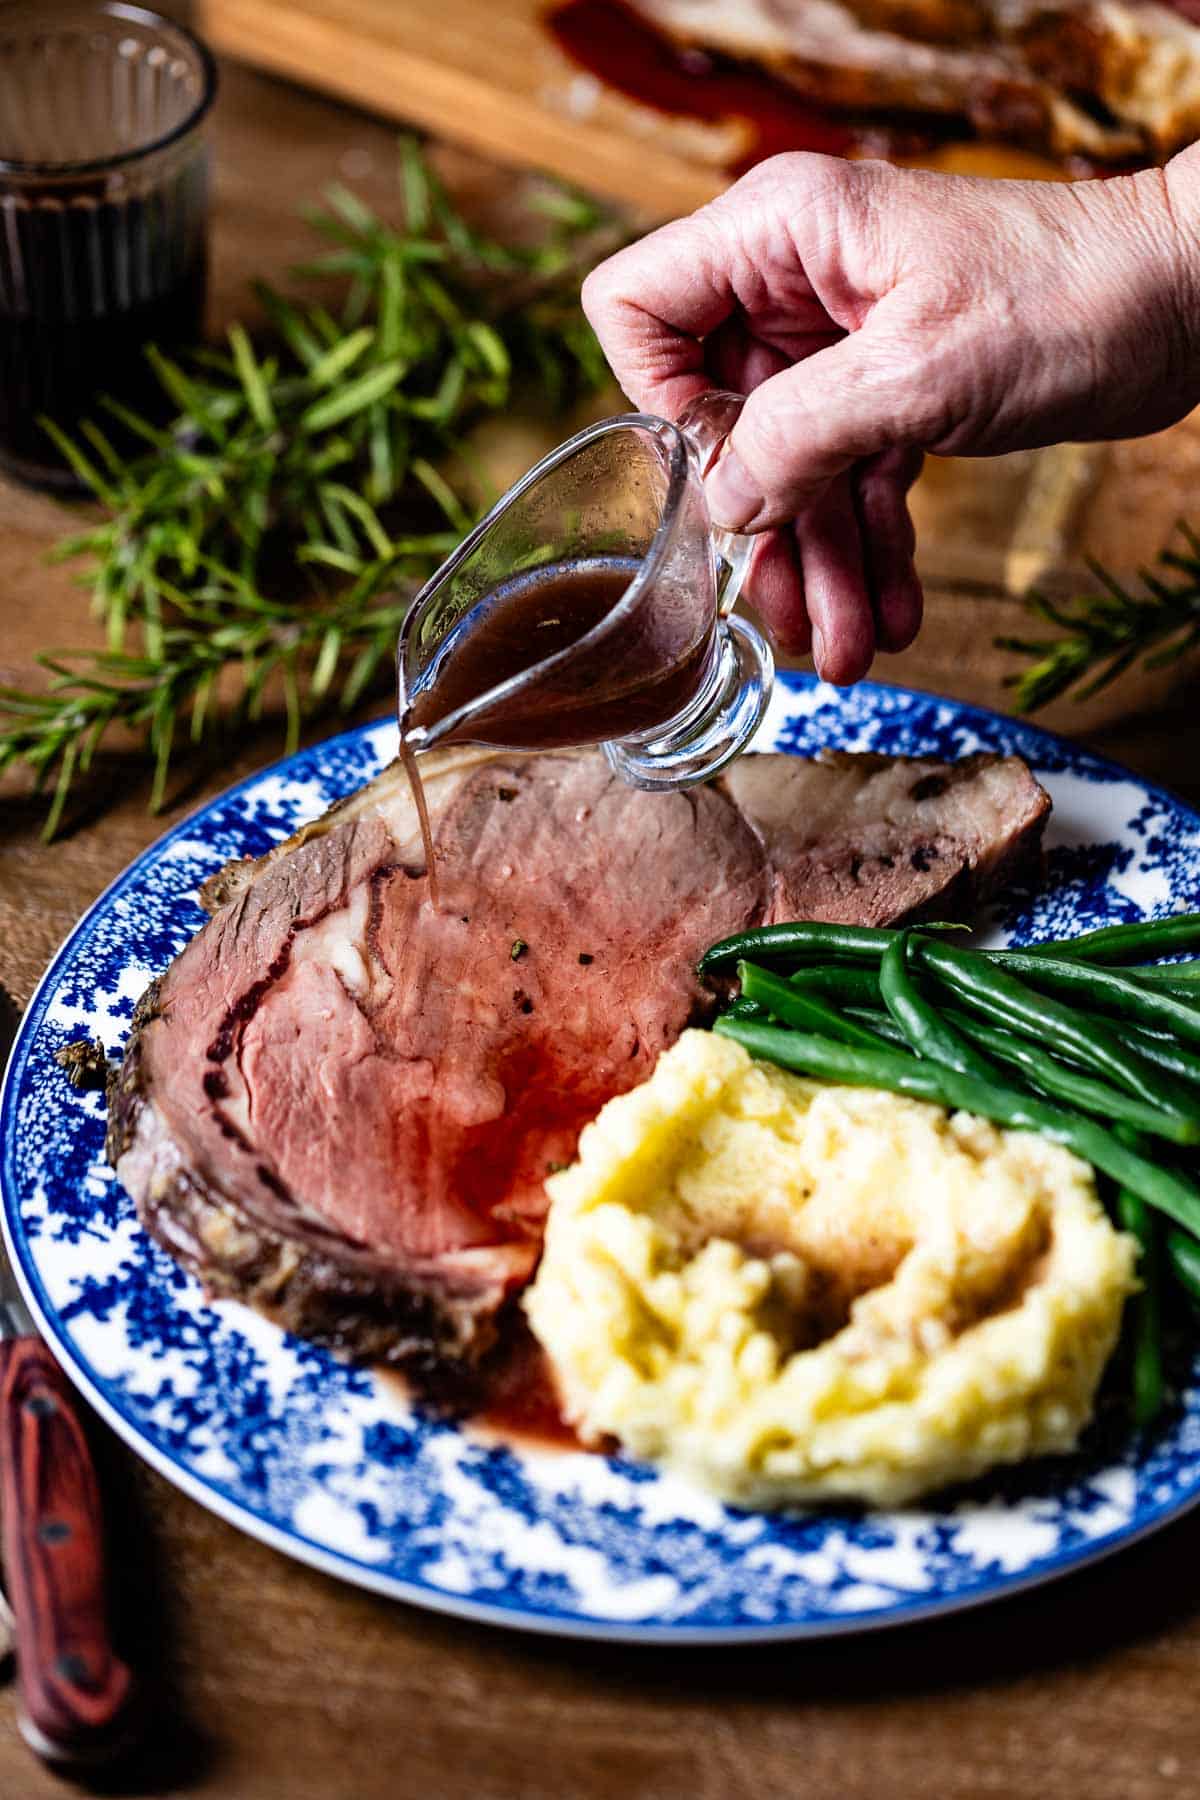
- Sauces: Reverse cooking prime rib ensures that your meat is so delicious that it doesn’t need any additions to impress your guests. However, you can still enhance its flavors by drizzling your sliced prime rib with a creamy Horseradish Sauce or Prime Rib Au Jus. If you prefer a smoother, richer topping, you can also prepare a Roasted Garlic Butter or a simple Beef Gravy for extra creaminess.
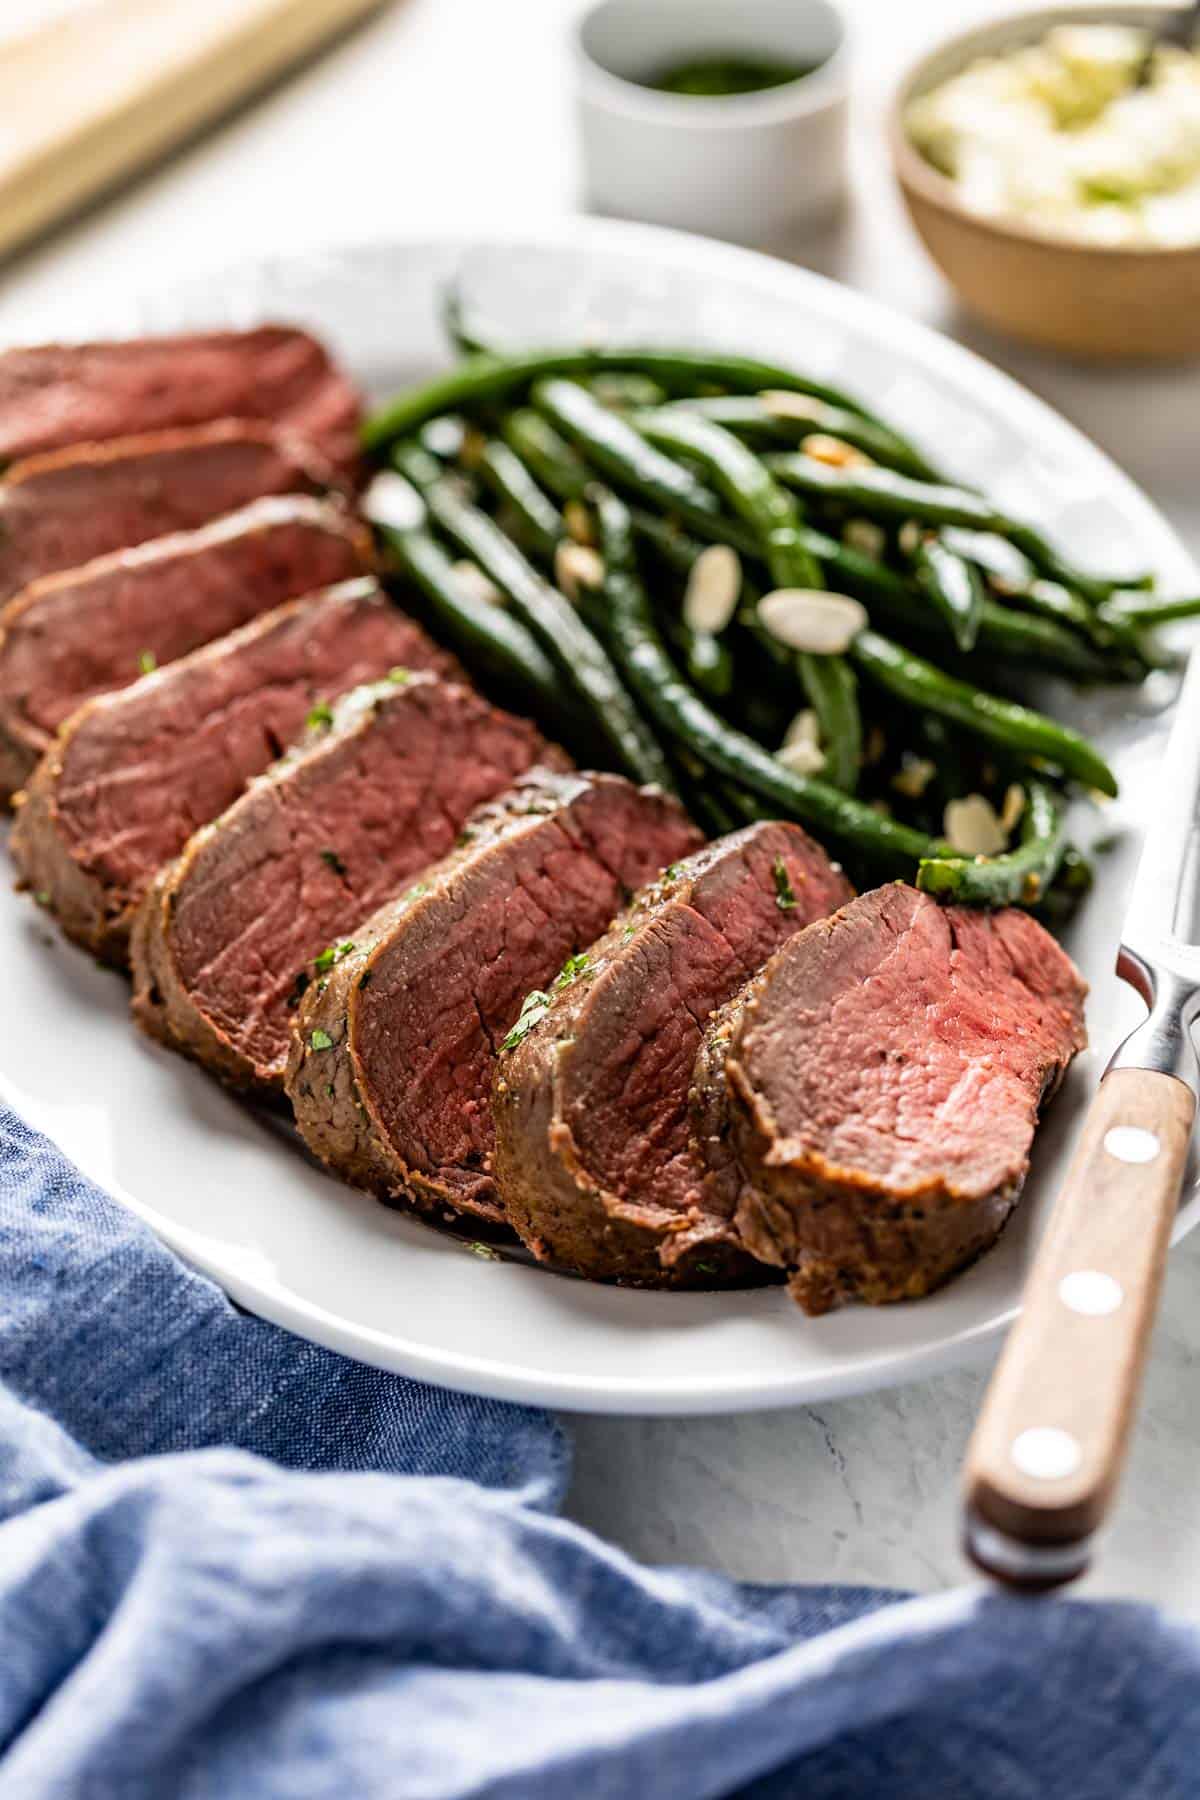
- Vegetable side dishes: You can’t go wrong with a classic when planning a menu around reverse sear bone in prime rib. My Garlic Butter Green Beans will brighten up your plate with a tender-crisp flavor, and for a sweeter take on traditional veggie sides, my Maple Roasted Carrots have a soft, caramelized taste that balances the savoriness of roasted beef.
- Potatoes: If you are making this for a holiday dinner like Christmas or New Year’s, no table feels complete without potatoes. Whether mashed, roasted, or baked until crisp and golden, they pair beautifully with prime rib. My personal favorite pairing is my creamy Garlic Rosemary Mashed Potatoes. Check out my Holiday Potato Recipes to find your perfect match.
Notes From My Recipe Testing
Even though this recipe is simple, a few helpful tips can make a big difference. These are the steps I always follow to make sure the reverse sear prime rib turns out perfectly every time, especially if you are making it for the first time.
- Bones + Tying = Even Cooking: Yes, you can make this recipe with either bone-in or boneless prime rib. However, if I were to choose, I would go with bone-in prime rib. Not only do bones act as a heat shield, but when tied with kitchen twine, they also help ensure even roasting and maintain the shape of the roast.
- Salt the night before: The best dry brine for prime rib comes together with a single, simple ingredient: kosher salt. Put simply, it pulls moisture from the surface, guaranteeing a perfectly browned exterior. Though I recommend salting the exterior of your beef 24-48 hours before cooking, if you’re short on time, you can let it sit for at least one hour.
- Don’t skip resting in the middle: Let your rib-eye roast rest for 30 minutes after first removing it from the oven. This resting time will allow the meat to reabsorb and redistribute its juices. Additionally, this resting time is the reason why you can carve the meat without having to wait.
- Ventilation is key: When you expose meat to high temperatures, it can burn quickly, especially with such a thick layer of fat on its top. Therefore, you must stay close to your oven during this step to keep your beef from charring. Additionally, since we are roasting a large piece of meat at a very high temperature, there will be some smoke, so it is best to ensure your kitchen is properly ventilated.
- Leave the probe in: If you are using a thermometer with a probe, insert it lengthwise through the center of your beef, avoiding the bones. Also, don’t remove the probe from the meat until just before serving. Otherwise, the juices may run out of the hole, draining your rib roast of its flavor and juiciness.
- Slice against the grain: When slicing the meat, draw your blade along the bone, carving against the grain to your desired thickness. This direction will shorten the meat fibers, yielding more tender portions that are easier to cut and chew.

Reverse Sear Prime Rib Recipe
Equipment
Ingredients
- 7 pound bone-in prime rib, silver skin and any excess fat removed, tied*
- 2 tablespoons kosher salt*
- 1 tablespoon black pepper, coarsely ground
- 1 tablespoon fresh rosemary, finely chopped
- 1 tablespoon fresh thyme, finely chopped
- 2 teaspoons garlic powder
Instructions
- A day before you are planning to cook your prime rib, place a wire rack on a sheet pan. Place the meat on top and dry it on all sides using paper towels. Sprinkle 2 tablespoons of kosher salt over the entire rib roast, firmly pressing to adhere.
- Place it in the fridge, uncovered, overnight, or for up to 48 hours*.
- Two hours prior to roasting, remove your prime rib from the fridge and let it come to room temperature.
- Meanwhile, prepare the prime rib seasoning by mixing together the black pepper, rosemary, thyme, and garlic powder in a small bowl. Mix until fully combined.
- Preheat the oven to 250 degrees F (121°C)
- Dry the prime rib thoroughly with paper towels on all sides. Rub it with the prepared seasoning mixture on all sides, pressing down firmly to ensure that it adheres to the meat. Ensure that the meat is on the wire rack with the fat side (aka fat cap) up.
- Slow roast the beef in the oven for 3 to 3 ½ hours until it reaches your desired doneness. It is best to use a meat thermometer (*please read the note below for more information) for foolproof results. We recommend cooking it until it reaches 115 degrees F (46 °C) for medium rare. Keep in mind that it will continue to cook after you remove it from the oven with the help of carry-over cooking.
- Remove the standing rib roast from the oven, tent it loosely with foil, and let it rest for 30 minutes (and no more than 45 minutes) on the counter.
- While the meat is resting, turn the oven temperature up to 550 degrees F. (288 °C) If preferred, make prime rib au jus while the prime rib is resting.
- Transfer the meat to the now-preheated oven and let it roast for 5 minutes or until a nice crust is formed. We recommend keeping a close eye on it during this time to avoid burning the crust of the meat.
- Once the cooking time is completed, you can enjoy it right away. There is no need to let it rest. To carve, cut the meat off the bone using a serrated (or a very sharp) knife, following the curve of the rib and slicing against the grain to your desired thickness. Serve.
Video
Notes
- Yield & Serving Size: We found that a 7-pound (3175 g.)uncooked bone-in prime rib weighed about 4 1/2 pounds (2041 g.) after it was cooked (and the bone was removed). It gave us about eight 1/2-inch slices of prime rib per serving, with each slice weighing about ~ 9 ounces (227 g.)
- Tying: If the butcher does not already tie your meat, you can easily do it yourself. Simply line up your string at the center of your prime rib so that it lies between the innermost bones. Then, wrap the string around the body of your meat and double-knot it close to the flesh. From there, you can tie 2-4 more strings (depending on the size and weight of your ribeye roast), moving outward from the beef’s center until you secure the entire cut in a uniform shape.
- Short on time? While I recommend a longer dry brining, I have tested this recipe with only an hour of salting and it still worked well.
- Salt: We used Diamond kosher salt in this recipe. If you are using Morton kosher salt, use half the amount.
- Herbs: You can also use dried herbs, but if you decide to do so, we recommend using 1 1/2 teaspoons of the dried version (of each herb.)
- Placement of the probe: If you are using a meat thermometer with a probe, insert it into the center of the roast (the thickest part of the meat) lengthwise, approaching from the side, ensuring that it doesn’t hit any of the bones. Do not remove it until you are ready to carve the meat so that the juices will stay in the meat. If you do not own one, you can check the temperature using a meat thermometer periodically.
- Store: Let the meat come down to room temperature. Once cooled, store it in an airtight container in the refrigerator for up to three days.
- Reheat: To reheat sliced prime rib, place it in a low-temperature oven (about 300 degrees F.) until warmed through. The heating process should take around 5-7 minutes, though the timing will vary depending on the thickness of your slices and how you like the doneness of your prime rib. No matter your personal preference, be sure to keep a close eye on your meat, as the heating process happens quickly.
- Freeze: We highly recommend freezing without slicing the beef to protect against freezer burn and retain as much juice as possible. To do so, bring your meat to room temperature and wrap it tightly in plastic wrap as further protection against freezer damage. You can then store your wrapped meat in the freezer for up to a month and thaw it in the fridge overnight when ready to eat.
- Using oil or butter: I opted not to use any oil because my prime rib already had a fat cap on top. However, if you want a glossier finish, I recommend using an oil with a high smoke point, such as ghee (clarified butter) or avocado oil. Butter will burn during the high heat, 550°F searing.
Nutrition
Nutrition information is automatically calculated, so should only be used as an approximation.
FAQs
For the most tender and flavorful roast, start by dry brining the meat with kosher salt for 12 to 48 hours before cooking. Then add the rest of your seasoning right before you put it in the oven.
No. With the reverse sear method, the roast cooks low and slow, so it stays juicy without burning. There is no need to cover it, as it could trap steam and keep the heat from circulating properly.
Technically, you can cook prime rib ahead of time, but I don’t recommend it. This roast tastes its best the day it is made. Simply salt the beef 24 to 48 hours before cooking. On the day you plan to serve, add the seasoning and start roasting a few hours before serving.
How to Store, Reheat, and Freeze?
One of the best parts of making prime rib is how simple it is to store and reheat. With a few easy tips, your leftovers stay tender and juicy, whether you are enjoying a second round of your holiday dinner or turning the meat into a Leftover Prime Rib sandwich, a quick stir-fry, or a stew.
How to store: When storing prime rib, first let it come down to room temperature. Once cooled, store it in an airtight container in the refrigerator for up to three days.
Reheat: To reheat sliced prime rib, place it in a baking dish with a splash of Au Jus or beef broth (to keep it moist), cover it with foil, and warm it in a low-temperature oven at 300°F (150°C).
It should take about 5-7 minutes, though the timing will vary depending on the thickness of your slices and how you like your prime rib done. Keep a close eye on it, as it reheats quickly.
Freeze: If you want to freeze your prime rib for future use, I highly recommend freezing it without slicing the beef to prevent freezer burn and retain as much juice as possible.
To do this, let your prime rib come to room temperature after cooking, and wrap it tightly in plastic wrap as further protection against freezer damage. You can then store your wrapped meat in the freezer for up to a month and thaw it in the fridge overnight before eating.
More Holiday Beef Recipes You Might Also Like
I don’t know about you, but I am always looking for special occasion dinners that I can trust. Below are a few more recipes that I stand behind.
- If you want something just as elegant, my Reverse Sear Beef Tenderloin is a beautiful option. It follows the same cooking method to cook yet another popular cut, beef tenderloin.
- For a restaurant-quality steak at home, try my Reverse Sear Filet Mignon. This recipe is ideal if you want a dish that is quick to make but just as impressive.
- If you are craving cozy comfort food, Ina Garten’s Pot Roast is a classic. My step-by-step guide includes her original version plus slow cooker and pressure cooker options, so you can pick the method that works best for you.
This post includes Amazon links and as an Amazon Associate I may earn commissions if you make a purchase using my links at no cost to you.


This sounds amazing! I’m looking for a recipe that won’t make my kitchen Smokey the entire cooking time. It seems like reverse smoking would help with that. Any thoughts? Do you still have to deal with heavily ventilating the kitchen? Thanks!
Hi Renee,
I am not too sure what you mean when you say “smokey” but your kitchen will definitely smell like meat as it cooking in the oven. I don’t think that it would be as much as searing it on the stovetop in a cast iron skillet per se, but still you would smell the meat.
I hope this answers your question, but please let me know if I can help further.
Thanks so much for the great recipe! Most reverse sear recipes are for much lower temps which many ovens cannot hold. Yours was the only one I found with real cooking times shown.
We cooked a 9.7 pound 3 rib tied prime rib, pretty much exactly as directed here. We roasted it on the next to the bottom rack for 3 hrs 45 minutes. The center was 118 to 120. The ends 130 to 135. Unfortunately, the roast had to stand 1 1/2 hours before searing. It came out perfect. Medium rare with a lovely crust. Just wasn’t as hot inside as we would have liked.
I am happy to hear that you liked the recipe. Thanks for taking the time to leave a review.
Prime Rib is always my Christmas Day dinner meal. This is the first time I wasn’t worried. It was amazing!!!
This makes me so happy Erika. Thanks for taking the time to leave a review.
Cheers!
This was the 1st time I’ve made prime rib. I followed your instructions completely, except I did add butter to the herbs. And it was the best I ever had! It turned out perfectly. Best recipe ever! Also made the au just & it was so good…
This is music to my ears Kathryn. I am thrilled to hear that you enjoyed it. Thanks for coming by and taking the time to leave a review.
This rivals any steak house!!!
I can’t agree more with you on that statement.