

For years, my husband and I have celebrated Thanksgiving with close friends who, like us, don’t have big families. I used to make a whole turkey, but over time, I realized that roasting just the breast makes so much more sense for a smaller table.
If I am being honest, I am always most excited about the gravy. I think we can all agree that it is what ties the whole meal together: the turkey, the mashed potatoes, even the stuffing. So, when I began developing this recipe, I wanted it to be simple, dependable, and complete.
Here is what makes this recipe special for me:
- Great for intimate gatherings: Ideal when you want the comfort of a Thanksgiving feast without the work of roasting a whole turkey.
- It is quicker than roasting a whole turkey: It cooks faster, it is easier to carve, and with the right butter and herbs, it turns out just as juicy and satisfying.
- No need to brine: The herb butter keeps the turkey juicy without any advance prep.
- Everything in one pan: While the turkey rests, you can make the gravy right in the same roasting pan.
- Tested for reliability: After four rounds of testing, I found the ideal timing, seasoning, and temperature for consistent results.
- Beginner-friendly: I wrote the instructions in a clear, step-by-step way so even if you have never roasted a turkey breast before, you can do it with confidence.
Ingredients You’ll Need
You’ll need three sets of ingredients to make this baked turkey breast recipe: The seasoning, the vegetables and turkey breast, and the gravy ingredients.
You can find the full list of ingredients with exact measurements in the recipe card below; however, I’ve included some notes from my recipe testing:
For The Compound Butter
To season my turkey breast, I opted for my trusty Thanksgiving turkey compound butter, not only because it flavors the turkey beautifully but also makes the drippings delicious for gravy later on.
Now, you can certainly use the whole recipe (with one stick of butter), but I thought that the halved recipe was just the right amount for a 6-pound turkey breast.
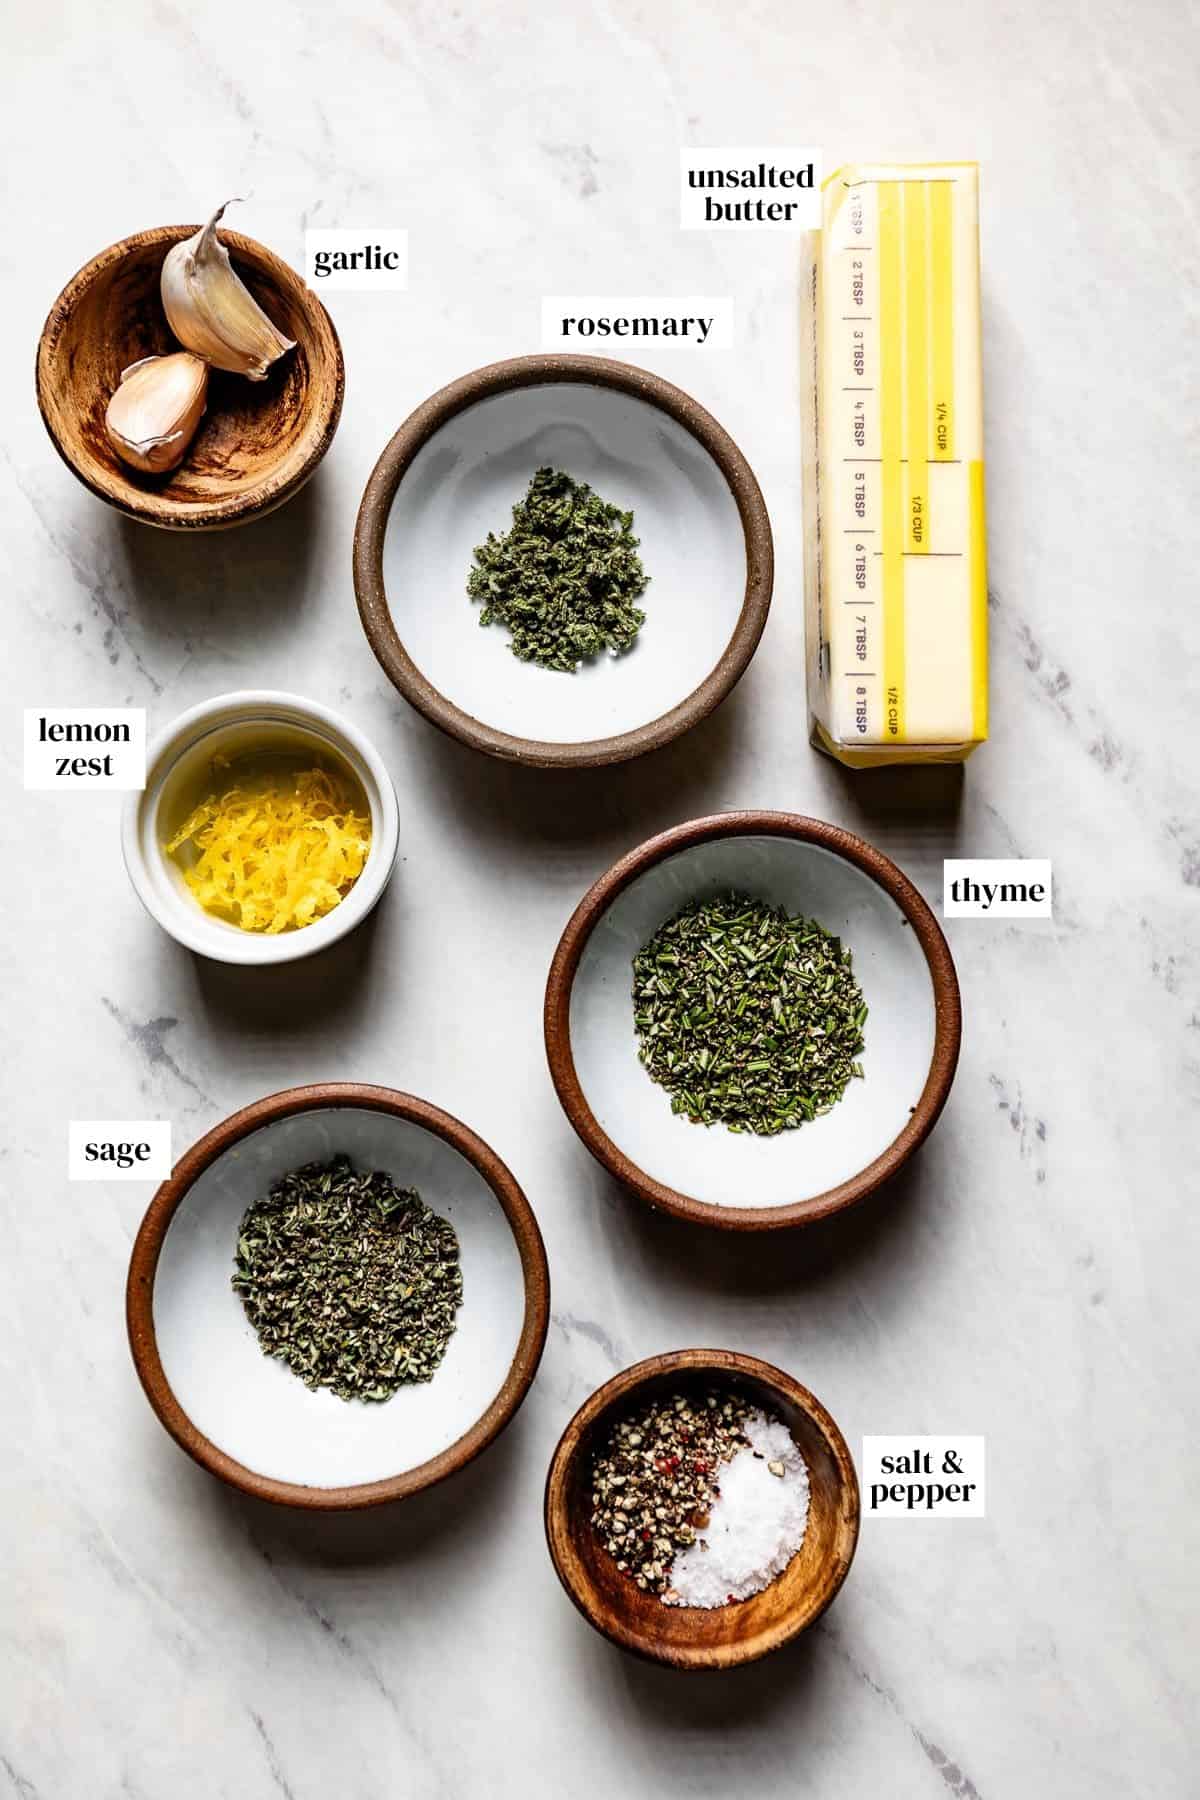
Unsalted butter: I prefer unsalted butter to control the salt, but you can use salted butter. I would reduce the salt to ¼ teaspoon.
Fresh herbs (or dried herbs): Hearty herbs like fresh rosemary, thyme, and sage make it feel like fall and hold up well during cooking. If you want to use dried herbs, reduce the quantity to ½ teaspoon per herb.
Garlic: One fresh garlic clove gives us a delicious bite, but ¼ teaspoon of garlic powder would be a great substitute.
Lemon zest: Do not skip this, as the zest from a fresh lemon balances and brightens all the earthy flavors of the herbs.
Seasonings: Stick to a simple seasoning of Kosher salt and freshly ground black pepper. It is optional, but if preferred, a teaspoon of paprika can be added to the mixture.
Need more seasoning ideals? Try my Turkey Dry Rub or Turkey Injection Method. Both options give the meat and the gravy a rich, perfectly seasoned finish.
For The Turkey Breast and Vegetables
You do not need much when roasting a turkey breast, just a few basic staples:
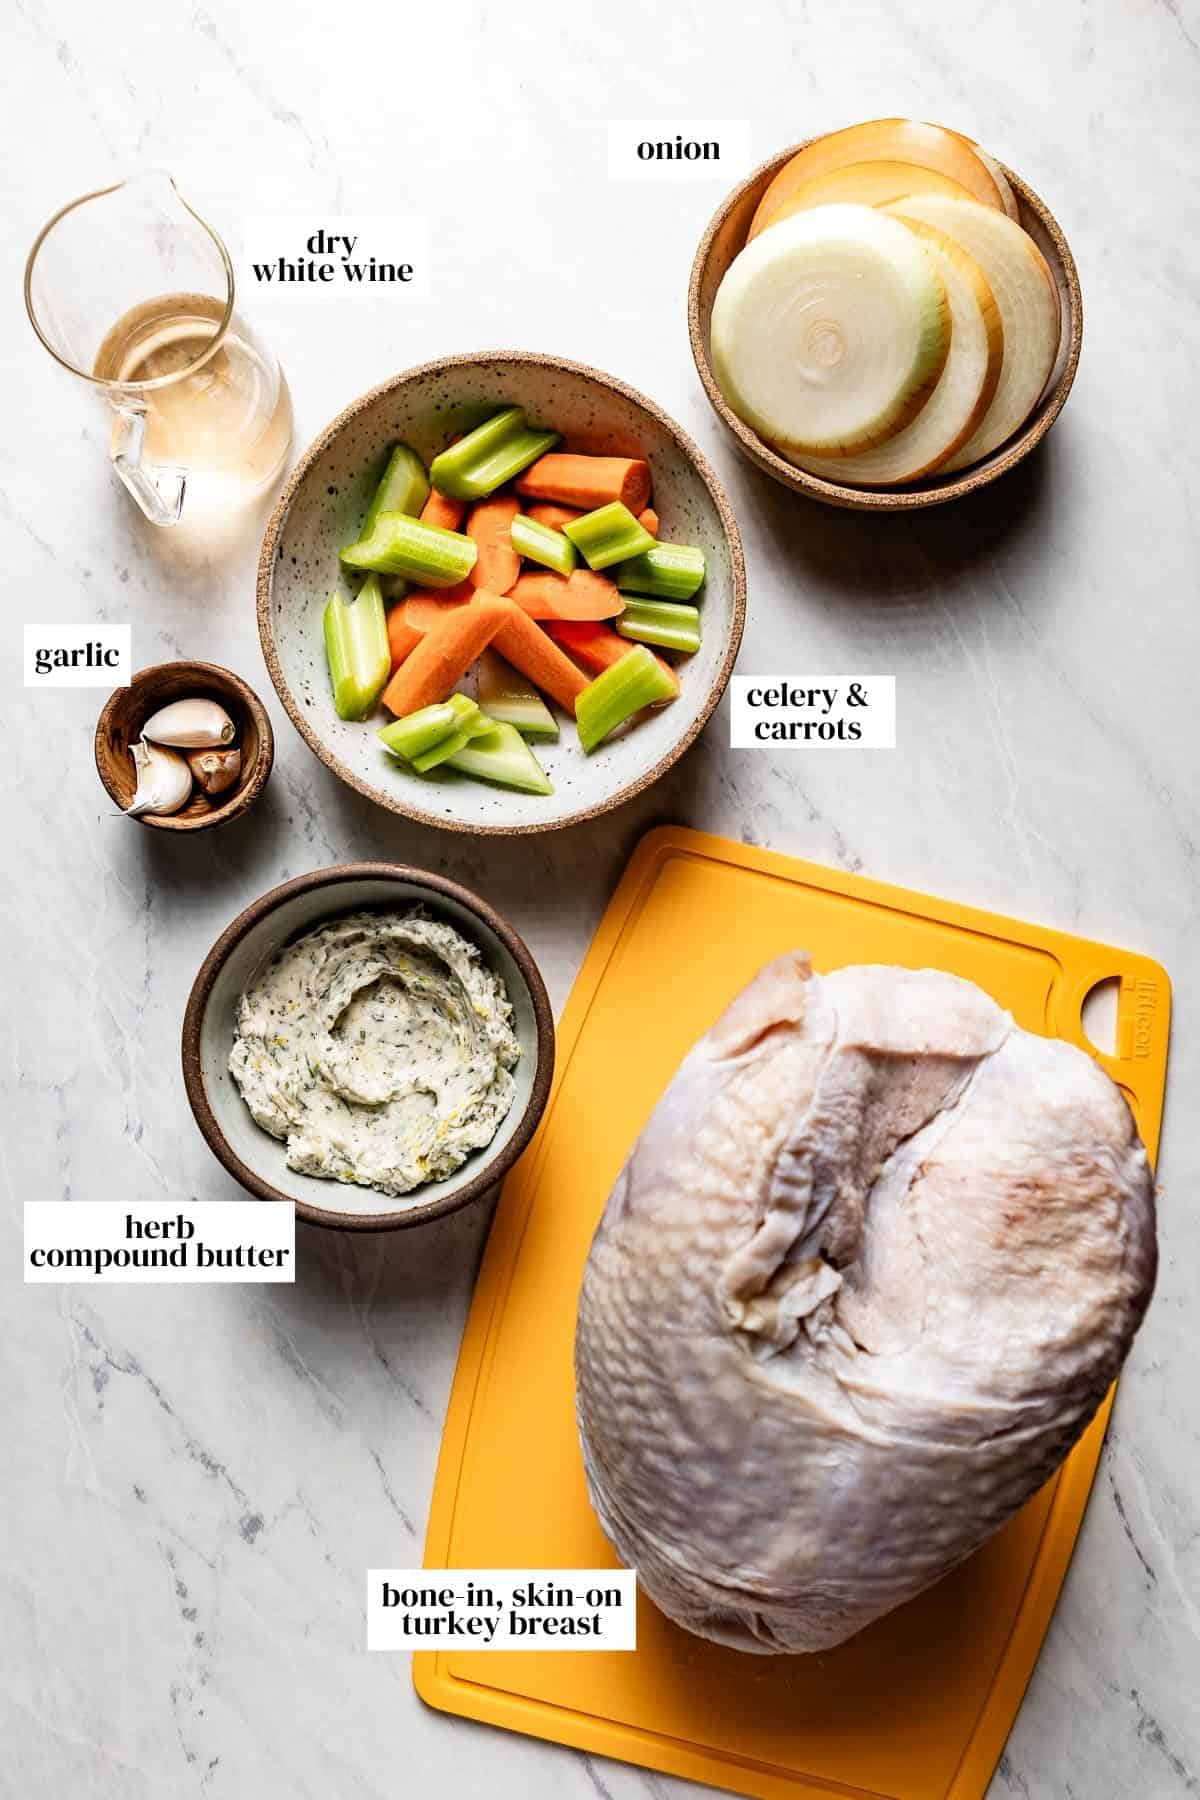
Turkey breast: I use a bone-in, skin-on-whole turkey breast, also known as a hotel-style turkey breast. A whole turkey breast consists of two breasts joined at the breastbone. If you prefer a half breast (only one breast), ask the butcher to cut the whole breast in half.
Aromatics: A classic mirepoix blend of onions, carrots, and celery, along with garlic, provides the base. Even more so, the vegetables elevate the turkey breast, creating enough circulation so you don’t need to use a V rack (or a wire rack) if you don’t have one.
Lemon: One of my secrets in this recipe is to tuck a whole lemon into the cavity and secure it with a toothpick. It adds a subtle citrus note and helps keep the skin around the neck in place during roasting.
Liquid: Dry white wine, such as a Sauvignon Blanc or Pinot Gris, keeps the turkey breast meat moist while cooking. If you prefer an alcohol-free recipe, use Chicken Stock, Vegetable Stock, or turkey stock instead.
For The Gravy
My favorite part of this recipe might just be the homemade gravy, made with the drippings from the roasted turkey. Here is what you will need:

Unsalted butter: Again, I prefer unsalted butter to control the salt. Salted butter can also be used, but you’d have to adjust the salt accordingly.
Flour: Regular all-purpose flour thickens the gravy to the right consistency. If you are following a gluten-free diet, use 1:1 gluten free flour such as Cup 4Cup.
Drippings from roasting pan: A small amount of the pan drippings adds depth and meaty flavor.
Stock: Use chicken stock, turkey stock, or vegetable stock, depending on what you have on hand. I recommend using homemade stock if possible, but store-bought works perfectly fine. If you go that route, choose a low-sodium option so you can better control the seasoning.
Seasonings: I recommend tasting the gravy near the end of cooking before adding any more seasoning, as the pan drippings may already be salty. After tasting, add more salt and black pepper if needed.
How to Roast a Turkey Breast in the Oven?
This turkey breast with gravy recipe has become my go-to for whenever I host a smaller holiday gathering. And the best part, you ask? It is ready in just a couple of hours.
Here are the step-by-step instructions:
Step 1 – Preheat oven: Preheat your oven to 450°F (232°C). I recommend removing the turkey breast from the fridge about 30-60 minutes before cooking so it comes closer to room temperature. I’ve found that this small step helps it cook more evenly.
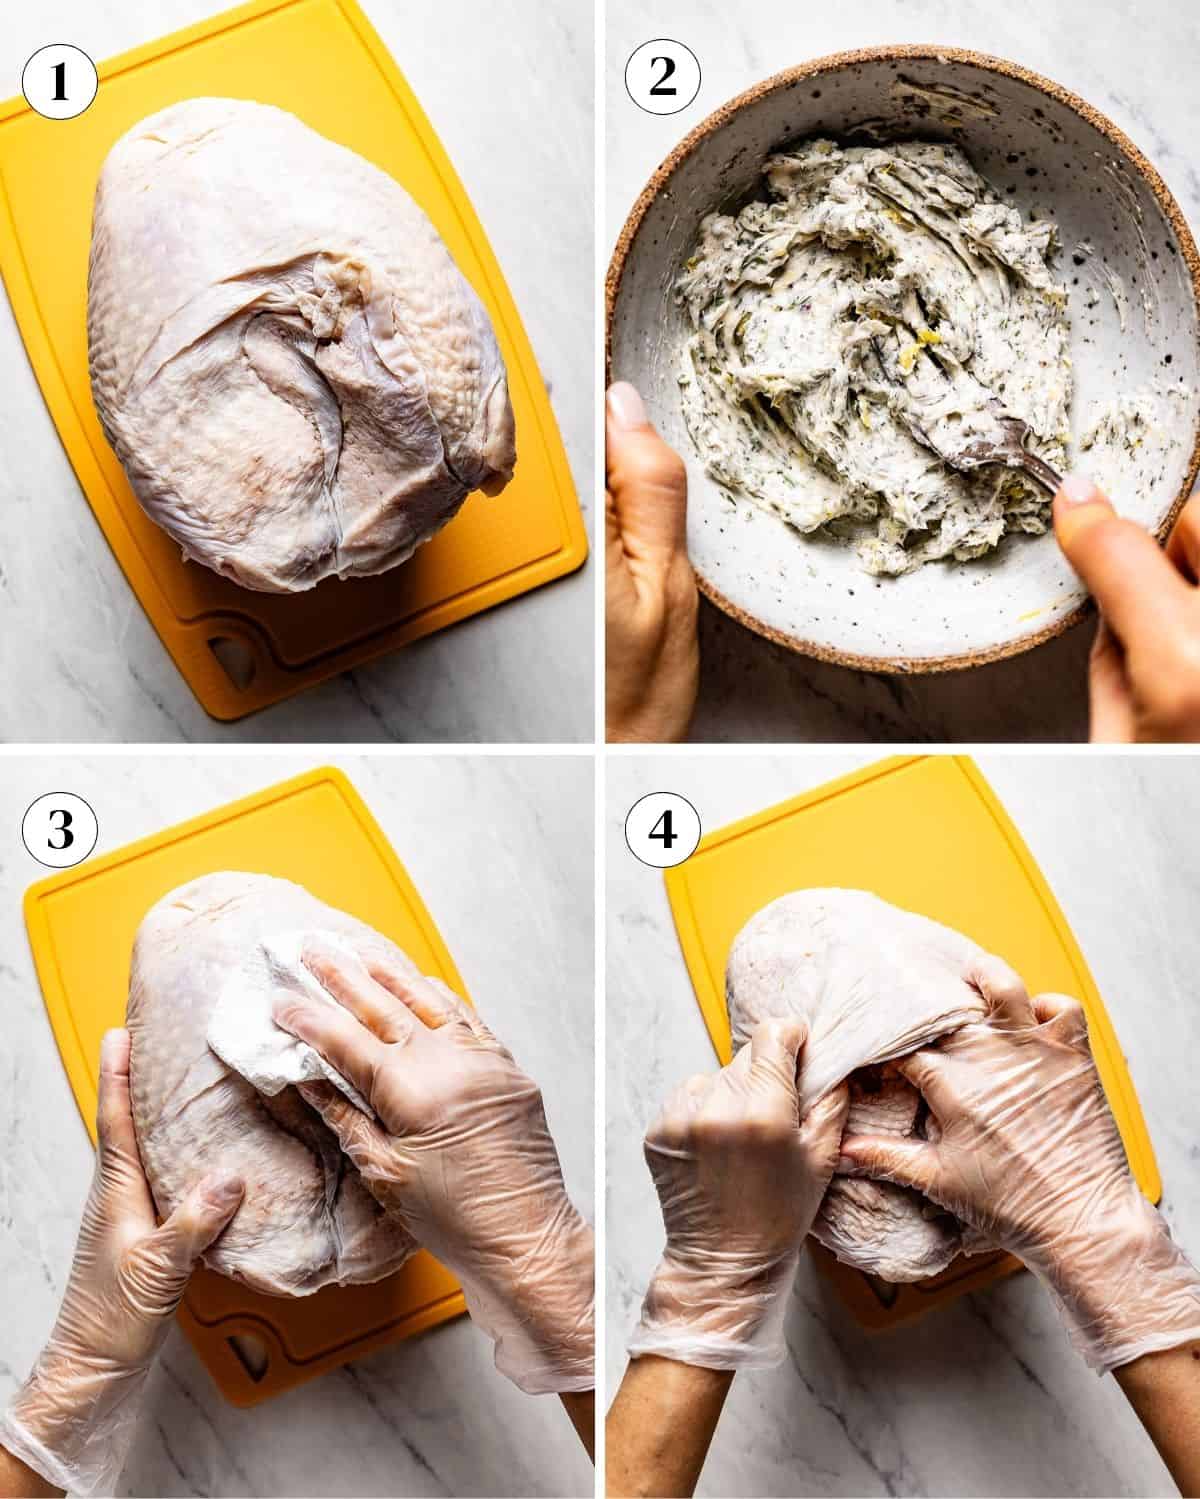
Step 2 – Prepare the herbed butter: In a small bowl, mix the butter, rosemary, thyme, sage, garlic, lemon zest, salt, and pepper.
Pro tip: The important thing when making the butter mixture is to have your butter at room temperature, as it not only mixes easily but also spreads better on the meat.
Step 3 – Pat dry: Pat dry the turkey breast and the cavity with paper towels as much as you can. Do not skip this step. Otherwise, it will be hard to spread the butter on top.
Step 4 – Loosen turkey skin: To butter your turkey, gently separate the skin from the meat with your fingers, being careful not to tear it. I find it easier to start at the bottom and slowly work my way up the breast.
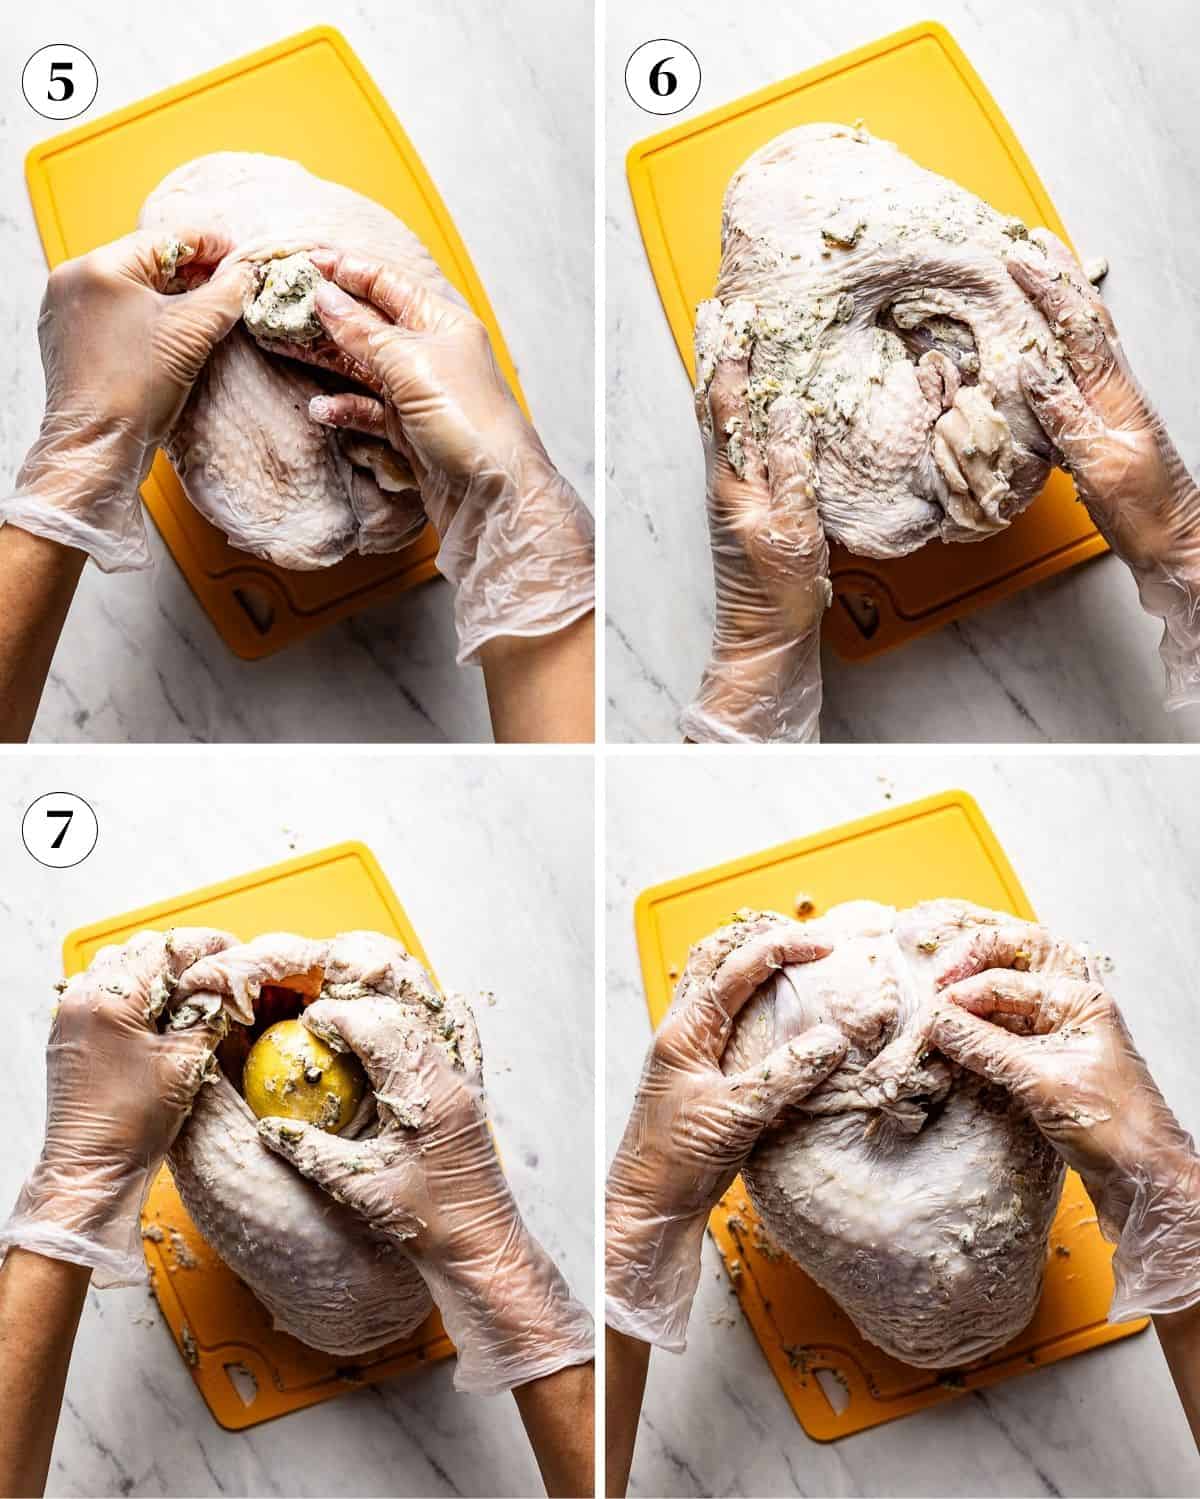
Step 5 – Add butter under skin: Lift the skin and place 3 tablespoons of the softened herb butter (about 1 ½ tablespoons on each turkey breast) underneath the skin on both sides.
Step 6 – Spread butter over the skin: Spread the remaining herb butter on the top and sides of the turkey skin, then massage it underneath the skin into an even layer.
Pro Tip: As you distribute the butter under the skin, be as gentle as possible and go slow. You don’t want to tear the turkey skin as it will expose too much flesh while cooking.
Step 7 – Finish with lemon: Place the whole lemon in the neck cavity and secure it with a toothpick (this holds the lemon in place and prevents the skin around the neck from shrinking).
Step 8 – Add vegetables: Spread the onions, carrots, celery, and garlic in one even layer in a large roasting pan or a casserole dish. Pour in the wine (or stock).
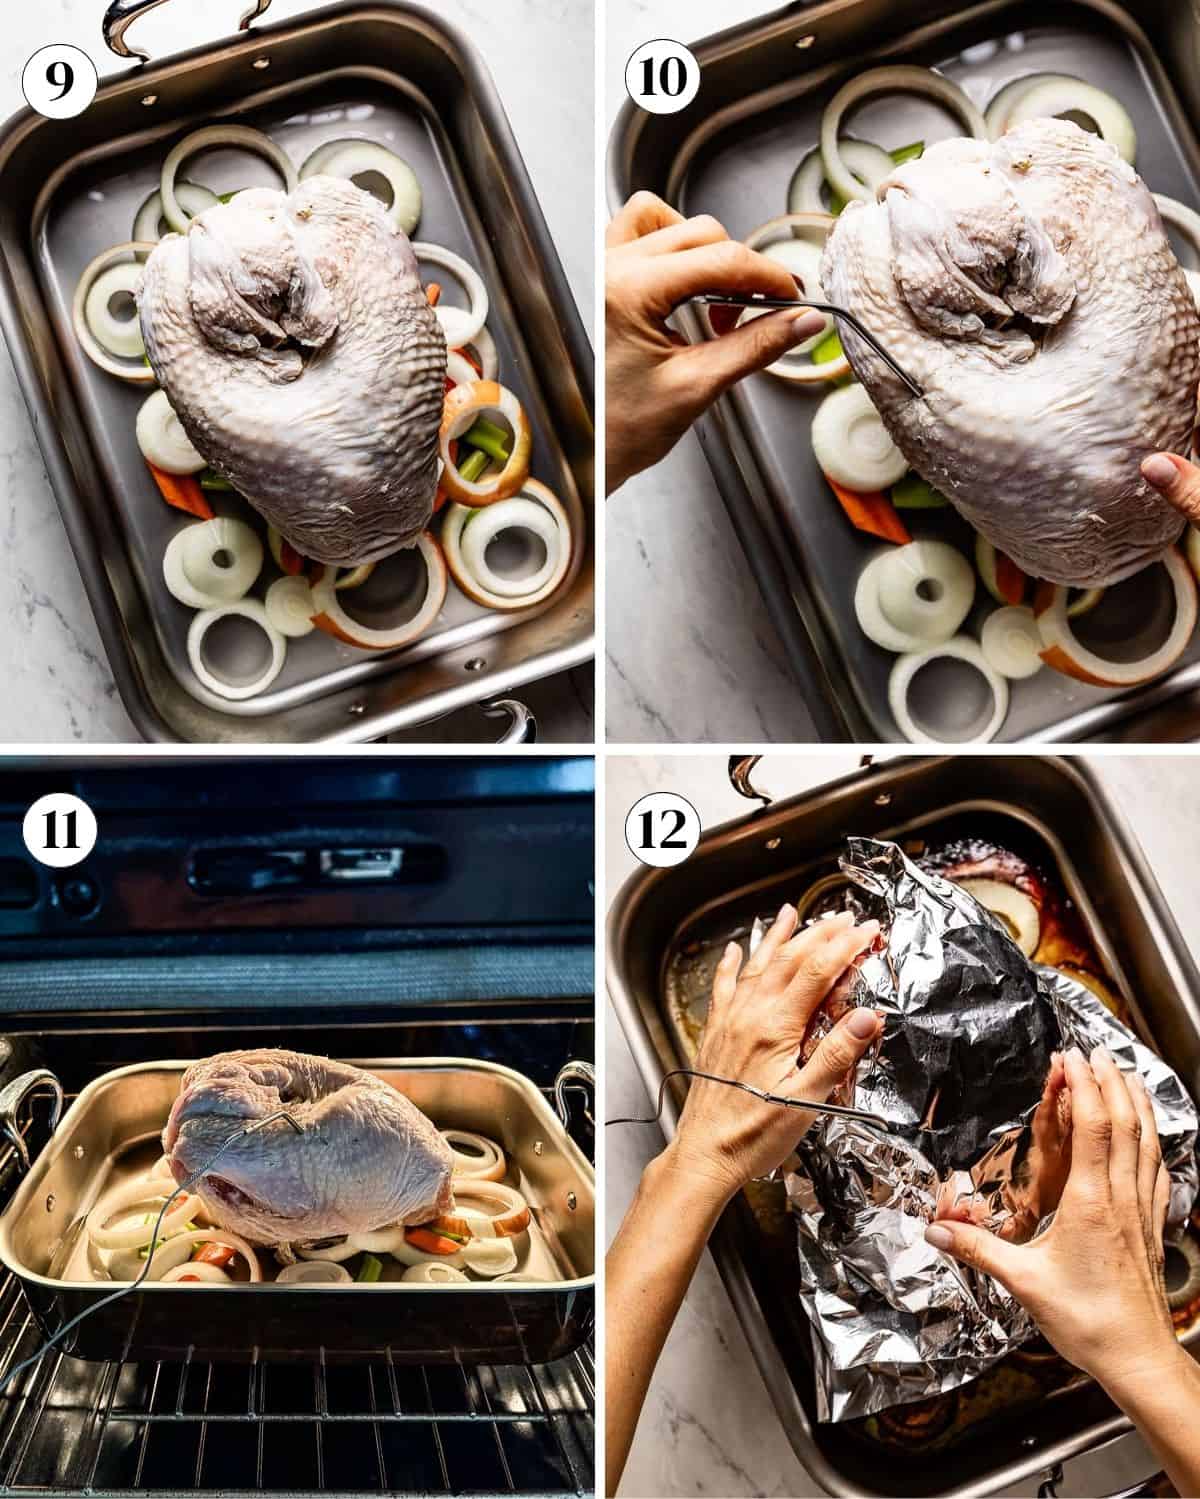
Step 9 – Position turkey: Place the turkey breast on top of the vegetables, skin side up, ensuring it is elevated, so hot air can circulate underneath and keep the meat tender without needing a wire rack. Feel free to rearrange the veggies a bit to help the turkey sit upright.
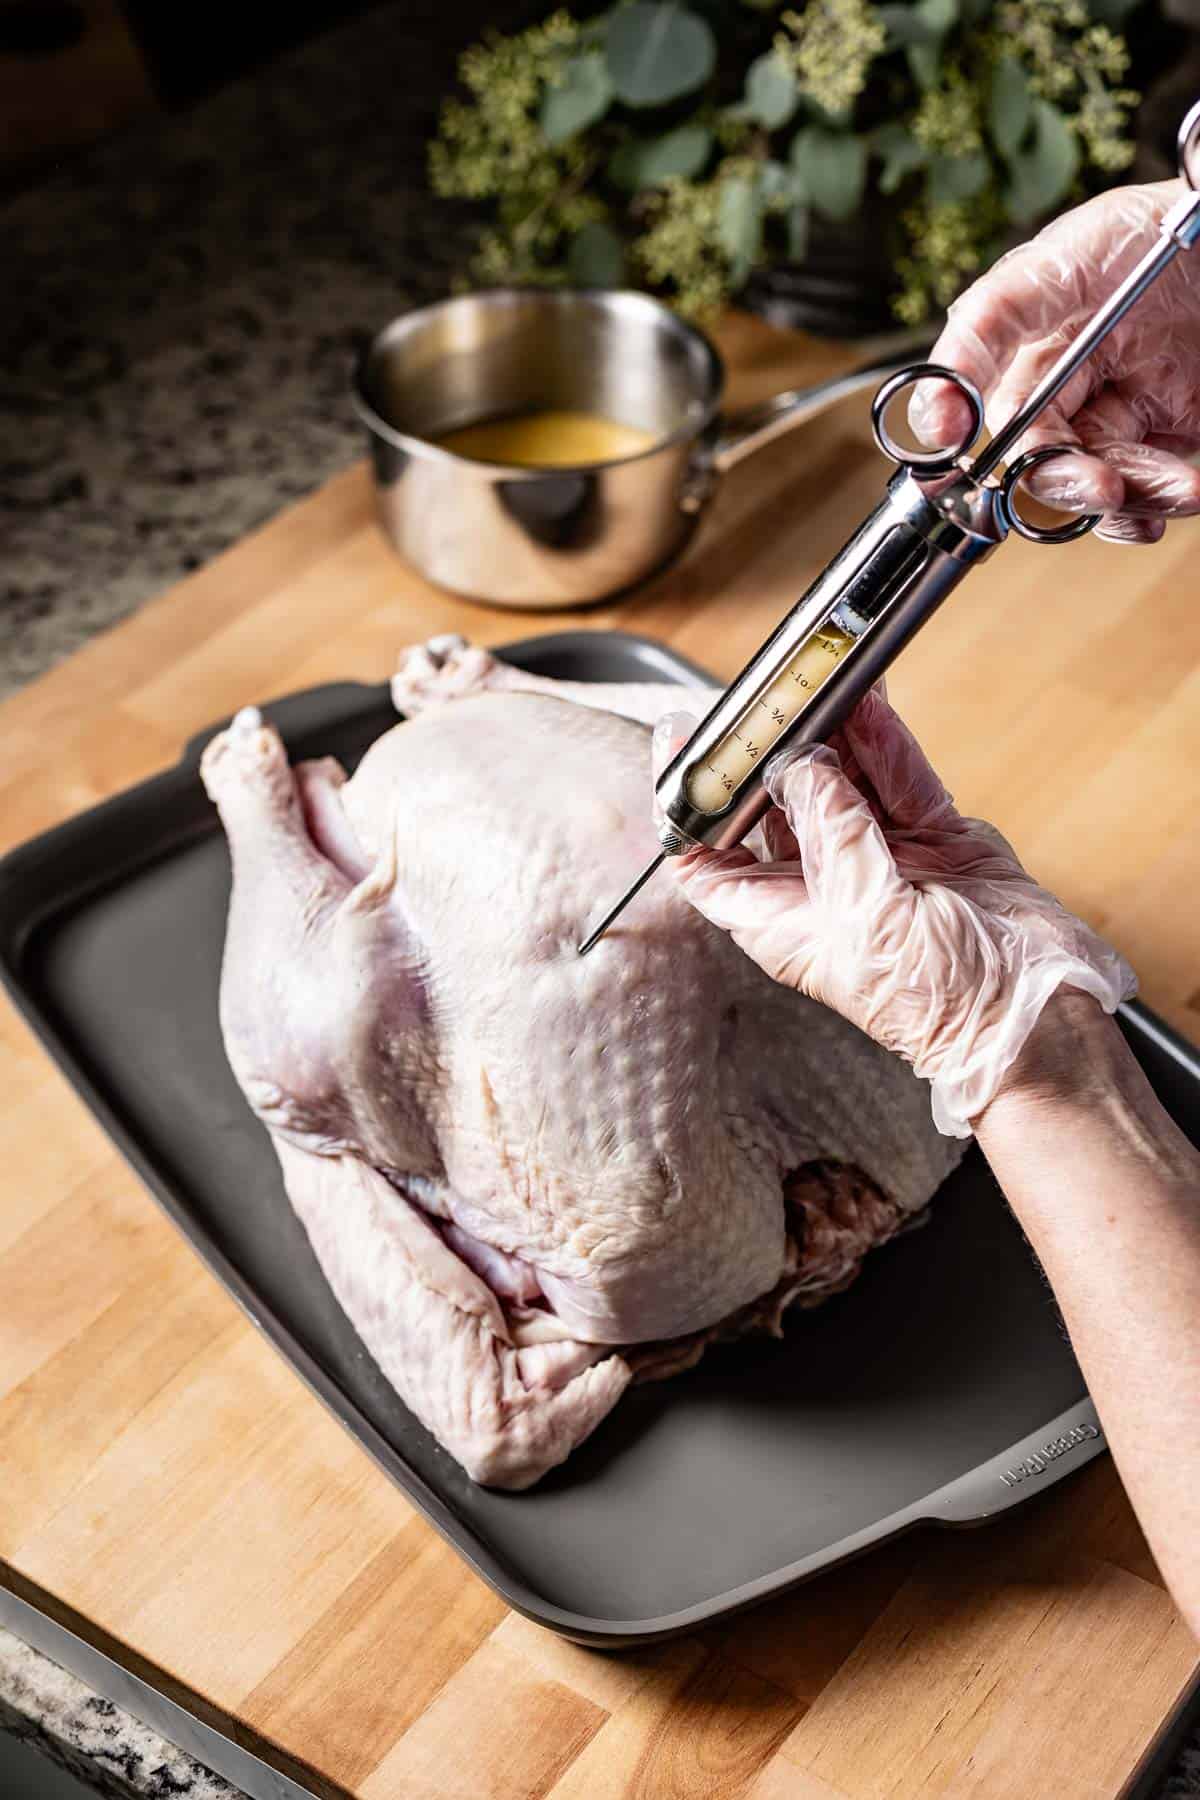
Step 10 – Insert meat thermometer: If using a temperature probe, place it in the thickest part of the breast, being careful not to touch the bone. If you hit the bone, pull back by approximately ½ inch. Set it to alert at 155°F (68°C). (If you do not have a meat thermometer for the oven, skip this step.)
Step 11 – Reduce oven temperature: Once the turkey goes in, immediately lower the oven temperature to 325°F (163°C).
This was a turning point in my recipe testing, because lowering the oven temperature from very hot to medium helped the skin crisp beautifully while cooking the turkey gently, without drying it out.
Step 12 – Roast the turkey: Cook for 1 ½ -2 hours, or until the internal temperature reaches 155°F (68°C). If you do not have a temperature probe, check the turkey with an instant-read thermometer.
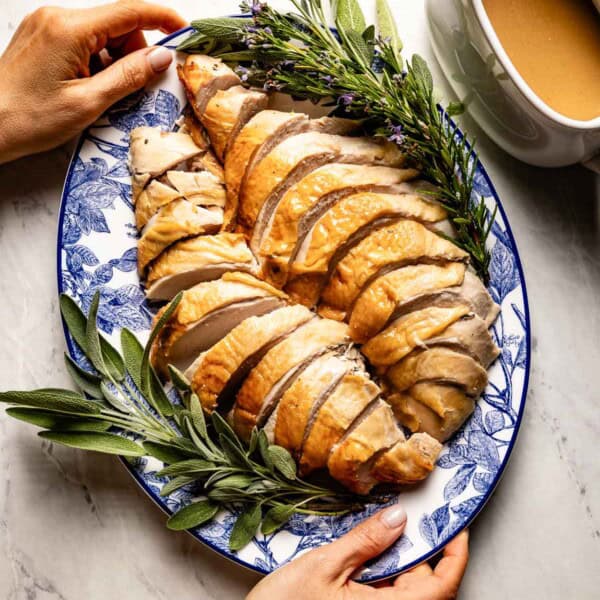
Step 13 – Rest the turkey: Remove the turkey breast from the oven. Place it on a cutting board and lightly tent with aluminum foil. Do not remove the temperature probe. Let it rest for 30 minutes. Trust me when I say this is when the magic happens. All of the juices redistribute, and the carryover heat brings the internal temperature up to a perfect 165°F (74°C).

How to Make Gravy from Turkey Breast?
While the turkey breast is resting, I make the homemade gravy. I always say this is where all those golden drippings come to life. It’s rich, silky, and full of that roasted flavor no one should ever waste.
Here’s how I do it step by step:
Step 1 – Remove vegetables: Remove the vegetables from the roasting pan and set them aside.
Step 2 – Separate fat from drippings: Pour the pan drippings into a large glass measuring cup or a fat separator. Let it sit for about 10-15 minutes so the fat rises to the top. I use a small spoon to scoop off the excess fat. At that point, you will be left with all the rich liquid. You’ll need about 3 tablespoons of drippings for the gravy.
Step 3 – Preheat the pan or saucepan: If you use an oven-safe roasting pan, you can use it to make the gravy. Place the roasting pan directly on the stove over medium-high heat. Otherwise, a medium saucepan would work just as well.
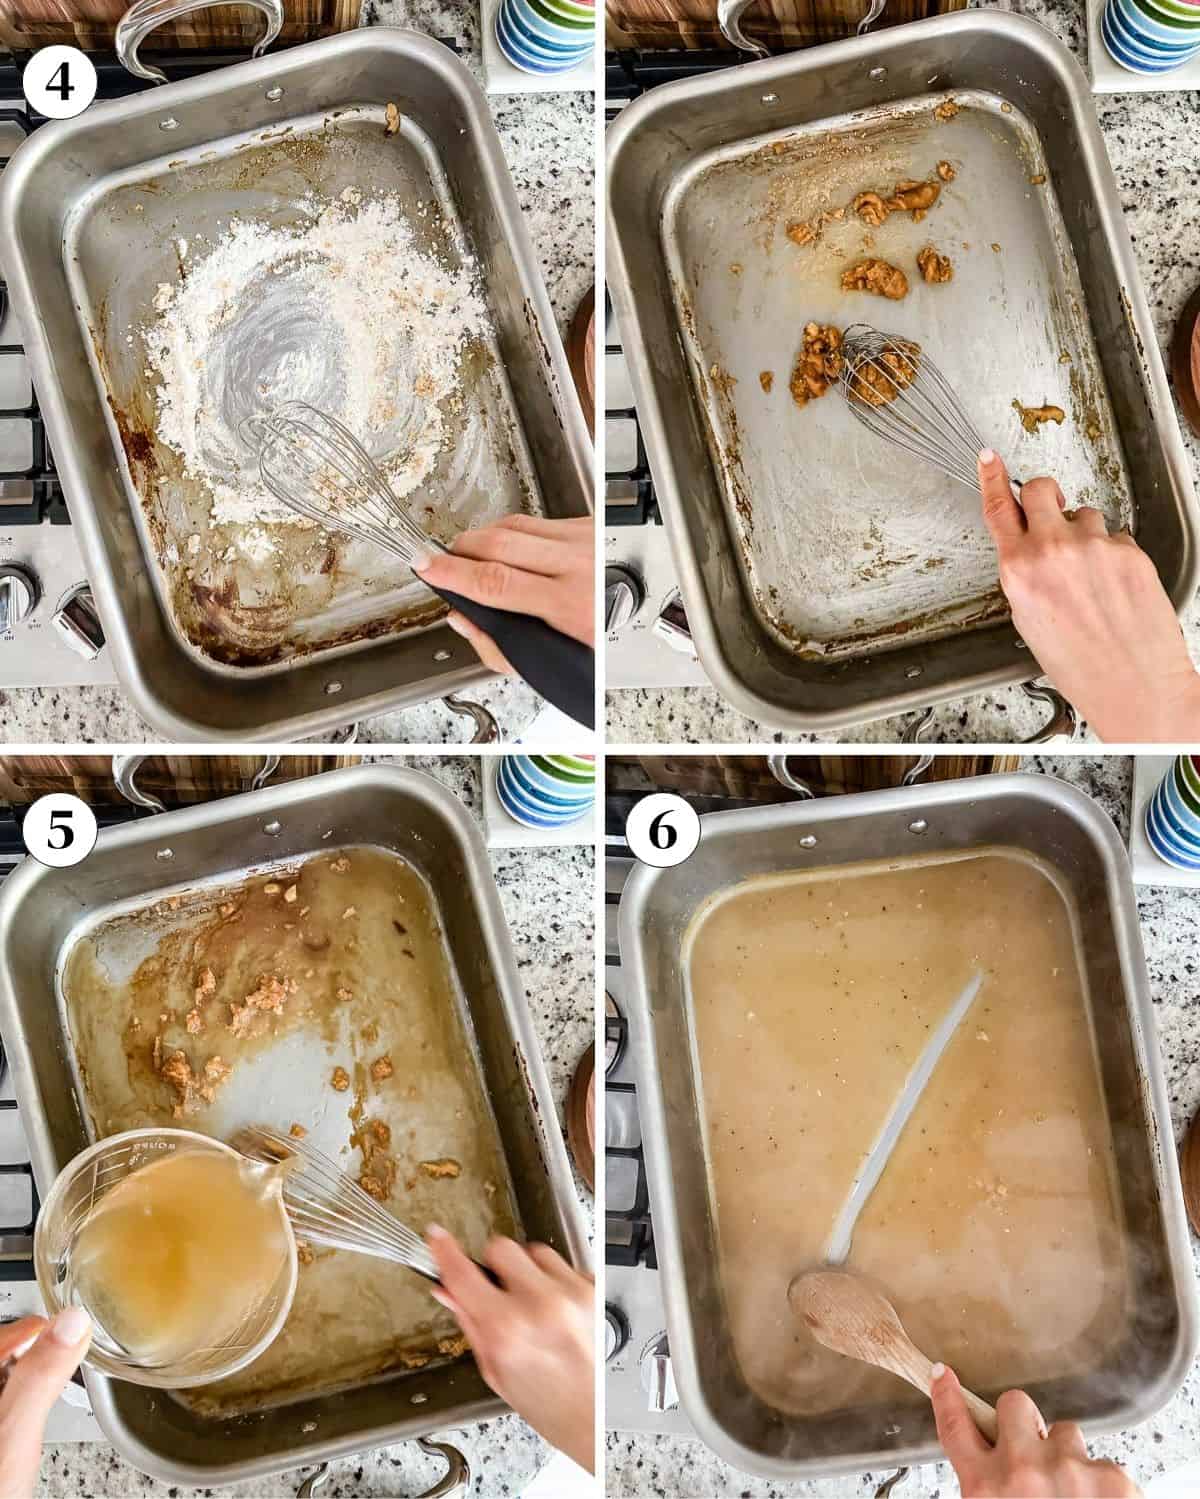
Step 4 – Make the roux: Add the butter to the pan and let it melt for a minute. Then whisk in the flour, stirring constantly until it turns a light golden color, about 6-8 minutes. It will start to darken quickly, so keep an eye on the heat and lower the heat if needed.
Pro Tip: The 6-8 minutes of stirring time might seem like a lot, but it is important for the final product’s taste. If you don’t cook the flour long enough, your gravy will have a noticeable floury taste that won’t go away no matter how long you cook it.
Step 5 – Add pan drippings and stock: Add the reserved turkey drippings and stir, scraping up any “brown bits” from the bottom of the pan (that’s where all the flavor is). Gradually add the stock in a steady stream.
Bring to a boil, then lower the heat to a simmer and cook, stirring frequently, until thickened to your desired consistency, about 10-15 minutes.
Step 6 – Add seasonings (if needed): I always recommend tasting the gravy before adding any extra salt, as those drippings can already be quite flavorful. Adjust with salt and black pepper only if needed.
Gravy Troubleshooting
You can learn more about this in my Turkey Gravy with Drippings post, but if you feel like your gravy isn’t quite right, here are a few ways to fix it:
- Too thick? Whisk in a splash (in 1-2 tablespoon increments) of warm stock until it loosens up.
- Too thin? Let it simmer a few more minutes, keeping a close eye on it and stirring often; it will naturally thicken as it reduces.
- Too salty? Stir in a bit of unsalted stock or a splash of heavy cream to balance the flavor.
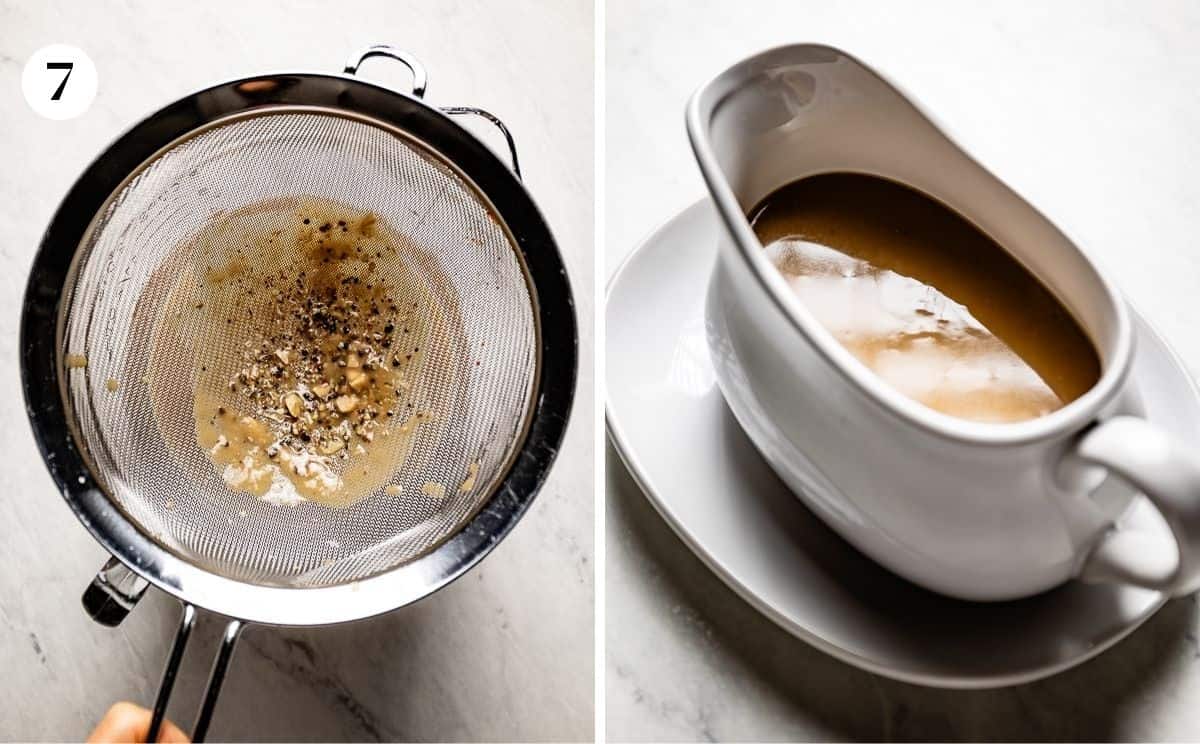
Step 7 – Strain: Place a fine mesh strainer over your serving bowl. Pour the gravy through the strainer. Use the back of a spoon or spatula to press out any residual “lumps.” Transfer it to a gravy bowl.
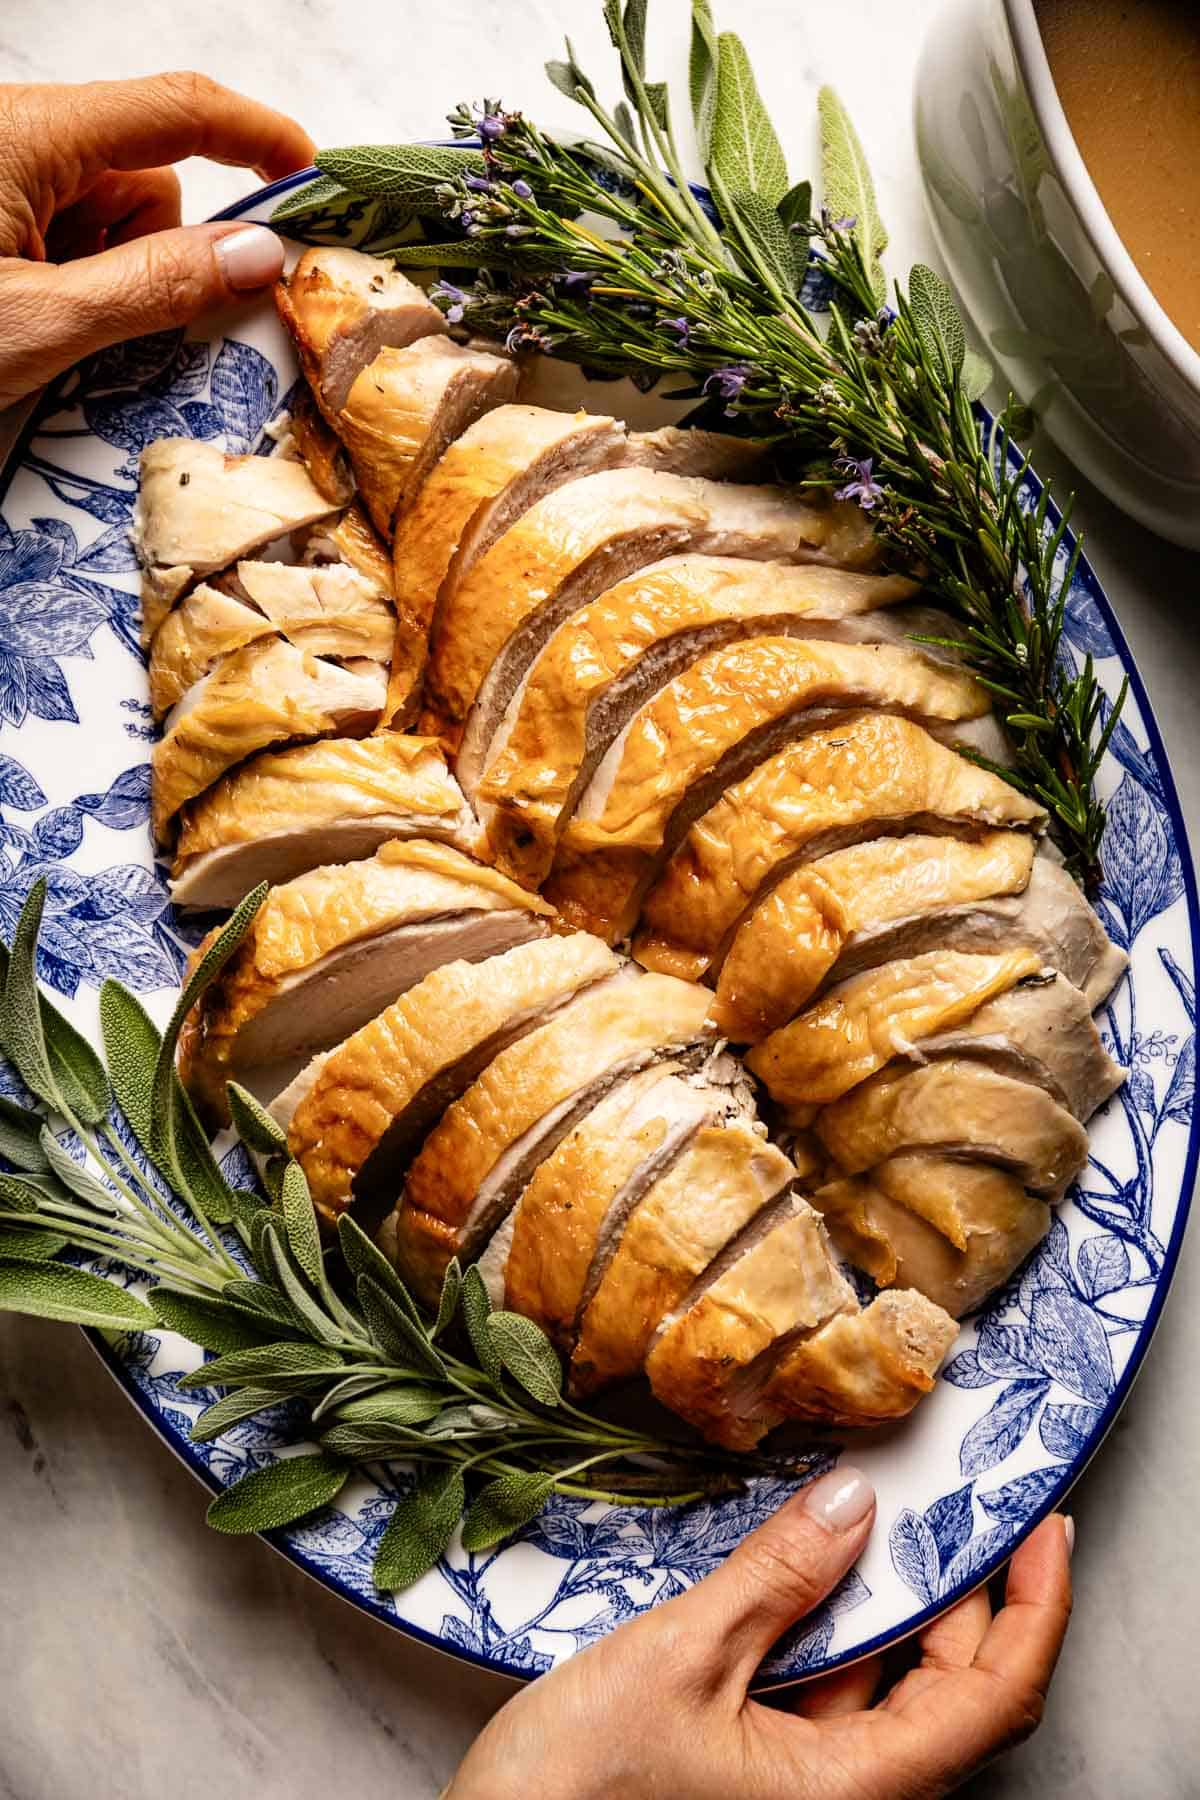
Step 8 – Carve and serve: Use a sharp knife to slice the turkey breast into thin slices. Arrange them on a platter, and serve with warm gravy on the side, or, as I like to do, drizzle a little over the top.
Timetable for Cooking Turkey Breast in the Oven
If you are wondering how long to cook a turkey breast in the oven, I have a foolproof timetable for you!
However, there are a few essential factors to keep in mind. The cooking time will depend on your turkey’s weight.
Additionally, the turkey must be thoroughly thawed. I always remove it from the fridge 30 to 60 minutes before cooking because the herbed butter spreads more easily, and the turkey is not cold.
Following these guidelines, a bone-in turkey breast will take approximately 22-24 minutes per pound at 325°F (163°C).
The internal temperature goal is 155°F (68°C) at the thickest part of the breast, as the carry-over heat will help raise it to the safe 165°F (74°C) as it rests.
| Turkey Breast Weight | Bone-In Turkey Breast Roast Time (325°F (163°C)) |
| 2-3 pounds | 45 – 75 minutes |
| 4-6 pounds | 90 – 150 minutes |
| 7-8 pounds | 154 – 200 minutes |
How to Store and Reheat?
We all love Thanksgiving leftovers, and I don’t want any of that gorgeous baked turkey breast and gravy to go to waste. Also, while roasting a turkey breast is typically associated with Thanksgiving, having some fresh turkey on hand is a great way to stock your fridge with some lean protein for lunch or dinner.
Here are my best storage and reheating instructions:
Storage: To store any leftovers, let the turkey breast and gravy cool to room temperature, then store them in separate airtight containers in the fridge for up to 3 days.
To Reheat:
- Turkey: I like to reheat turkey slices in a skillet with a splash of chicken or turkey broth, then cover and let them simmer gently over medium-low heat for 5-8 minutes. This will keep the meat moist and tender every time.
- Gravy: Reheat in a small pot over medium heat until bubbly and warm, about 5 minutes. Your gravy will naturally thicken as it cools, so if it feels too thick, you can whisk in a little warm stock (in 2-tablespoon increments, depending on the amount you are reheating ) until it reaches a smooth texture.
Expert Tips From My Recipe Testing
Like with any turkey recipe, a few small details can make the difference between a dry turkey and one that’s juicy, tender, and golden brown. Below, I’m sharing what I’ve learned through years and years to make the best roasted turkey breast with gravy:
Thaw your turkey: If your turkey breast is frozen, thaw it safely and completely in the fridge. Place the turkey (while it is still in its packaging) on a baking sheet (to catch any juices) and thaw in the fridge. It takes about 24 hours to thaw every 4 pounds of turkey, so your turkey breast can take anywhere from 36 – 48 hours, depending on the weight. Once thawed, the turkey should be cooked within 1-2 days.
Remove the turkey from the fridge before cooking: I always let the turkey sit out for 30-60 minutes before roasting. I know it might sound like a small step, but it makes a big difference in helping the turkey cook evenly and stay juicy.
Make the compound butter in advance: The herbed butter can be made 3-5 days ahead. Having it ready cuts down the prep time in half.
Thickness of the turkey gravy: The gravy will thicken as it sits and even more so when stored in the fridge. You can thin it out with more stock (¼ cup at a time), just make sure to check the seasoning after each addition.
Equipment you need: While you can bake the turkey breast in a large casserole dish, I had even greater success with a roasting pan (affiliate link) because you can easily roast the turkey and then make the gravy on the stove while it rests. You can prop the turkey up on the included V-Rack, but the veggies are enough to prop it straight if you do not have one.
Use a meat thermometer: During my recipe testing, I used Digital Meat Thermometer with a probe. I especially liked that it lets you set a temperature alarm, so there is no guessing or opening and closing the oven.
That said, you can use a regular instant-read thermometer. I would recommend checking at the 1 ½-hour mark, then every 10 minutes thereafter until the turkey reaches 155°F (68°C) at the thickest part of the breast.
Don’t skip resting: Allowing the turkey to rest for at least 30 minutes helps redistribute the juices, resulting in a juicy, succulent turkey.
Also, if you use a digital probe thermometer, do not remove it until after the turkey has rested. You don’t want all the good juices to escape! Letting the turkey rest with the thermometer still in place prevents any openings that could cause those flavorful juices to leak out, ensuring every bite is moist and delicious.
FAQs
I did not think covering the turkey breast was necessary as we roasted it in a low-heat (325 degrees F) oven. The gentle heat cooks the turkey evenly and promotes a crispy, golden-brown skin; however, if you feel the breasts are browning too quickly (i.e., your oven is hotter than the recommended temperature), you can use a piece of foil to cover them.
I have found the best way to reheat turkey is to do so in a large skillet over medium heat with a splash of stock, either chicken broth, vegetable, or turkey. The added liquid helps retain moisture and flavor.
About ¾ lb of turkey breast per person is ideal. If you want leftovers, however, I would increase that to 1 pound of turkey breast per person. A 6-pound turkey breast will feed 6 people with some leftovers.
Since this recipe relies on the drippings from the roasted turkey breast, it is best to make it right before serving. The good news is that it takes no more than 10 minutes from start to finish.
What to Serve with Turkey Breast Roast
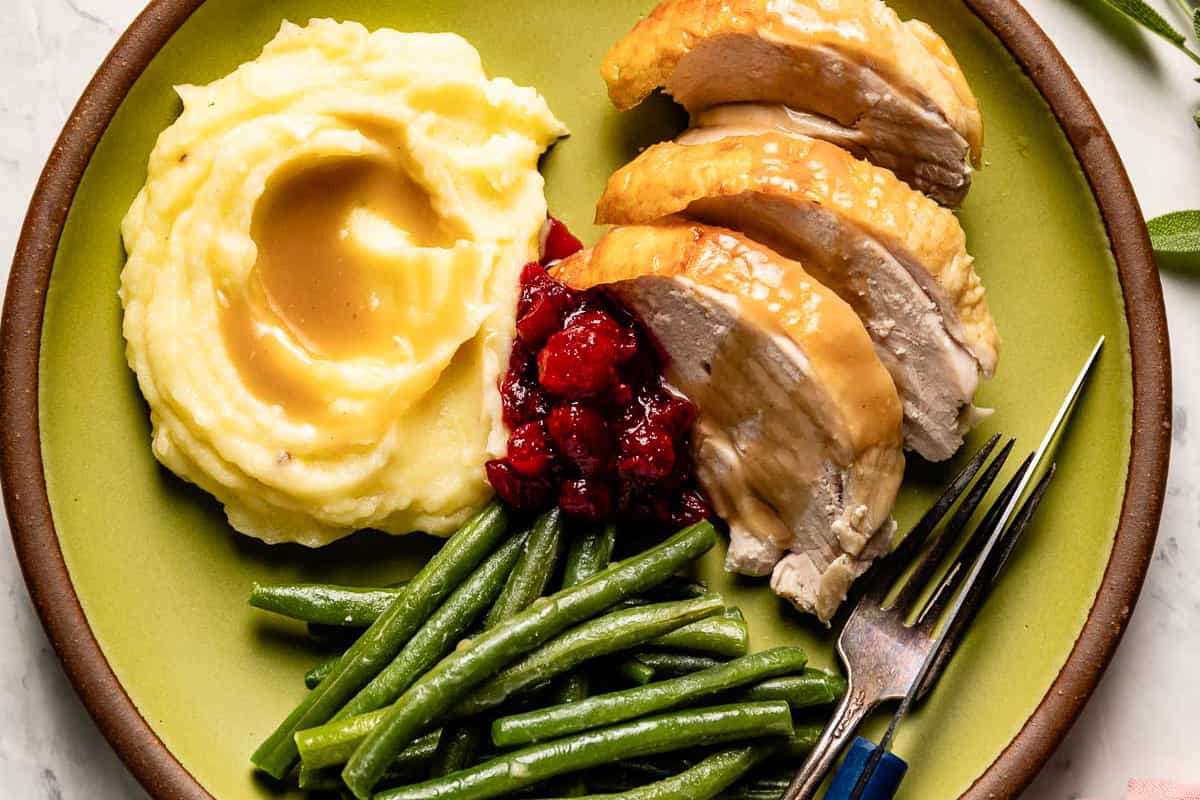
Nothing beats the simplicity of this simple turkey breast recipe. It is easy and show-stopping at the same time. If you are serving a small gathering, I keep it simple with Maple Cranberry Sauce.
But when I am making this roasted turkey breast for Thanksgiving or an elegant fall gathering, I make sure to have all the classic vegetable side dishes. My favorites include:
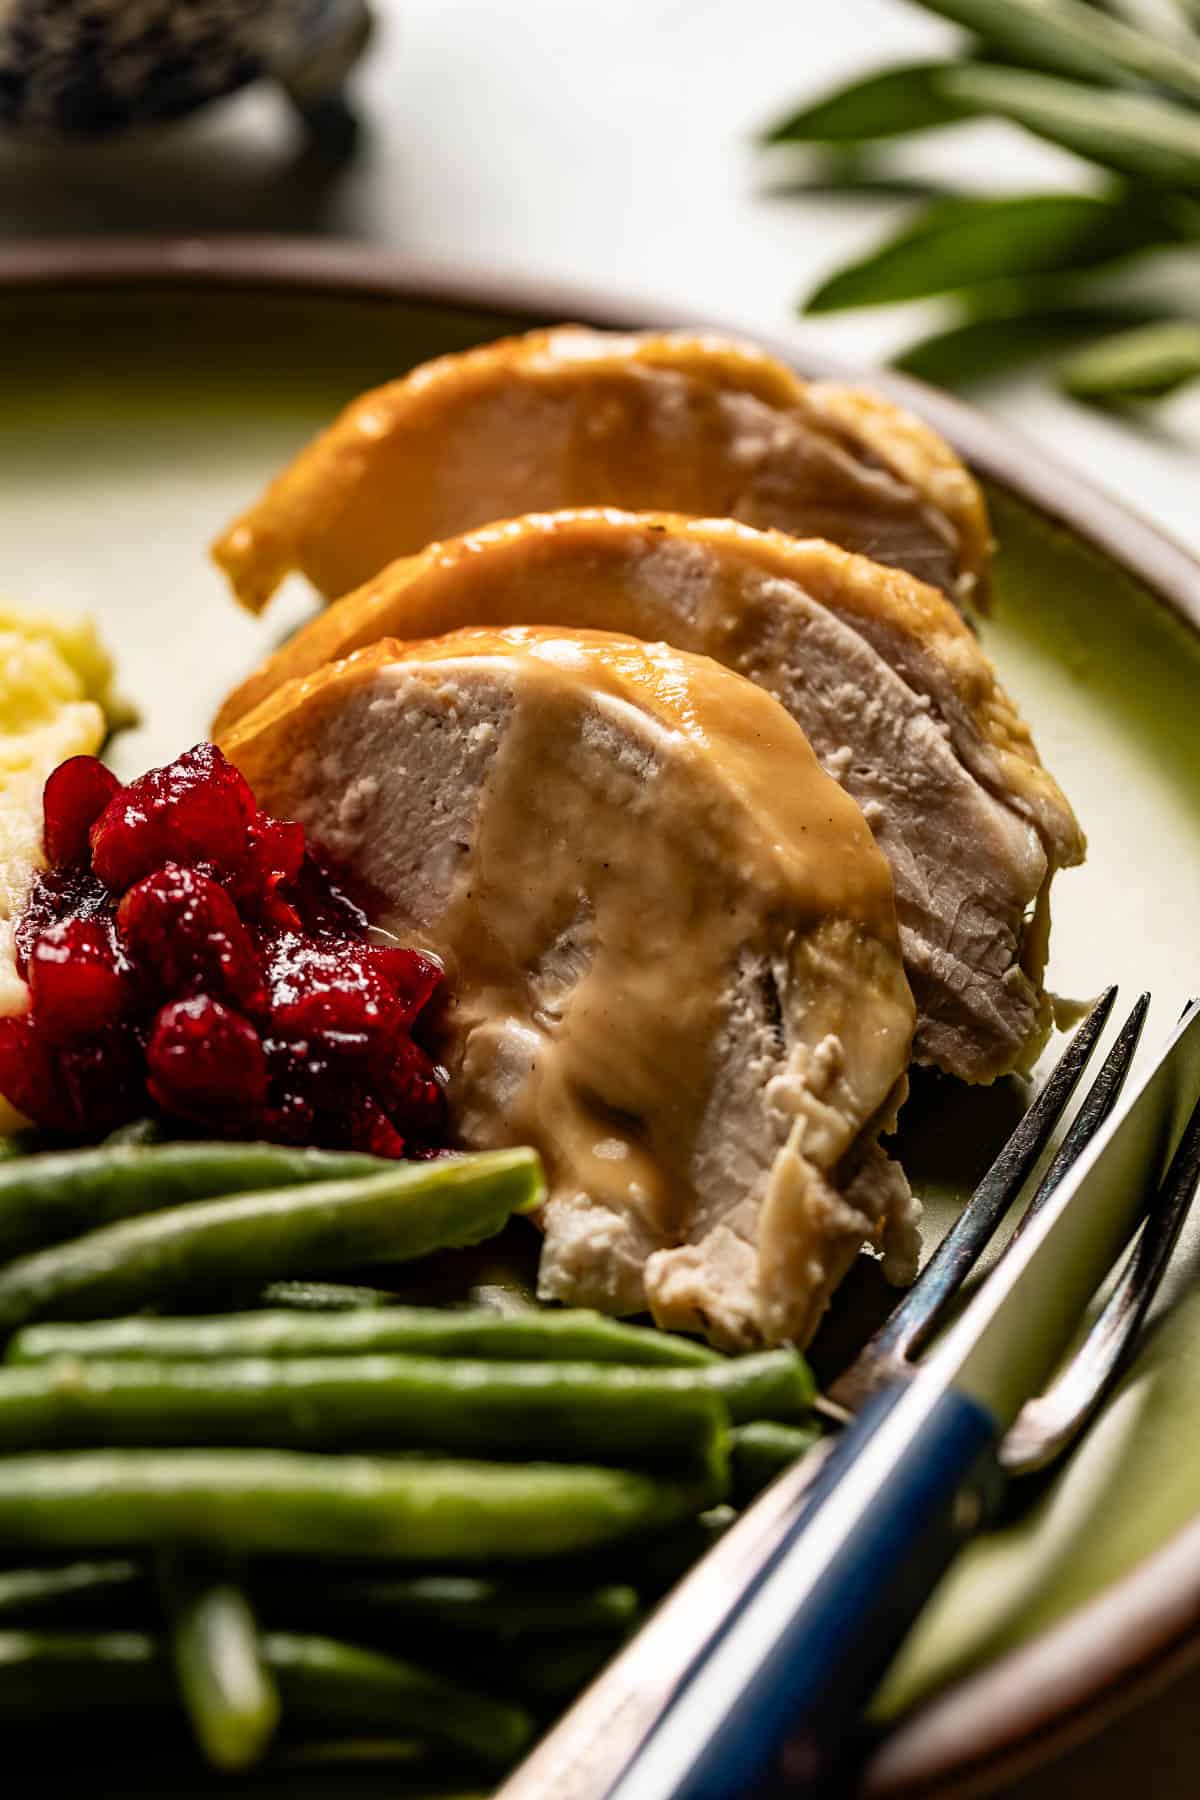
- Potatoes: You can never go wrong with the classic meat and potatoes pairing. I often serve this roasted turkey breast with my Rosemary Garlic Mashed Potatoes (as pictured), Potato Roses, or Sweet Potato Mashed Potatoes. But if you need more potato sides, check out my Holiday Potato Side Dishes recipes collection for inspiration.
- Stuffing: For a more traditional Thanksgiving spread, stuffing is a must. I like pairing it with my chestnut stuffing or wild rice stuffing when I want something a bit lighter.
- Roasted vegetables: You can’t have turkey without some colorful roasted veggies to go with it. I love to pair it with Roasted Butternut Squash, Butter and Garlic Green Beans (as pictured), and/or Baked Sweet Potato and Brussels Sprouts.
- Fresh and Colorful Salads: When I’m serving a heavier main course like this, I always like to include something fresh and crisp on the table. Give your guests a lighter touch with any of our fall salads or seasonal Butternut Squash Salad.
More Turkey Recipes You Might Like
This roasted turkey breast is one of my go-to recipes when I want something elegant but approachable. That said, I have a few other tested and trusted turkey recipes and techniques that I make every year, whether it’s for Thanksgiving or to bring to a smaller holiday party:
- Whenever I crave a turkey recipe that cooks as quickly as chicken, I turn to my Roasted Turkey Loin recipe. I use my turkey tenderloin marinade, which doubles as a delicious sauce for drizzling later on.
- If you’re feeling a little intimidated by cooking a whole bird, my Herb Roasted Turkey recipe will change that. It’s a beginner-friendly Thanksgiving classic that turns out tender, juicy, and golden brown every single time.
- For something cozy and a little more casual, try my Roasted Turkey Legs. They’re prefectly crispy on the outside on juicy on the inside.
- When I’m craving something simple yet satisfying, I make my Baked Turkey Wings. With just 10 minutes of prep, you’ll have tender and crisp wings that pair well with any vegetable sides.
This post contains affiliate links. As an Amazon Associate, I earn from qualifying purchases.

Roasted Turkey Breast with Gravy Recipe
Equipment
Ingredients
For The Turkey Breast:
- 6 pound turkey breast, skin and bone-in
- ½ cup herb compound butter, recipe below
- 1 large onion, sliced into thick rounds
- 1 large carrot, sliced in large chunks
- 2 celery ribs, sliced in large pieces
- 3 cloves garlic, peeled and rough chop
- 1 lemon
- ½ cup dry white wine, such as sauvignon blanc or pinot gris (or chicken stock for an alcohol-free option)
For The Herb Compound Butter:
- 2 oz unsalted butter, ½ stick – at room temperature
- 1 ½ teaspoons fresh rosemary, finely minced or ½ teaspoon dried rosemary
- 1 ½ teaspoons fresh thyme, finely minced or ½ teaspoon dried thyme
- ½ teaspoon fresh sage, finely minced or ¼ teaspoon dried sage
- 1 clove fresh garlic, finely minced or pressed
- ½ teaspoon lemon zest
- ½ teaspoon kosher salt
- ¼ teaspoon ground black pepper
For the turkey gravy:
- 2 tablespoons unsalted butter
- 4 tablespoons all-purpose flour
- 3 tablespoons drippings from roasting pan, fat separated * it can be a little bit more or less
- 3 cups chicken stock , or turkey or vegetable stock
- Salt and pepper to taste
Instructions
For The Turkey Breast:
- Preheat the oven to 450 degrees F/232 degrees C.
- Remove the turkey breast from the fridge 30 minutes or an hour before you are ready to roast it.
- Meanwhile, make the herbed butter by mixing together butter, rosemary, thyme, sage, garlic, lemon zest, salt and pepper in a bowl until well combined.
- Pat dry the turkey breast with paper towels on all sides.
- Using your fingers, gently separate the top skin from the meat, being careful not to tear the skin.
- Place three tablespoons of the softened herb butter underneath the skin on both sides.
- Spread the remaining herb butter on the top and sides of the turkey skin.
- Place one half of the lemon in the neck cavity rounded side up and secure the turkey skin with a toothpick*.
- Spread onions, carrots, celery, and garlic in an even layer in a large roasting pan or a casserole dish. Pour in the wine (or chicken stock.)
- Place the turkey breast on top of the vegetables. You may have to arrange the vegetables to “prop” the breast to stay upright.
- If using a temperature probe, place it in the thickest part of the breast, being careful not to touch the bone. If you hit the bone, pull back by approximately ½ inch. Set it to alarm at 155 F/ 68 C. (see notes if you do not have a thermometer probe).
- Place in the oven and immediately reduce the heat to 325 F/ 163 C.
- Roast for 1 ½ -2 hours or until the internal temperature reaches 155 F/ 68 C.
- Remove the turkey breast from the oven, place it on a cutting board, and lightly tent with foil. Do not remove the temperature probe if using it. Let it rest for 30 minutes. As it sits, it should reach 165 F/74 C with the help of the residual heat.
To Make The Turkey Gravy:
- Remove the vegetables from the roasting pan.
- Pour the pan drippings into a glass measuring cup. Set aside so that the fat can separate, for about 10-15 minutes. Skim the fat off and discard. You should end up with three tablespoons of drippings. If you have more, you can discard the rest.
- Place the roasting pan on top of the stove at medium-high heat. If you use an oven- and stove-safe roasting pan, you can use it to make the gravy. Otherwise, you can use a medium saucepan.
- Melt the butter and then sprinkle the flour. Cook, stirring constantly with a whisk, until the flour is lightly browned, about 6-8 minutes. Keep a close eye on it and adjust the heat accordingly to prevent burning.
- Add the drippings and stir, scraping up any “brown bits” from the bottom of the roasting pan.
- Add the stock and bring to a boil, then lower the heat to a simmer and cook, stirring frequently, for 10-15 minutes until thickened to your desired consistency.
- Taste the gravy and season with salt and pepper, if desired.
- You can serve it as it is or if you prefer a smooth and silky gravy, you can strain it. To do that, place a mesh strainer over your serving bowl. Pour the now-cooked gravy into the strainer, and use the back of a spoon or spatula to press “lumps.”
To Serve:
- Remove the temperature prope.
- Carve your turkey breast and transfer the slices onto a serving platter.
- Serve with gravy on the side.
Notes
- Yields: This recipe serves 6 people (¾ lbs turkey breast) per person comfortably. The nutritional values below are per serving and include the calories coming from the gravy as well.
- High and low temperature: We intentionally started with a high temperature to crisp up the skin and turned it down to a lower temperature to cook the breasts in a gentle heat. Also, because of the mild heat, we did not think that covering it with foil was necessary.
- Lemon hack: Placing a whole lemon in the cavity helps prevent the turkey skin in the neck area from sinking, but it is an optional step.
- Check doneness: A meat thermometer is the best tool for the most accurate results when cooking turkey. If you don’t have a probe thermometer, we recommend using a digital thermometer and following the time and temperature guide provided in the blog post above. Based on the weight of your turkey breast, it’s best to check doneness closer to the end of the cooking time.
- Residual heat: We intentionally cooked the turkey to 155 degrees F, as the residual heat continued to cook it during the resting process. During our recipe testing, it took about 20 minutes of resting time for the roasted turkey breast to reach 165 degrees F.
- Storage & serving leftovers: Leftover turkey breast and gravy can be refrigerated in airtight containers for up to 3 days. A foolproof method to reheat turkey is to slice the meat and place it in a pan or skillet. Add chicken or turkey broth, cover, and simmer over medium-low heat for 5-8 minutes. While the turkey breast is reheating, you can warm the leftover gravy in a small saucepan.
- Quantity of the gravy: The quantity will depend on the pan you use. When we used the roasting pan, there was a lot of evaporation because of the wide opening, resulting in 1 ½ cups of gravy. If you use a medium saucepan, you should end up with approximately 2 cups of sauce.
Nutrition
Nutrition information is automatically calculated, so should only be used as an approximation.


I had never cooked a turkey before so I was kinda nervous. I just followed your directions the best I could and honestly it turned out way better than I expected. I even made the gravy and that actually worked too. Thanks for explaining everything in a way that made it feel doable for someone like me who’s never tried it before.
This makes me so happy to hear. Thanks for coming by and taking the time to leave a review Nesli.
Great flavor and so easy to make. Will definitely be on my table this Thanksgiving! Thank you!
Thank you Monica! I am so happy to hear that you liked it.