
I still remember the first time I walked into a CAVA. I felt like someone had stolen my idea. While I’ve never had dreams of opening a restaurant, if I were to start one, it would look a lot like what the folks at CAVA are doing. Bowls made with real-deal Mediterranean ingredients, full of the things I grew up eating.
So, you can imagine my surprise when I saw their menu filled with all the things I love. It felt familiar in the best way. And since I’m not in the restaurant business, the next best thing was to bring it home and create my own homemade CAVA bowl.
This copycat CAVA bowl is now a regular in our meal prep rotation. I’m showing you exactly how I make it at home and how you can adapt it based on what you have on hand. Whether you make everything from scratch or pick up a few shortcuts from the store, it’s still going to taste fresh, delicious, and satisfying.
And the best part? You’ll have enough for several meals, all for less than the price of dinner for two at CAVA.
What is a CAVA bowl?
CAVA is a restaurant chain that features Mediterranean meals mainly served in bowls. Some people call it “the Mediterranean version of Chipotle”. A CAVA bowl is made by assembling various ingredients, starting with a base like grains or greens, adding protein, and finishing with a variety of toppings and dressings.
As someone who grew up in Turkey and now shares Mediterranean recipes for a living, I instantly recognized the ingredients and format as something I’ve known all my life. This kind of meal, which is built around grains, greens, legumes, vegetables, and sauces, is how we naturally eat back home. It’s balanced, colorful, and meant to be customized.
Customers can mix and match the ingredients to their liking or choose from various premade bowls on the restaurant’s menu.
CAVA Bowl Ingredients
If you’ve ever been to CAVA, you know you can either choose one of the bowls featured on their menu or create your own by selecting ingredients from four categories: the base, protein, toppings, and dressing.
As you can imagine, with so many options, the combinations are endless. I made sure to include a full list of ingredients in the recipe card below.
In this section, I am sharing my ingredient notes from testing the recipe in my kitchen to make my version of the copycat CAVA bowl recipe. This way, you can make it your own and customize it with whatever you have on hand.
The Base:
You can combine rice and salad greens or choose one as the base of your bowl. I prefer to use both because I like the variety.
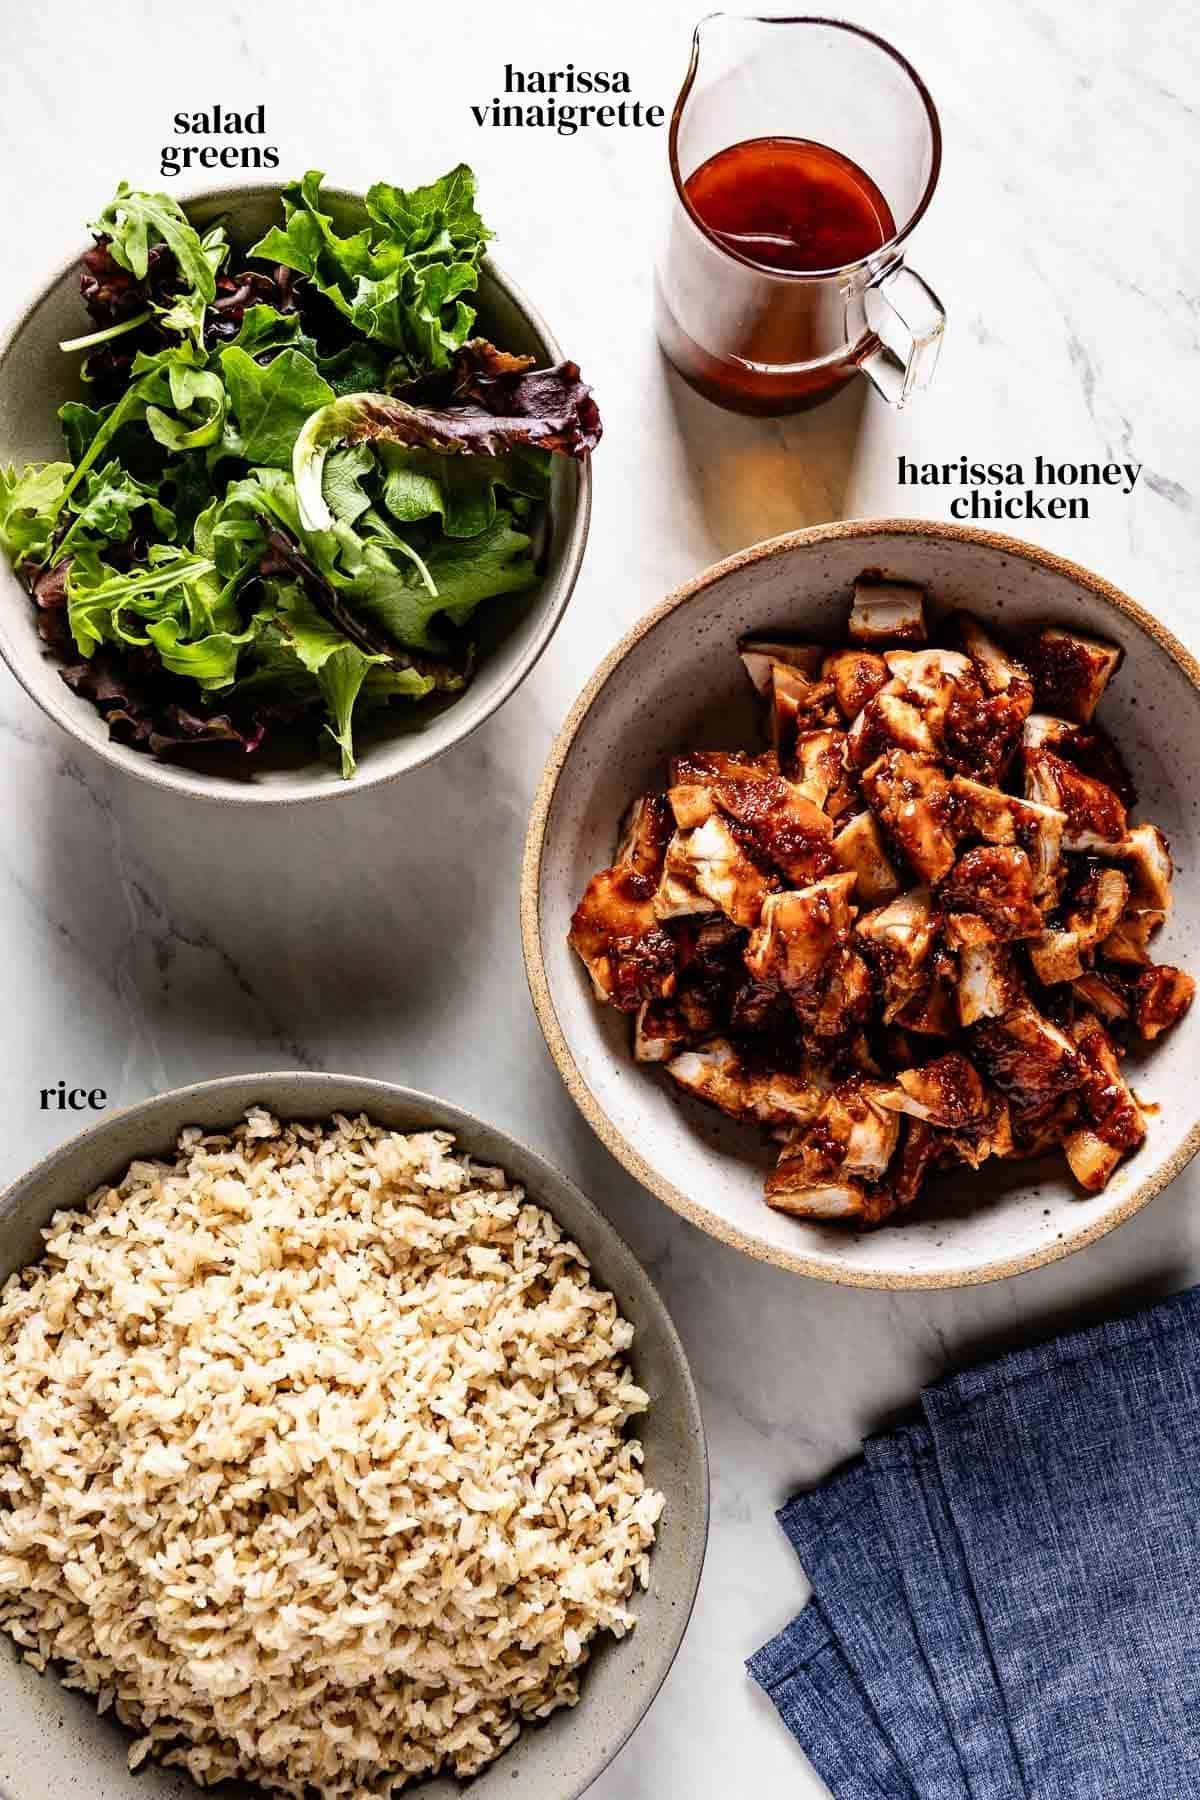
Brown Rice: In classic CAVA fashion, I use brown rice for my copycat recipe. I love the nutty flavors of brown Jasmine rice, which you can cook on the stove or in a pressure cooker. However, brown basmati rice would also work.
I know that this is a pretty controversial subject to many, but I prefer rinsing my rice until it runs clear before cooking. Still, feel free to cook in any way you like.
You can cook the rice in water or use chicken stock or vegetable broth to make it even more flavorful.
Salad greens: Use spring mix, chopped romaine lettuce, or baby spinach. Or, if you want to follow in the footsteps of CAVA, mix them all up and make your own “SuperGreens” mix.
The Protein:
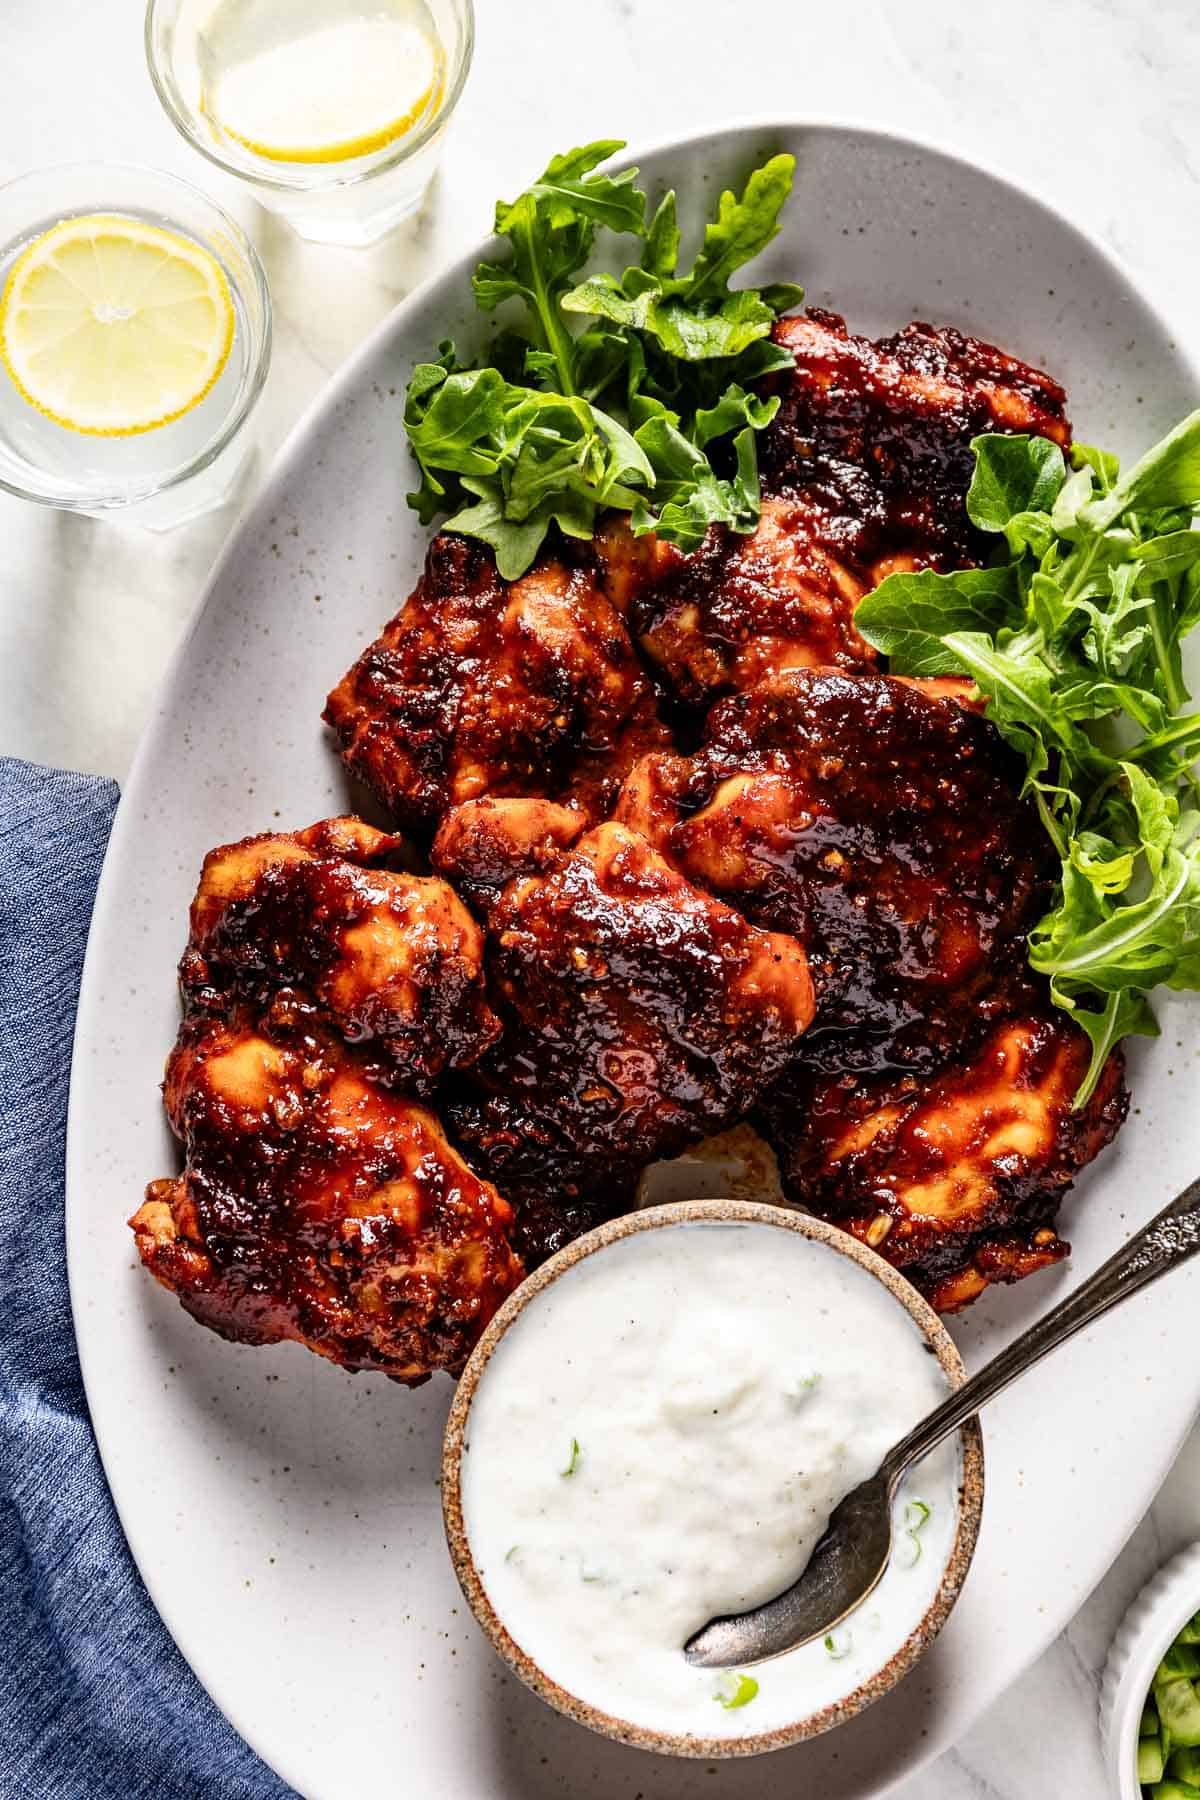
I chose their fan favorite, Honey Harissa Chicken, for the protein in my CAVA copycat bowl recipe. You’ll need:
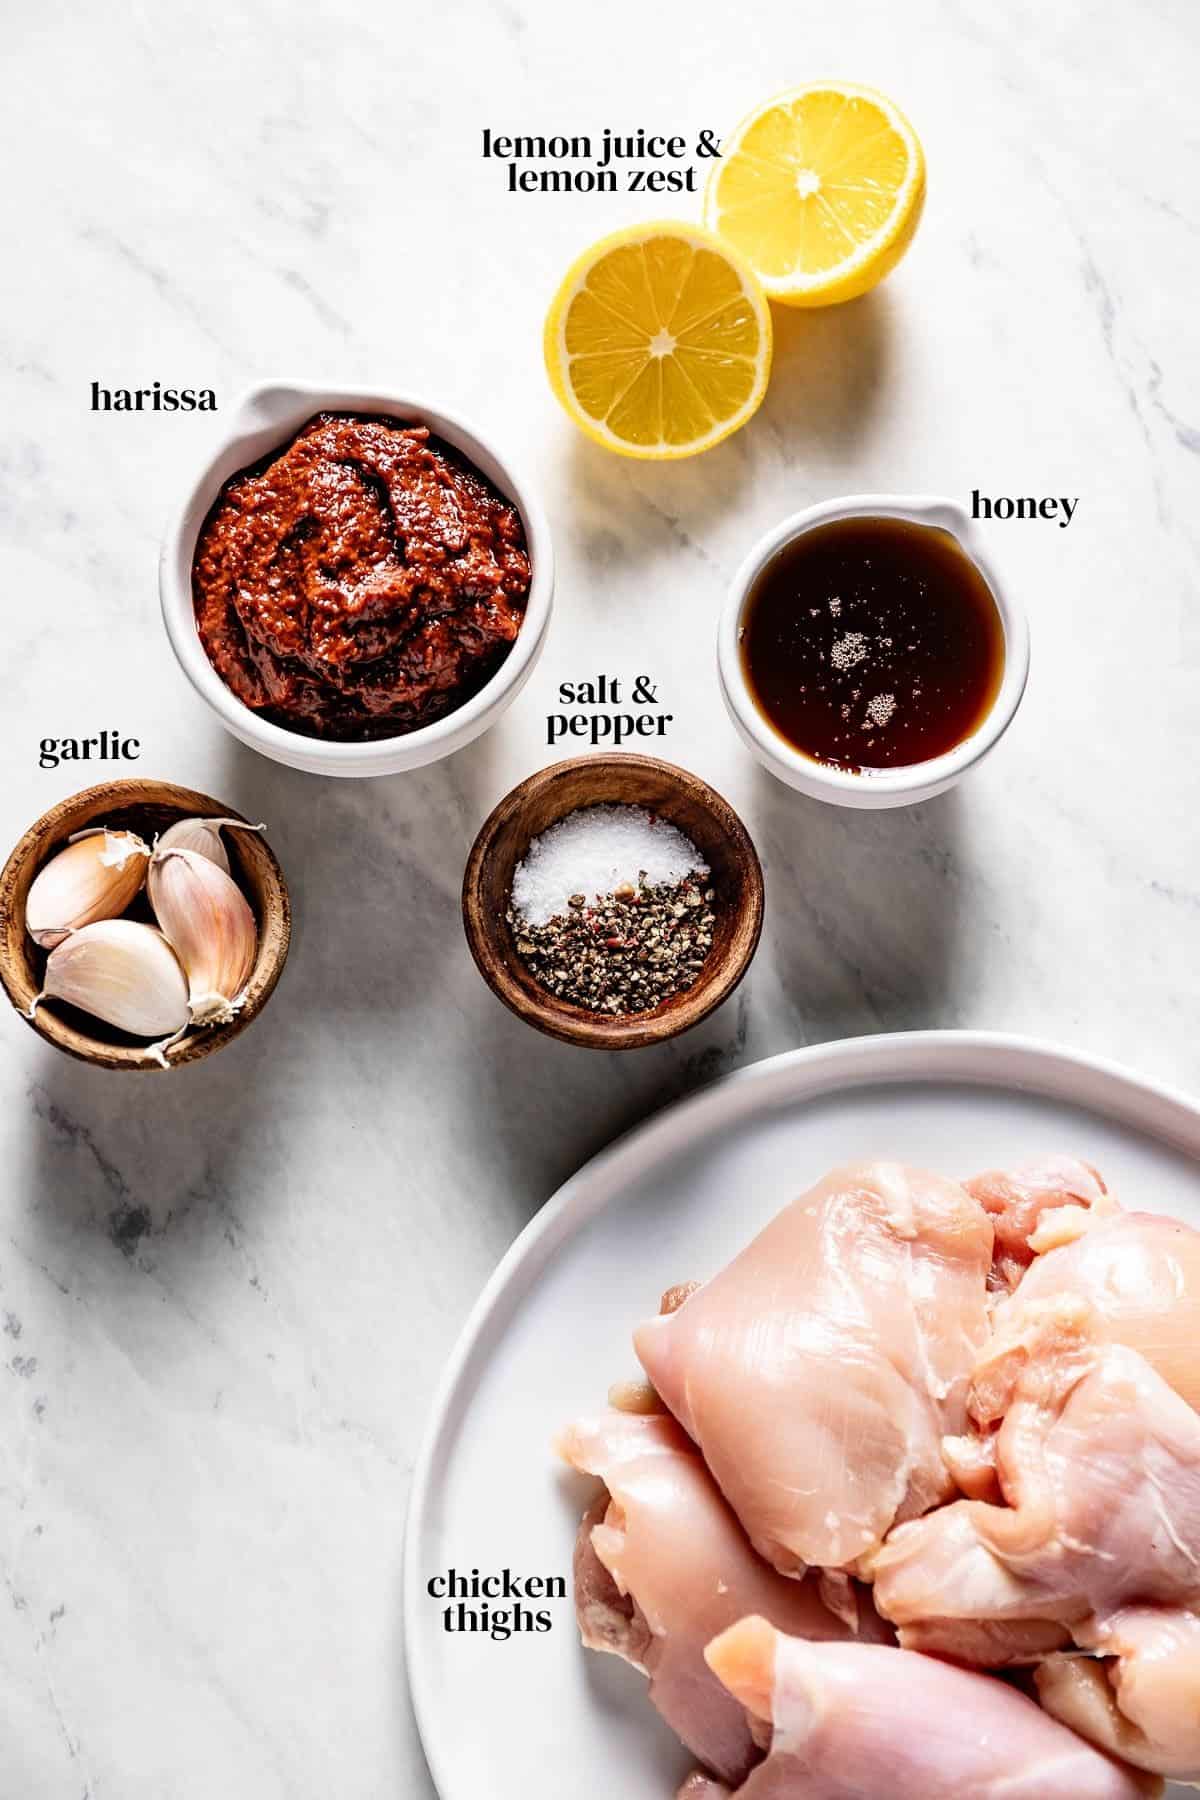
Chicken thighs or breasts: Using thighs or breasts is a personal choice here. I usually go for skinless, boneless chicken thighs for extra juiciness, but for a leaner option, chicken breasts would also work.
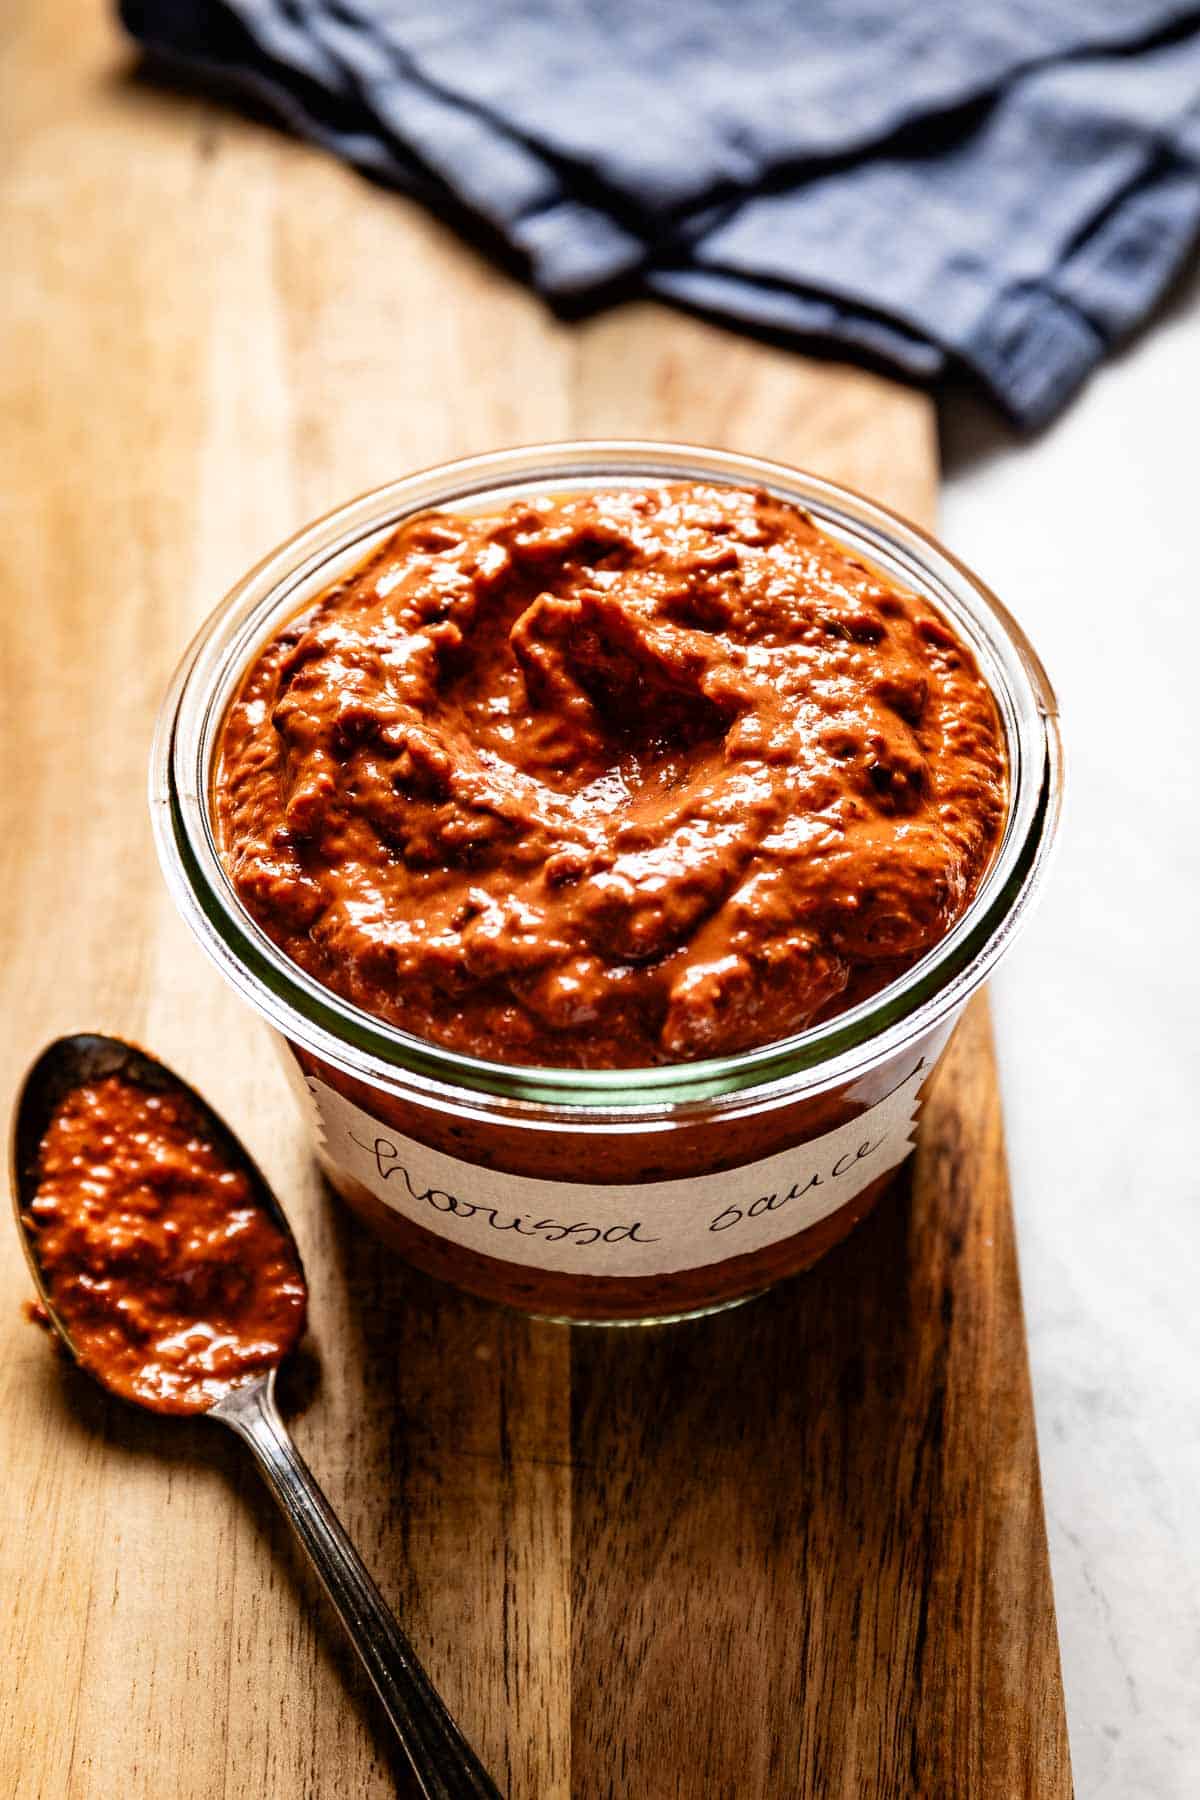
Harissa paste: This bold and spicy North African condiment is the star of this CAVA harissa chicken bowls recipe, providing its signature smoky heat and bold flavors. You can make harissa from scratch, use a shortcut by making it with harissa powder, or simply buy it from the store. Trader Joe’s and Mina (affiliate link) are two nationwide brands that I recommend.
Fresh Garlic: I prefer fresh garlic for its rich flavors, but you can use garlic powder in a pinch. In my recipe testing, fresh garlic gave the marinade a deeper, more authentic Mediterranean taste that reminded me of meals I grew up with in Turkey.
Lemon juice: A small amount of freshly squeezed lemon juice adds a bright, tangy note to balance the spiciness of the harissa. In a pinch, you can use bottled juice, but the flavors coming from freshly squeezed juice are more vibrant.
Honey: Adding honey does not make the recipe sweeter. Instead, it helps balance the heat coming from harissa and adds a unique layer of flavor. I tested this recipe with and without honey, and even a small amount made the chicken taste more well-rounded.
The Toppings:
You can add as many toppings as you like! These toppings remind me of the way we eat in the Mediterranean, where every meal is built around small bites of vegetables, sauces, and spreads. It’s about variety as much as it is about taste.
Below are the ones I used in my CAVA bowl at home, but feel free to customize with as many or as few as you’d prefer.
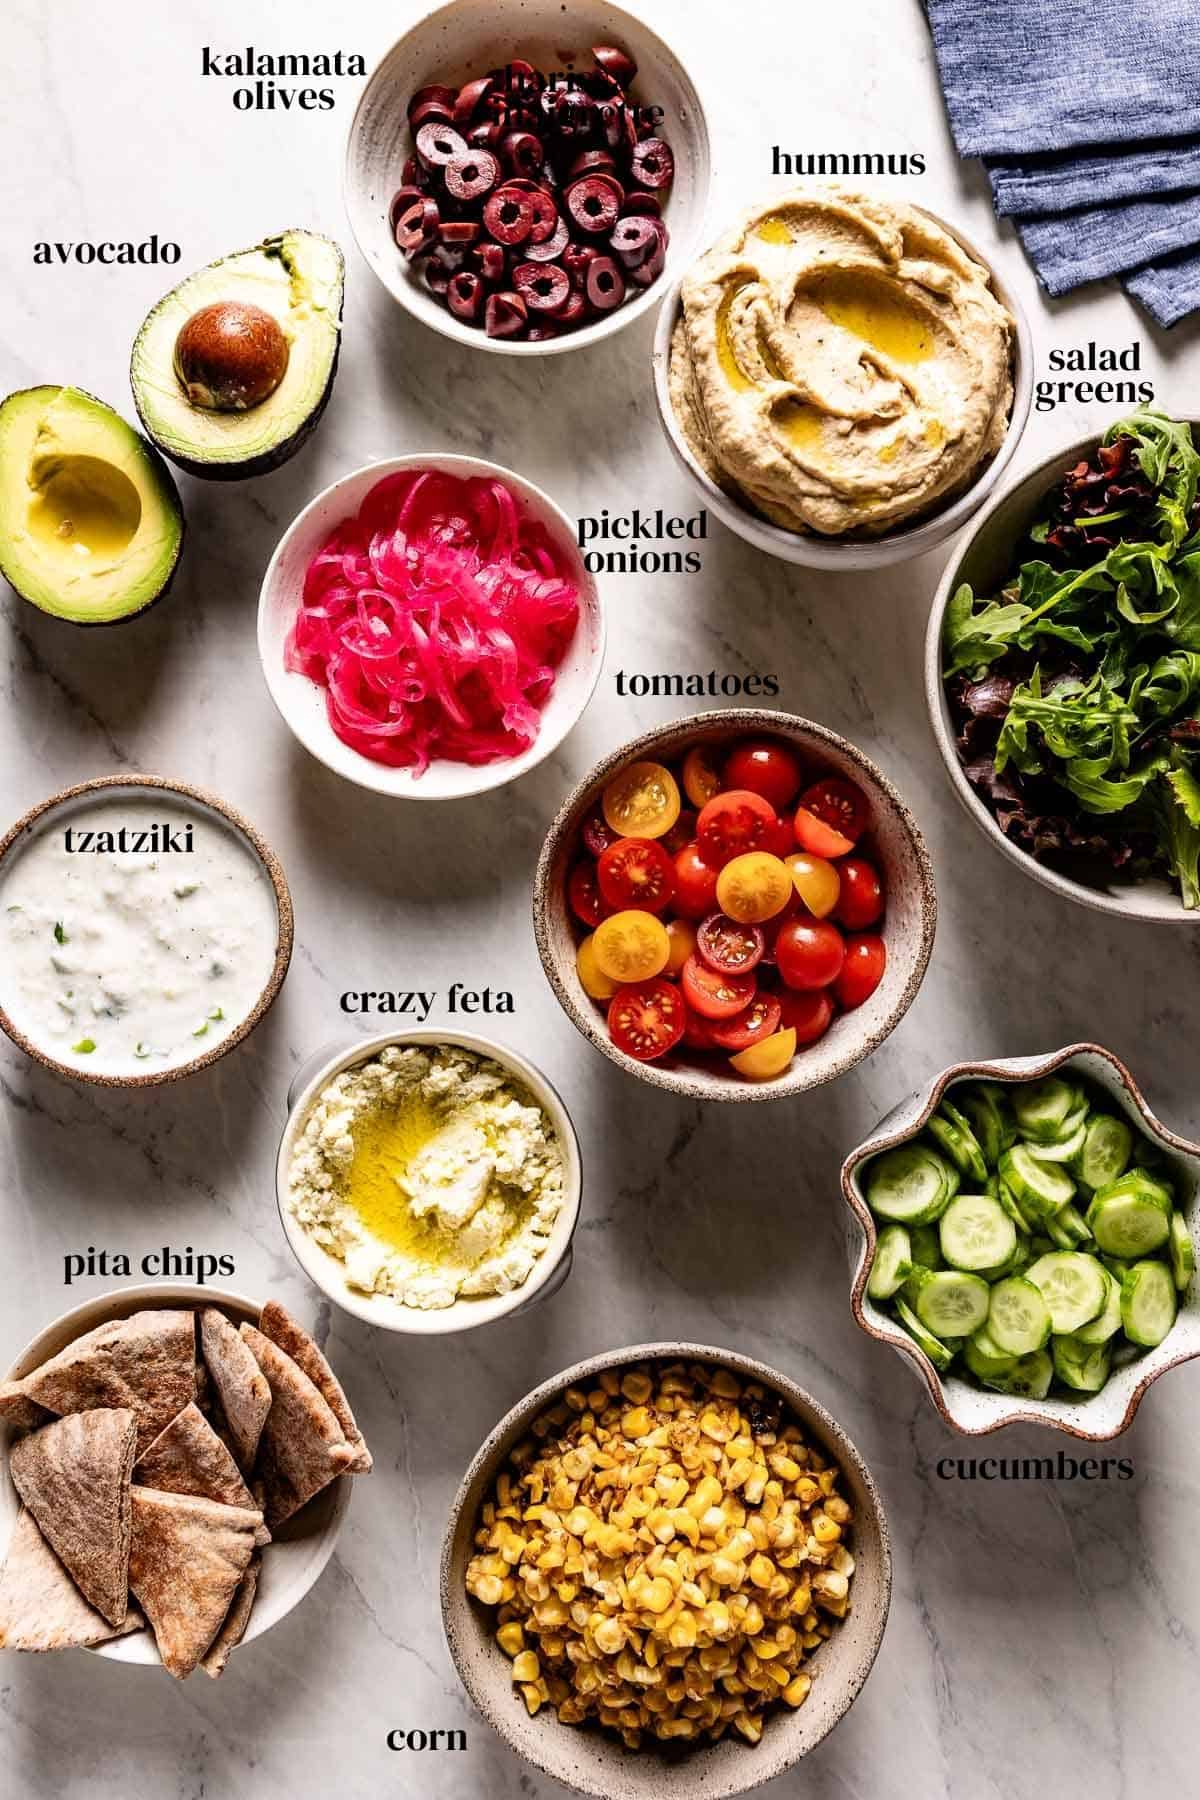
- Tzatziki sauce
- Hummus
- Pickled red onions, Sumac Onions, or my Mexican pickled onions
- Crazy Feta or crumbled feta cheese
- Greek cucumber tomato salad, Turkish Ezme, Shepherd Salad, or sliced grape tomatoes and cucumbers
- Roasted or grilled corn
- Pita bread or homemade pita chips or Lavash
- Pitted and chopped Kalamata olives
- Schug sauce (the Middle Eastern spicy green pepper and herb sauce)
The Dressing Ingredients:
While CAVA offers several different dressing options, I always choose their hot harissa vinaigrette because it is truly delicious. Growing up with Mediterranean food, I learned that a good dressing can tie an entire meal together, and this one is no exception.
You can adjust the spiciness based on your taste buds. You’ll need:
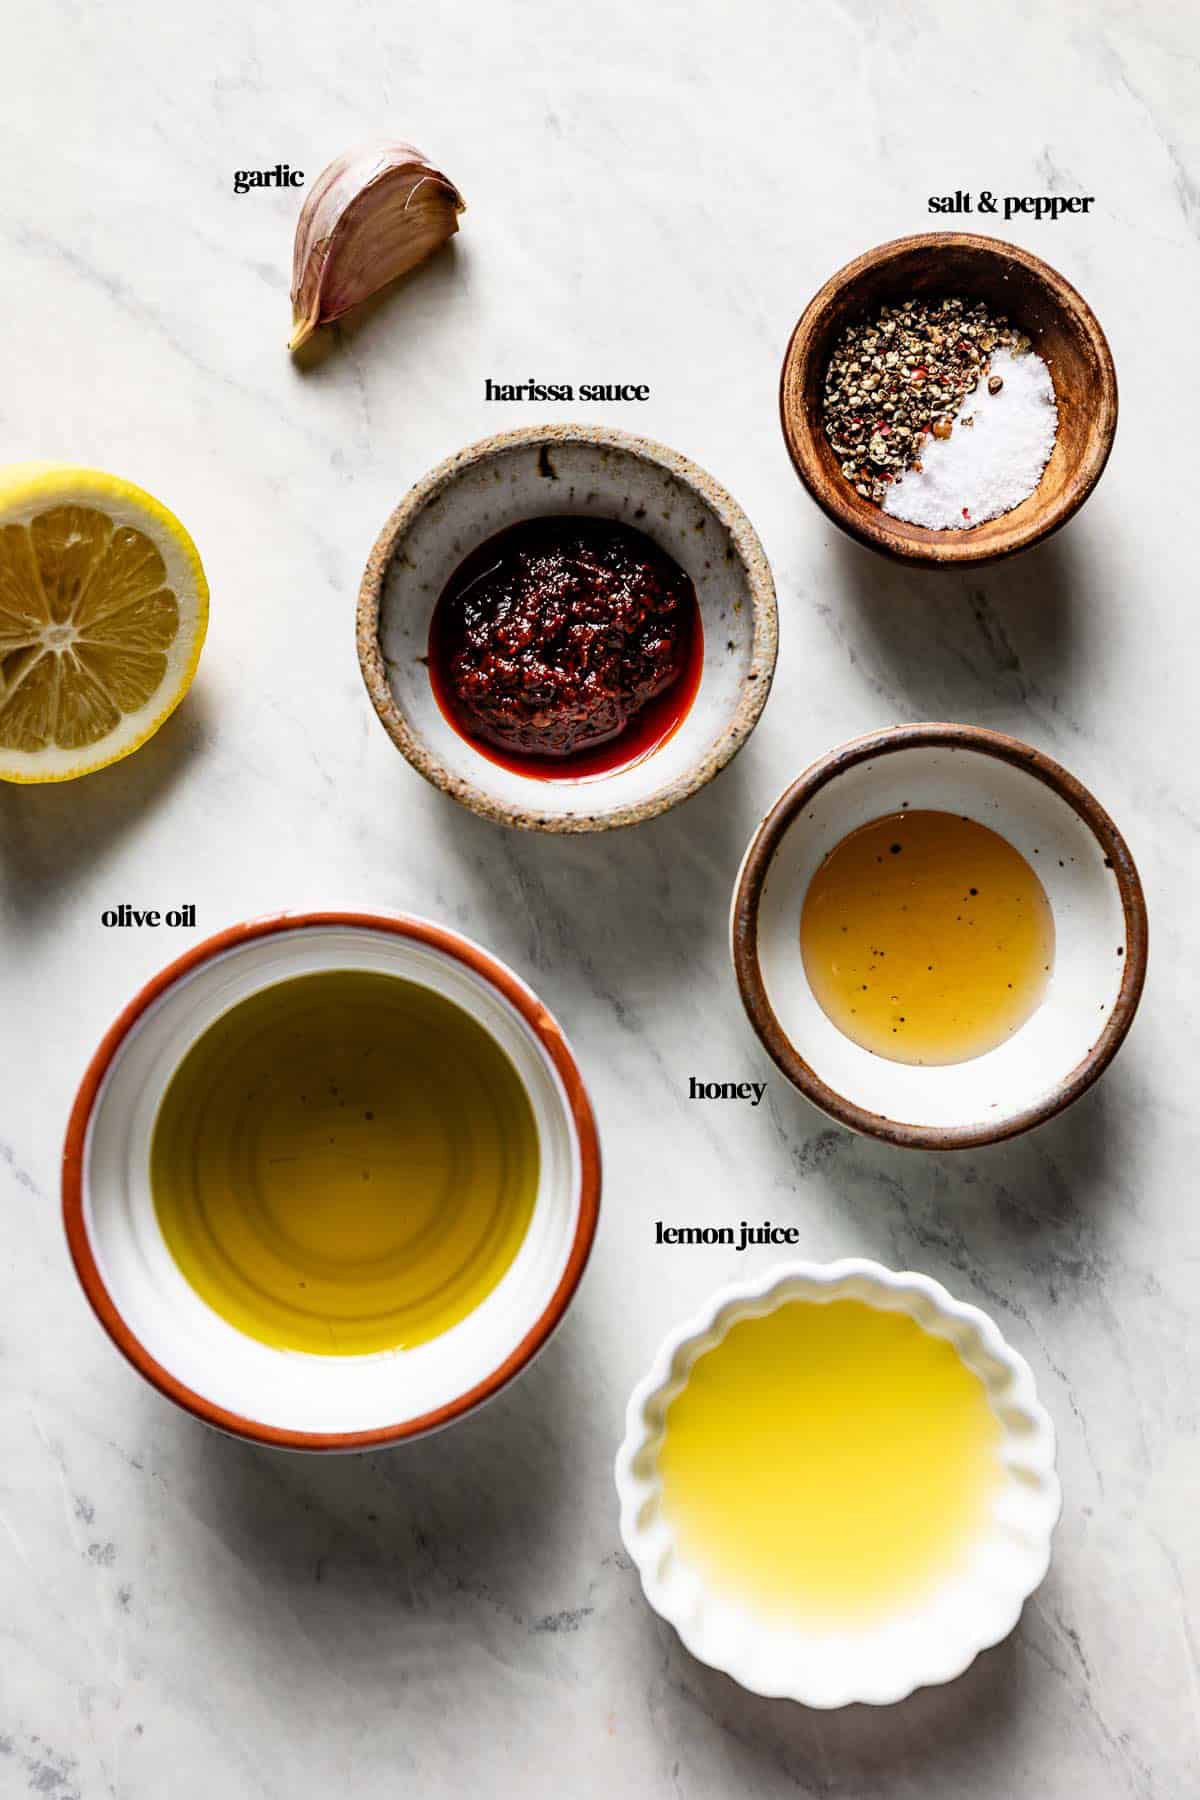
- Extra virgin olive oil: A mild-flavored extra virgin olive oil works best here. I have been loving Garcia Del Cruise (affiliate link) for its smooth finish without any bitterness.
- Lemon juice: Freshly squeezed juice is the best here, as bottled juice will not deliver the fresh, tart flavors this dressing needs.
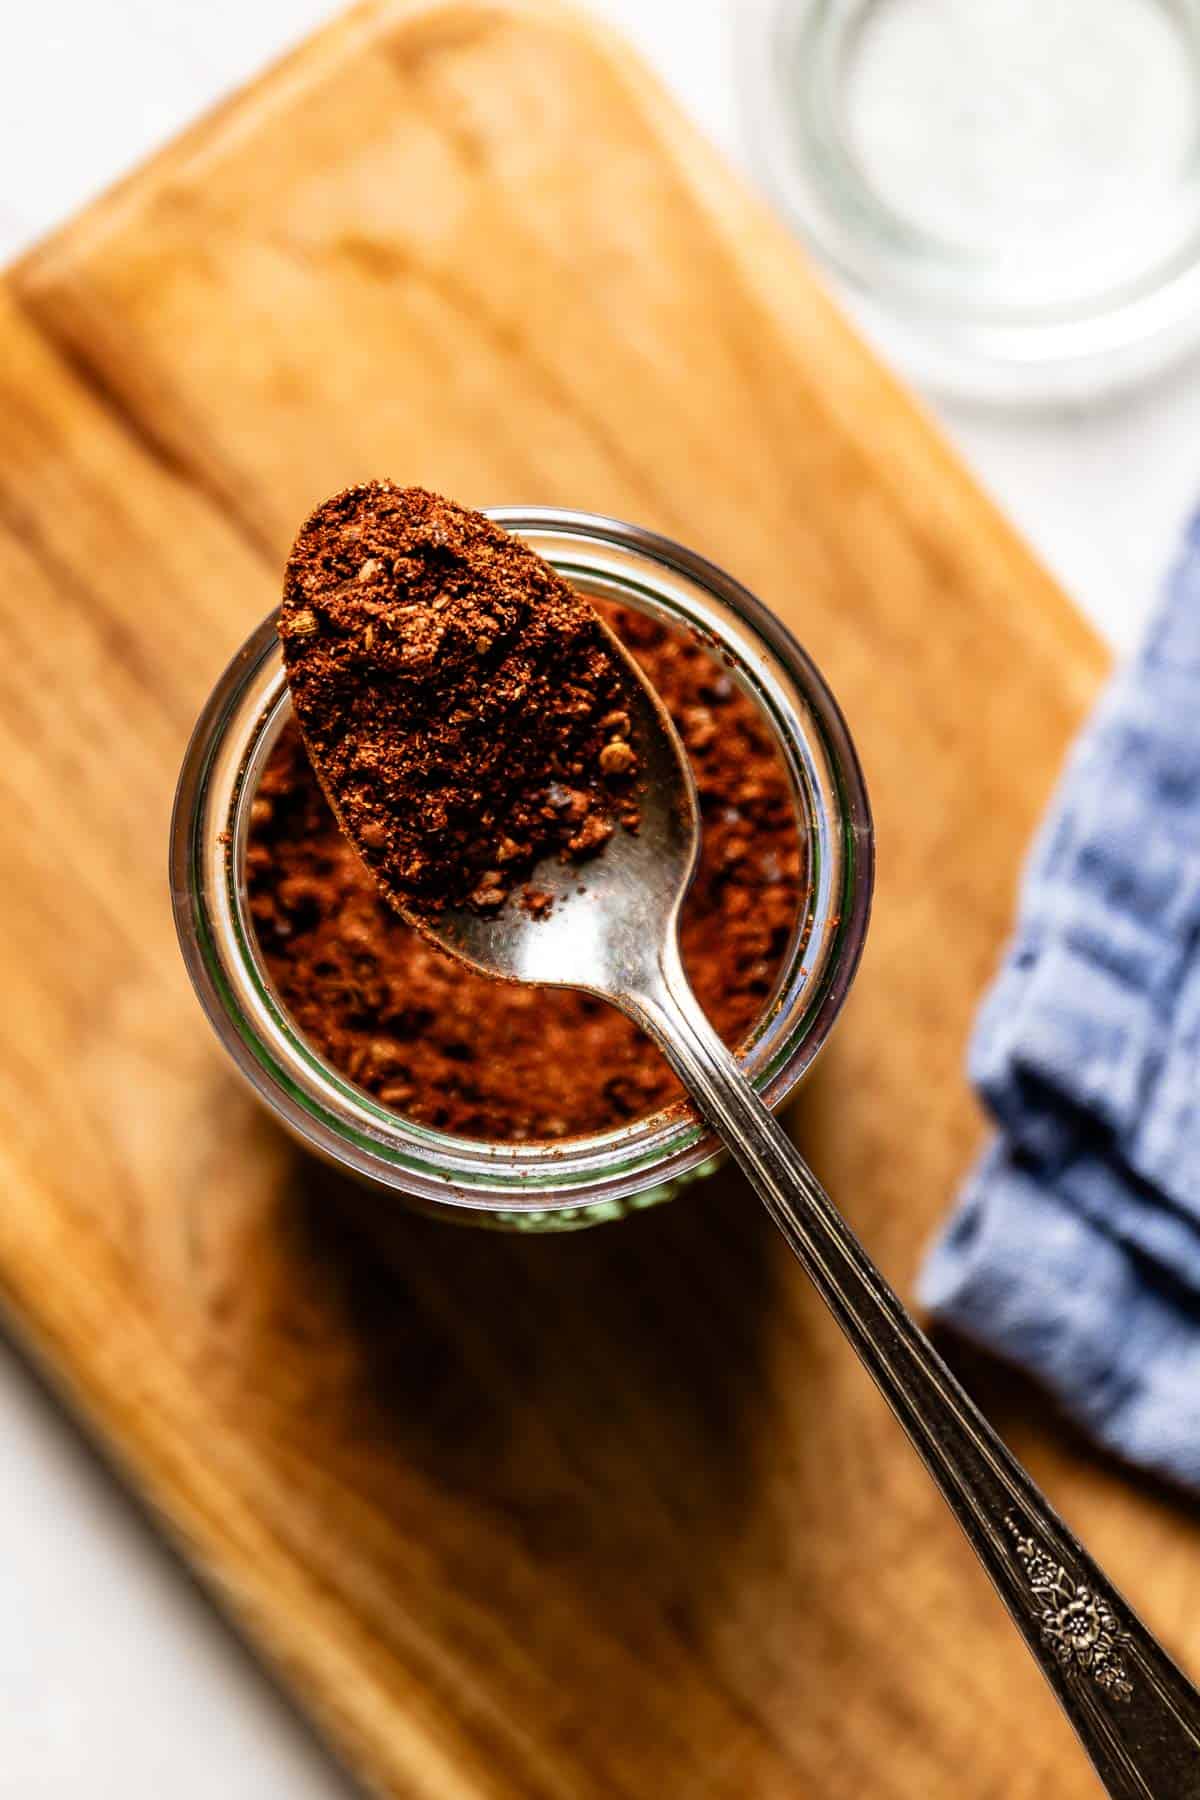
- Harissa powder: You can make your own harissa seasoning or buy it from the store. I recommend Whole Foods’ Harissa seasoning (affiliate link), which is mildly spicy and perfectly balanced.
- Honey or maple syrup: This helps balance the heat from the harissa. I tested both options, and while honey adds a subtle depth, maple syrup is a great vegan swap.
- Fresh garlic: I almost always use freshly minced garlic when I make my salad dressing, and this one is no exception. That being said, if you are after a milder garlic taste, feel free use garlic powder instead.
- Kosher salt and black pepper
How To Make CAVA Bowls At Home?
Making your own CAVA bowl at home is straightforward. I’ve tested this recipe many times, and the key is prepping the components ahead so assembly feels effortless. It usually comes down to four parts: prepping the chicken, cooking the rice, whipping up the dressing, and adding your favorite toppings.
Below is a step-by-step breakdown of how I do it:
To Make the Harissa Honey Chicken:
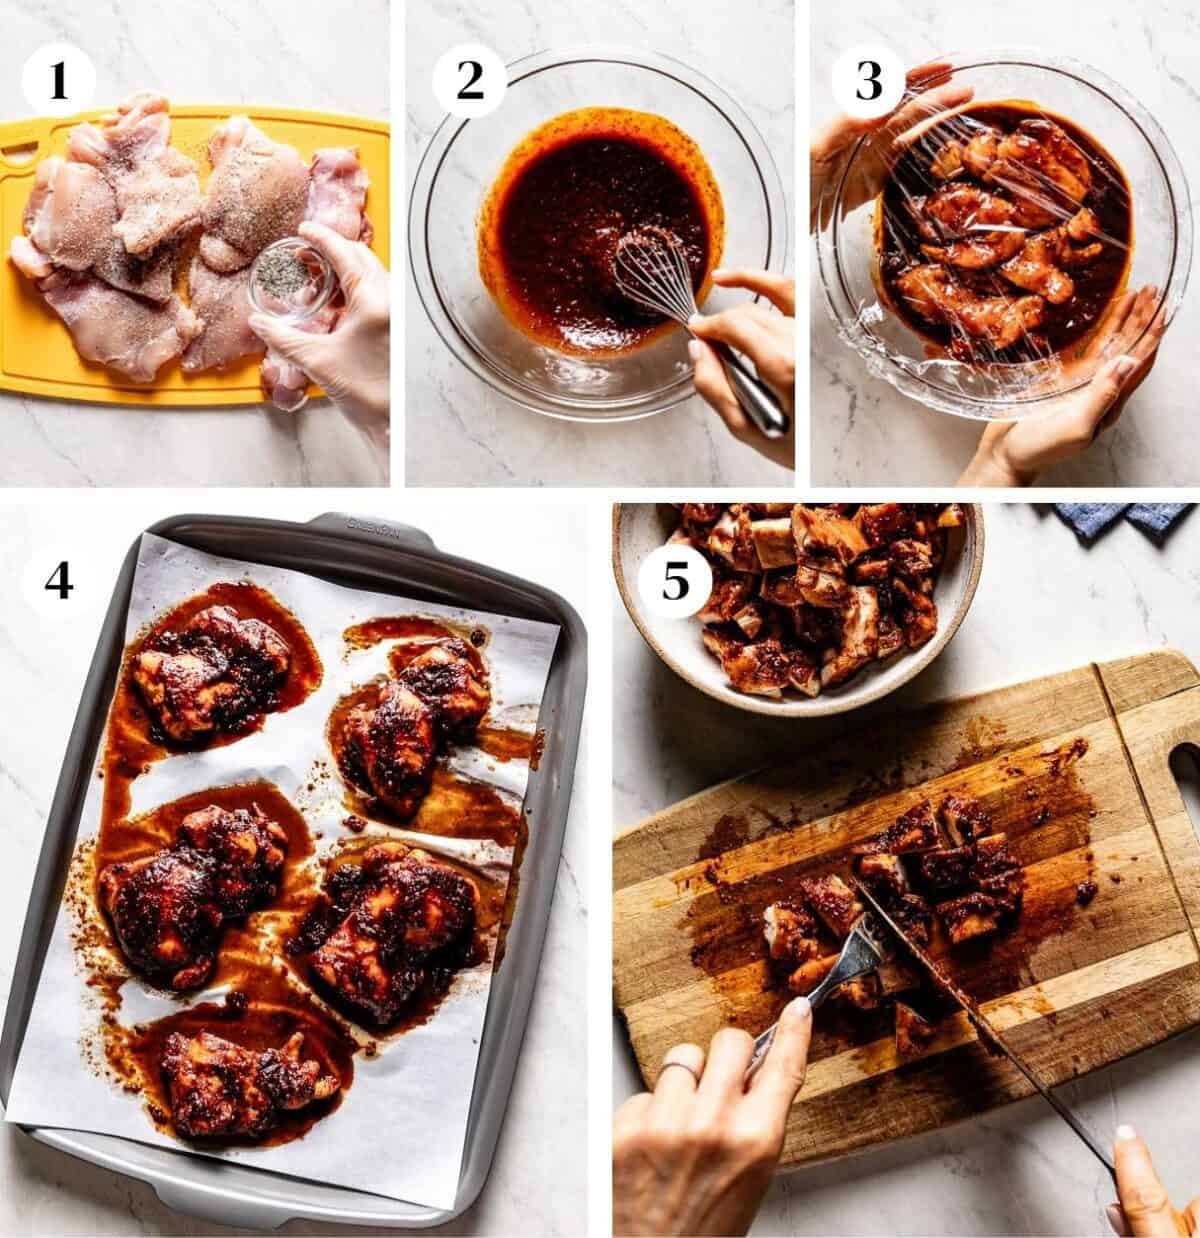
- Prep the chicken: Pat the chicken dry and season with salt and pepper. I like to season it beforehand so the chicken is properly seasoned before it is marinated. While the marinade will also “season” it, I find that salt and pepper first helps the flavor soak in more evenly and ensures the chicken is well seasoned all the way through once it’s cooked.
- Make the marinade: Into a large bowl (one that will accommodate all of the chicken) add harissa, minced garlic, lemon juice, and honey. Whisk until thoroughly combined.
- Marinate: Add the chicken and give it a big toss to ensure all of the chicken thighs are coated with the marinade. Cover with stretch film (or a lid) and refrigerate for at least 30 minutes to let the flavors soak in.
You can also use a sealable plastic bag, which makes cleanup easier. The key is making sure the chicken is fully coated in the harissa mixture. From testing this recipe multiple times, I’ve found that when the chicken is well covered, the marinade seeps into every nook and cranny, giving you the juiciest, most flavorful result. - Bake: Preheat your oven to 400°F and bake the marinated chicken for 13-15 minutes, or until it reaches an internal temperature of 165°F. Let it rest, then cut it into small pieces.
I always use a digital meat thermometer to check doneness, since oven temperatures can vary and this ensures the chicken is cooked safely without drying out. After baking, let the chicken rest for about 5 minutes so the juices redistribute. This small step makes a noticeable difference in keeping the chicken tender and juicy before cutting it into small pieces.
To Cook the Rice
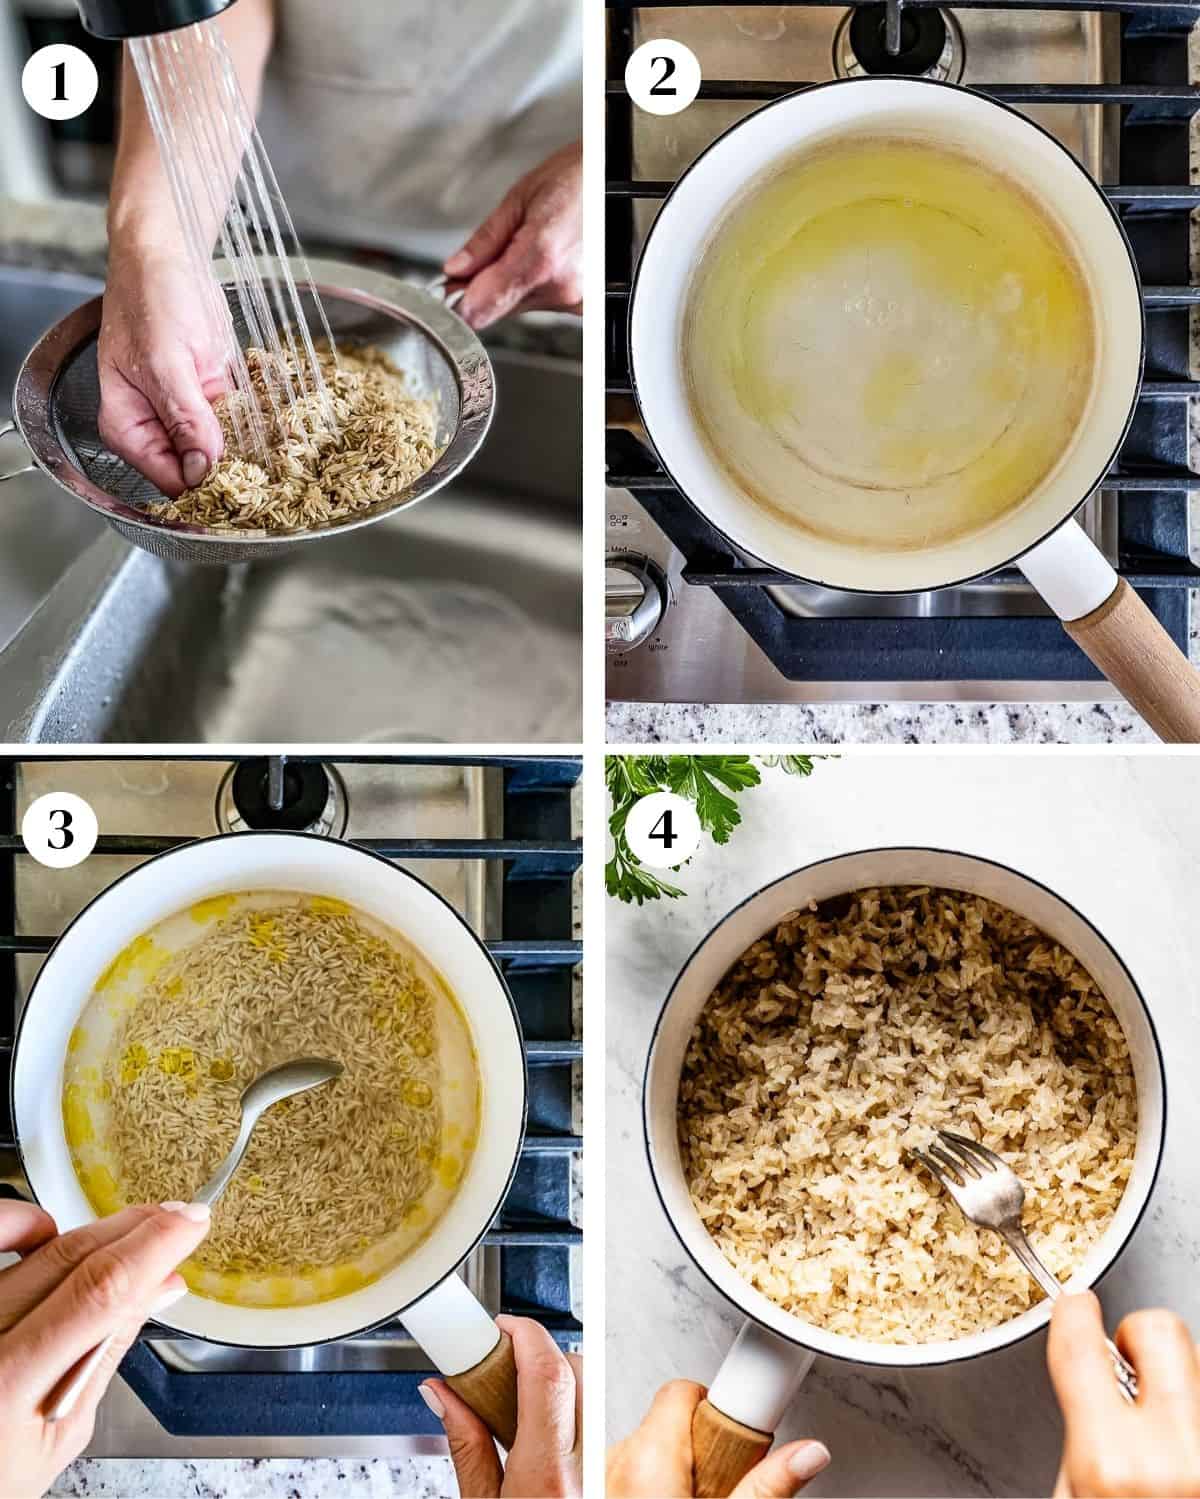
- Rinse: This is a personal preference, but I’d like to start with washing my rice.
- Boil the liquid: Over medium-high heat, bring water or stock, olive oil, and salt to a boil in a small saucepan.
- Simmer the rice: Add the rinsed rice, cover, and reduce the heat to low. Simmer for 30 minutes or until all the water is absorbed. Do your best not to open the lid too often to trap in all the moisture.
- Rest and fluff: After the liquid is absorbed, let the rice rest for 10 minutes, then fluff with a fork. Taste for seasoning and add more if necessary. Sprinkle with black pepper and garnish with parsley if preferred.
To Make the Dressing
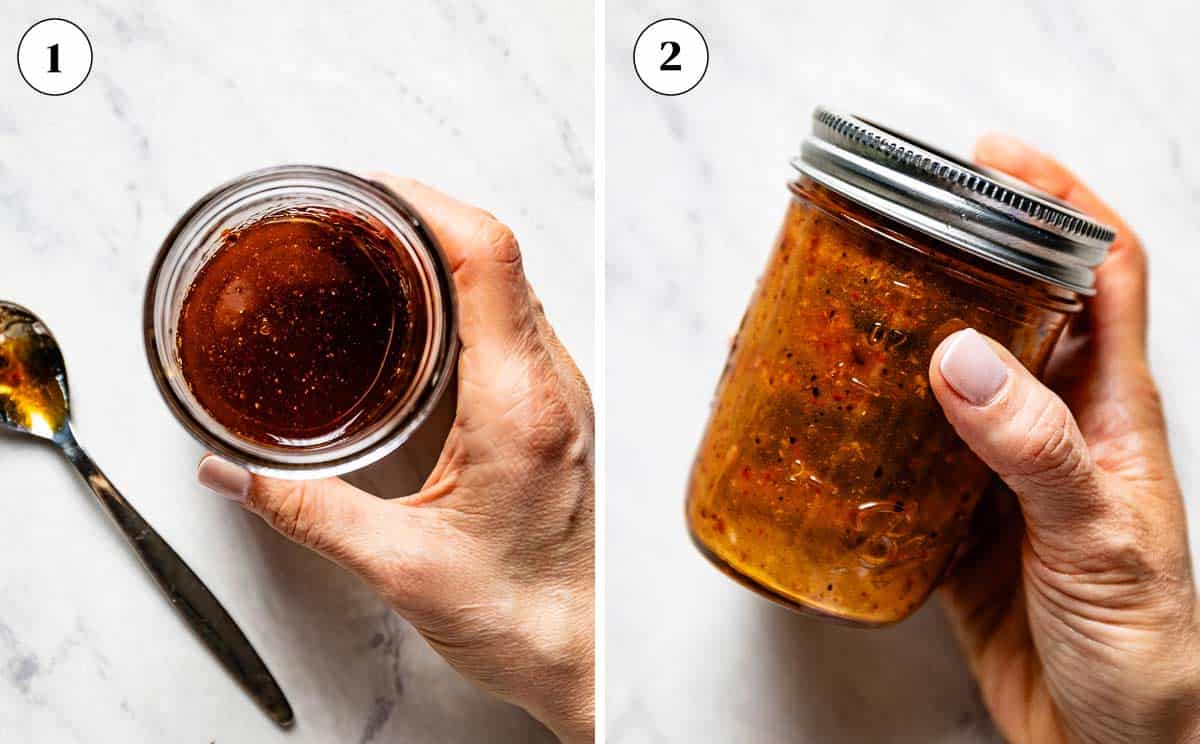
- Prep the ingredients: Add olive oil, lemon juice, harissa sauce, honey, garlic, salt, and black pepper in a mason jar. You can use a small bowl and a whisk as well, but I find that the mason jar is easier when it comes to making salad dressings.
- Shake: Put the lid on and shake until emulsified. If you are planning ahead, you can prep the dressing a few days in advance and keep it in the fridge.
To Assemble the Bowls
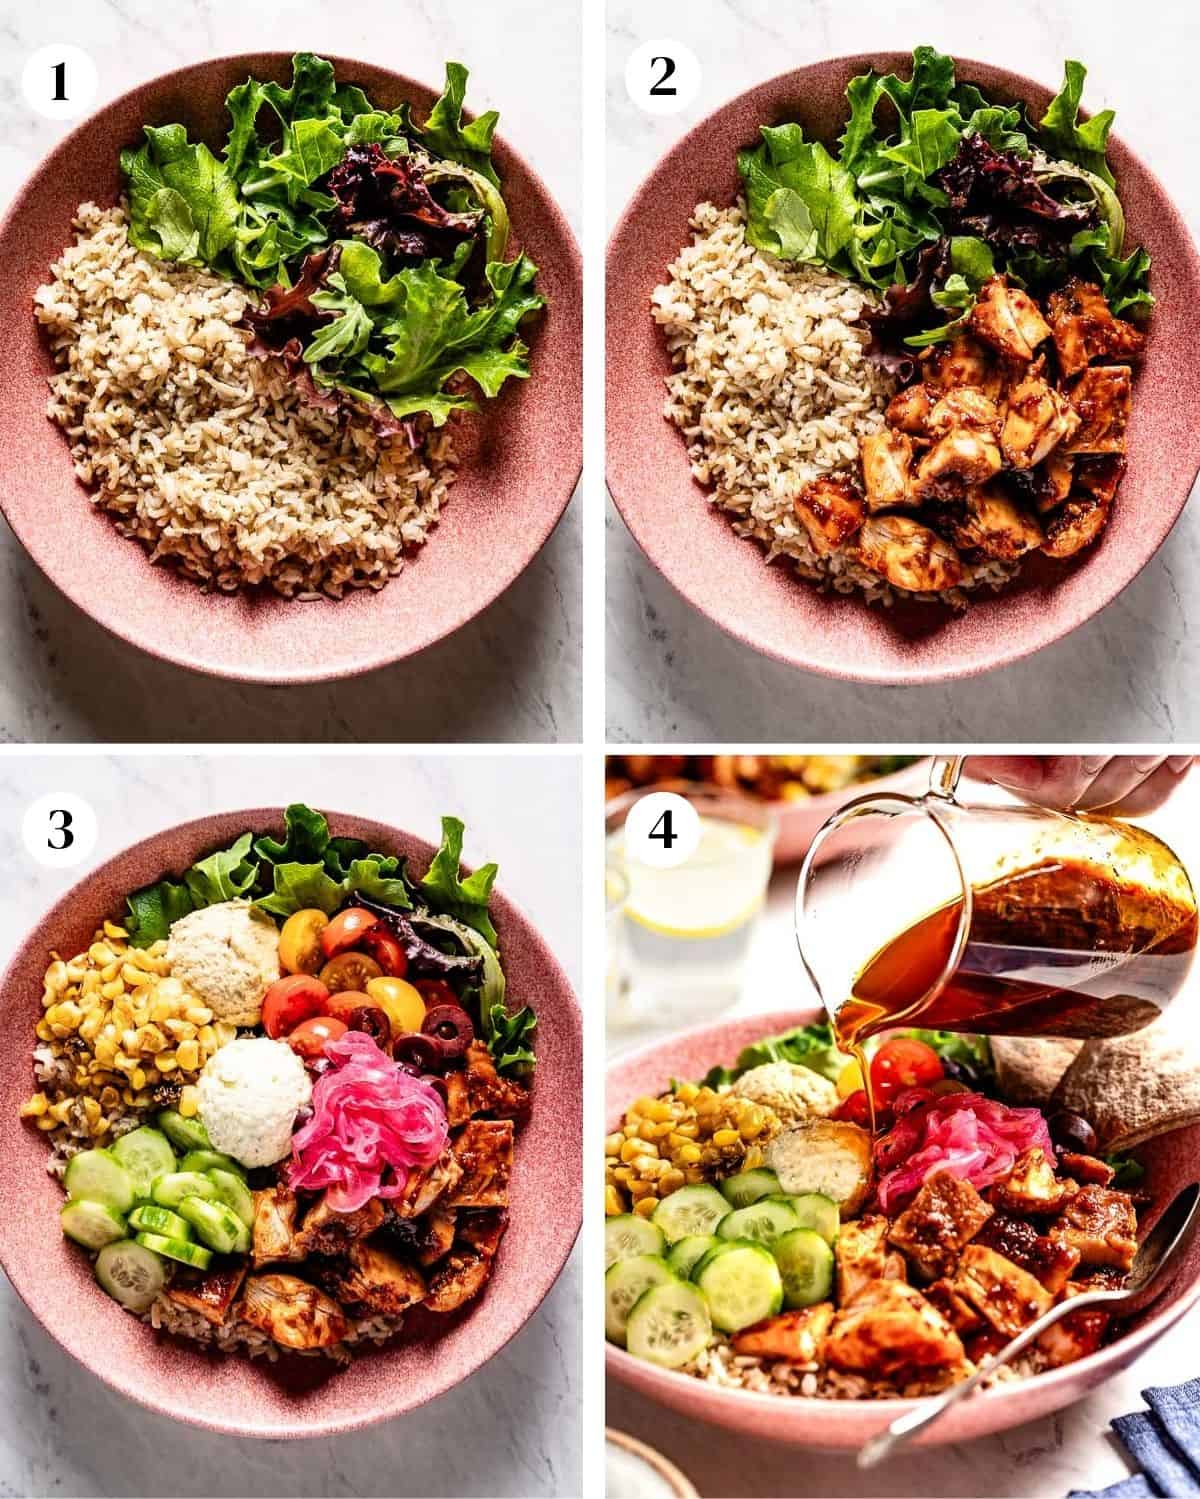
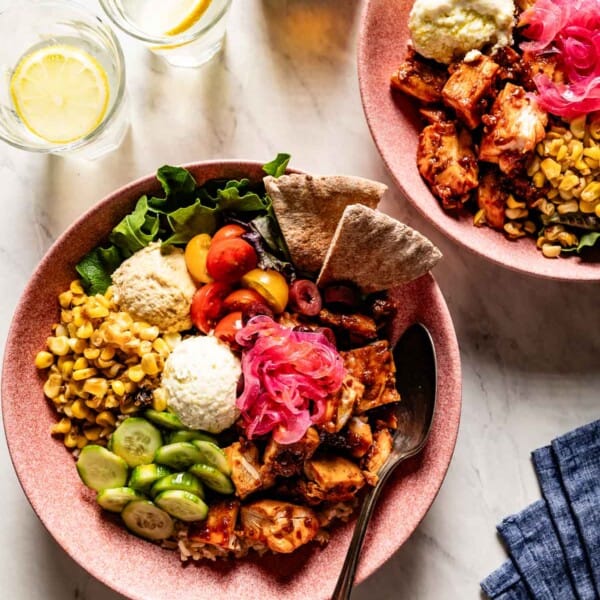
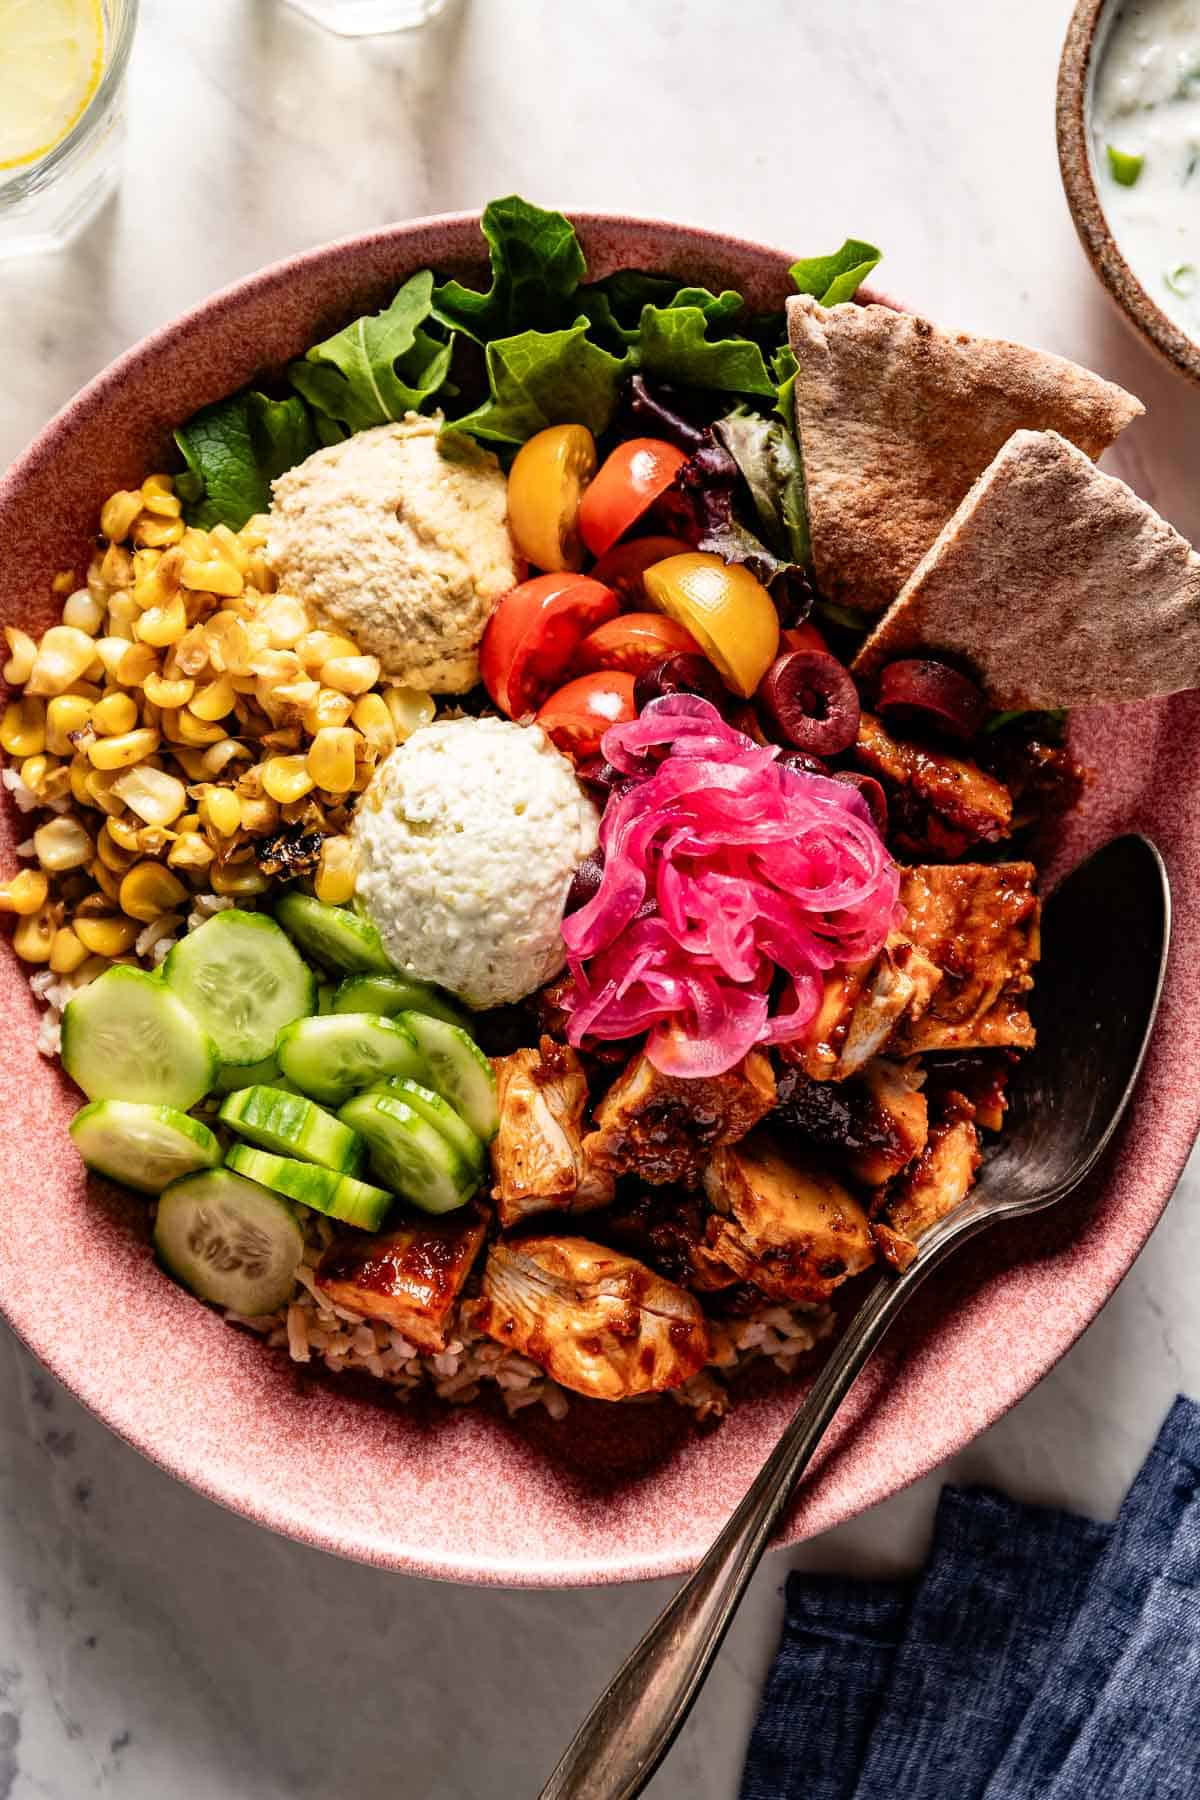
- Build your base: Place ½ cup brown rice and a handful of salad greens in a bowl. I like using both grains and greens for variety and balance, much like the traditional Mediterranean meals I grew up with, which were always built around multiple components to make them satisfying and well-rounded.
- Add the chicken: Pile on the cubed CAVA harissa chicken. I tested both bite-sized cubes and shredded chicken, and the cubes hold the marinade flavor better while keeping the texture juicy.
- Add the condiments: Using a spoon or a small cookie scoop – affiliate link (just like they do at CAVA), add a scoop of hummus, tzatziki, and Crazy feta. The scoop ensures a clean presentation and consistent portions, something I picked up after visiting CAVA multiple times and recreating the process at home. Then, continue adding chopped cucumbers, tomatoes, corn, and pickled onions for crunch and brightness.
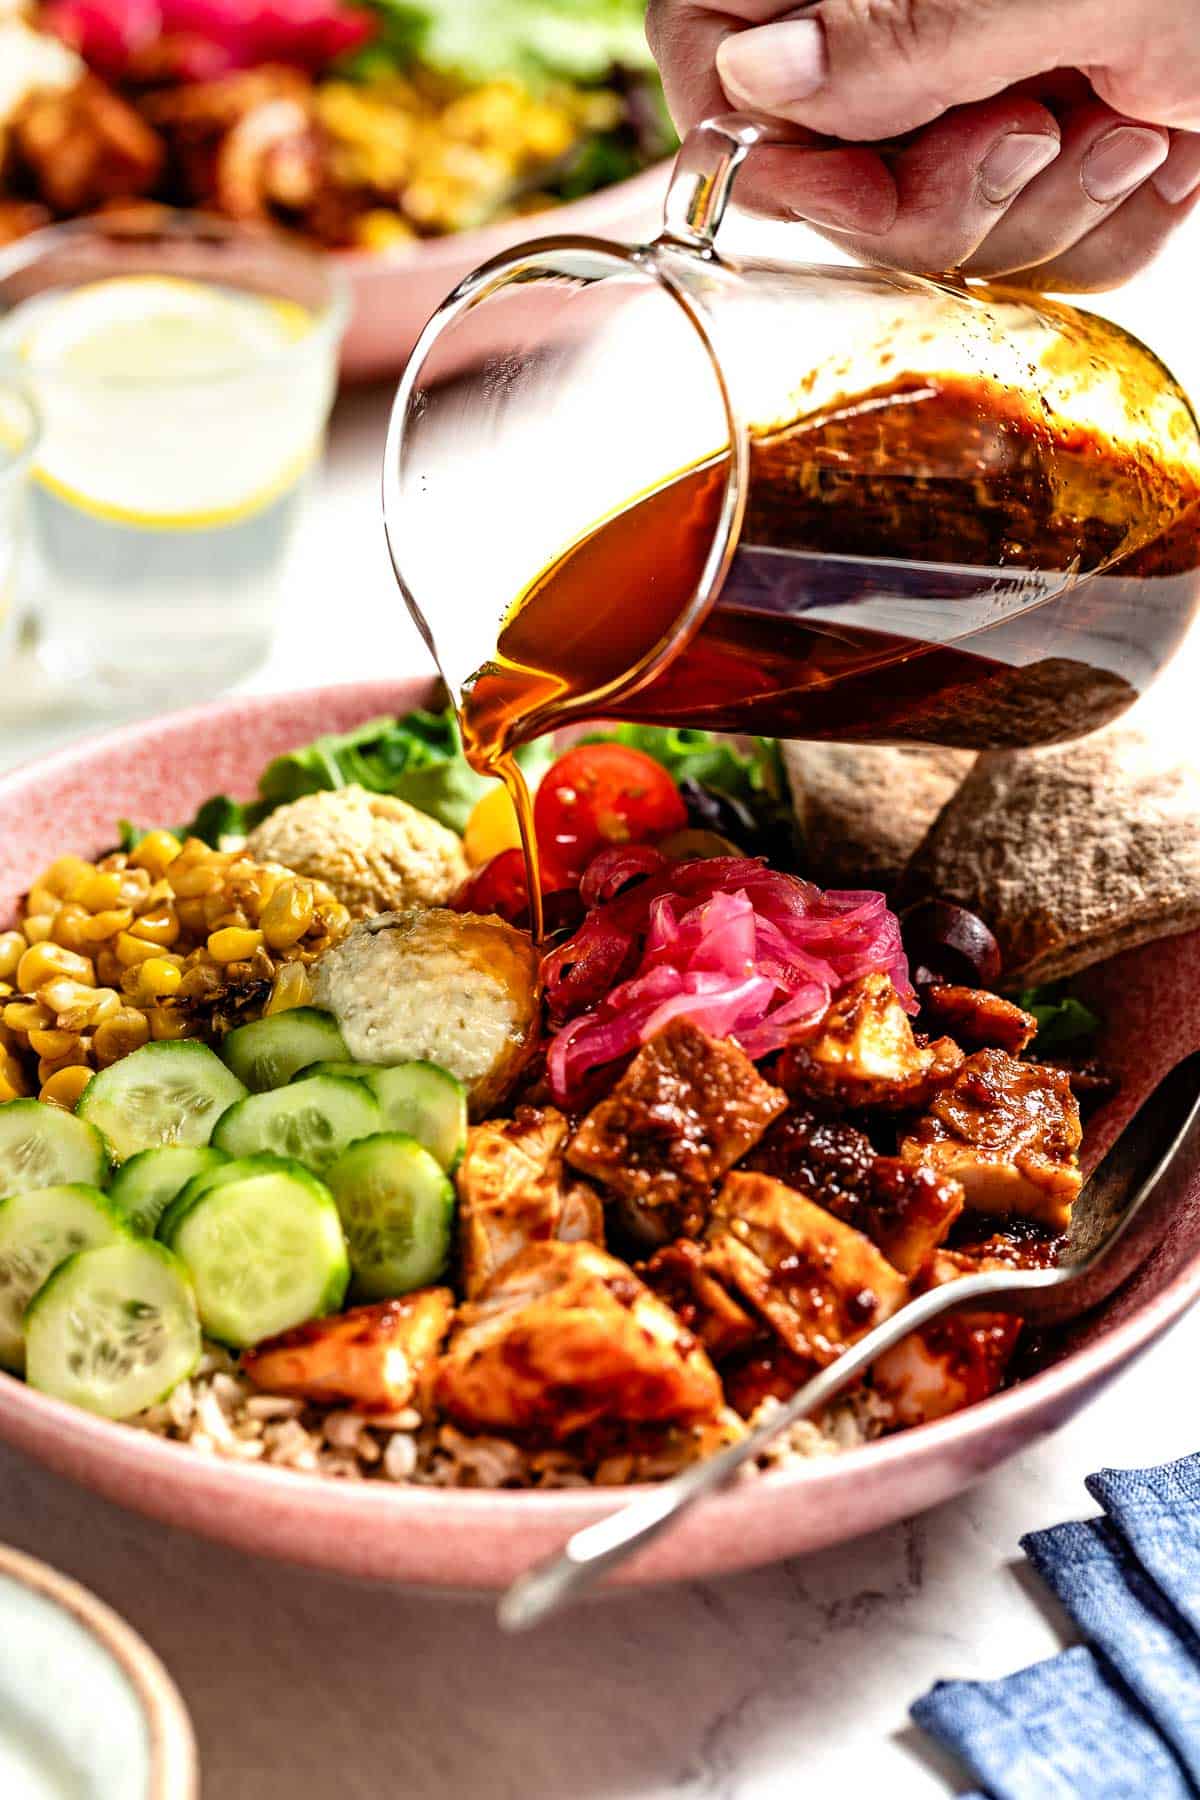
- Drizzle with vinaigrette: Finish with a light drizzle of harissa vinaigrette. I recommend starting with a smaller amount, tasting, and then adding more if needed. The heat can build, and this way, you can adjust to your preference.
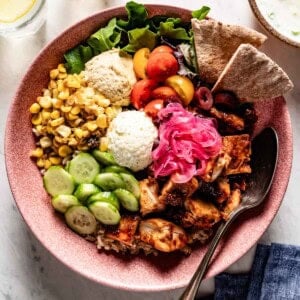
- Serve: Treat yourself to a delicious Mediterranean-inspired meal. Oh and if you have the time, be sure to make a batch of my copycat recipe for CAVA’s Cucumber Mint Lime drink. I promise you there is no better pairing than these two.
How To Make Ahead and Store Leftovers?
The best way to make a CAVA bowl at home is to prepare some components in advance, saving time and making it an excellent meal-prep option. This way, the bowls can be assembled in minutes once the chicken is cooked. The good news is the leftovers store well, too. Here’s how I do it:
- To Make ahead:
- Marinade the chicken and store it in the fridge a day before.
- Cook the rice ahead of time and refrigerate it for up to 3 days. To keep it from drying out when reheating, I like to sprinkle a little water over it before microwaving or gently reheating on the stovetop.
- The CAVA harissa vinaigrette can be made up to a week in advance and stored in the fridge. Give it a good shake before using it.
- Prep all the toppings (cucumbers, tomatoes, salad greens, hummus, tzatziki, etc.) and place them in separate containers to maintain their freshness for up to 2 days in advance.
- Wash and chop vegetables, and store them in separate containers. I keep delicate greens like spinach or romaine wrapped in a paper towel inside an airtight container to help absorb excess moisture and keep them crisp.
- On the day you plan to serve, bake the chicken, warm the rice, and assemble the bowl according to the recipe.
- To store leftovers:
- Store the cooked components (chicken, rice, and toppings) in separate airtight containers in the refrigerator to keep their texture and flavors fresh.
- Warm the chicken and rice right before you assemble your CAVA bowls. You can warm them in the microwave or a low-heat (300°F – 149 °C) oven until warmed thoroughly, 4-5 minutes.
- Assemble the bowls just before serving to avoid soggy greens.
- Leftover bowls can be stored in the fridge for up to 3 days, but keep the vinaigrette on the side and drizzle just before serving.
Recipe Variations
The good news is that you can take this CAVA copycat recipe as a starting point and turn it into your own masterpiece. Below are a few recipe variations to help you make it your own:
- Swap the protein: CAVA changes its menu regularly and offers different protein options. You can, too! During the summer months, I like to use grilled harissa chicken or spicy harissa salmon over harissa honey chicken. Alternatively, you can make my Turkish meatballs recipe , Chicken Kofta, Turkish Ground Lamb Kebab, or Chicken Shawarma for an authentic Mediterranean bowl.
- Change the base: Cooked black lentils are an excellent alternative to rice. It also works beautifully with salad greens.
- Toppings: You can take it up a notch and try your hand at making red pepper hummus, roasted eggplant and tahini dip (aka babaganoush), or eggplant yogurt dip.
- Dressings: While Cava’s Harissa vinaigrette is a classic, you can also use lemon balsamic dressing, red wine vinaigrette, or even pesto vinaigrette as an alternative.
- Make it vegetarian: Instead of meat, use roasted cubed butternut squash, sweet potatoes, chickpeas, falafel, or baked tofu. If you prefer a dairy-free option, you can simply omit the feta cheese and tzatziki.
Expert Tips
While this CAVA recipe is pretty straightforward, there are a few things I’d like to mention to save time and help you get the best results on your first try:
- Store-bought condiments: If you are short on time, there is nothing wrong with buying some condiments from the grocery store. I’ve tested this with both homemade and store-bought versions, and nowadays many brands carry excellent hummus, tzatziki, and even pickled onions. Trader Joe’s and Whole Foods are two places I often shop for these shortcuts.
- Prewashed salad greens: Most restaurants use triple-washed (and dried) salad greens. You can, too. It is a big-time saver. I do the same at home when I know I’ll be assembling several bowls during the week. It makes meal prep much easier and keeps the greens crisp.
- Buffet Style: This is a fantastic recipe for serving a crowd. I like to serve it buffet style by placing all the ingredients in bowls and having my guests assemble their own Cava bowls. It reminds me of the mezze-style meals I grew up with in Turkey, where everyone customizes their plate from a variety of small dishes.
- Serve warm or cold: While you can warm up the leftovers in the oven (or microwave), I usually eat them cold or at room temperature. Since the chicken is fully cooked, serving it without warming up is perfectly fine.
FAQs
Yes, you can. For best results, store all the components in separate air-tight containers in the fridge. They should store well for up to 3 days, but it is best to keep any dressings separately and use them right before serving to avoid sogginess.
CAVA used to use a brand called Rightrice, but that brand is no longer available. Nowadays, they offer brown rice or saffron Basmati rice.
Emma Chamberlain’s CAVA bowl has a base of super greens and it is topped with falafel, pickled onions, Kalamata olives, cubed avocado, crumbled feta, spicy hummus, and schug (Yemeni green chili and herb sauce).
Copycat CAVA Bowl Recipe
Ingredients
For the Harissa Honey Chicken:
- 2 pounds chicken thighs, skinless and boneless
- 1 teaspoon kosher salt
- ½ teaspoon ground black pepper
- ½ cup harissa
- 5 cloves garlic, finely minced or grated
- 1/2 teaspoon lemon zest
- 2 tablespoons lemon juice
- ¼ cup honey
For The Rice
- 2 cups water , or vegetable or chicken stock
- 1 tablespoon olive oil
- 1 teaspoon kosher salt
- 1 cup brown jasmine rice, thoroughly rinsed – or basmati rice
- ½ teaspoon ground black pepper
- 1 tablespoon parsley, chopped, optional
For The Harissa Vinaigrette:
- ¼ cup olive oil
- 3 tablespoons lemon juice, or white wine vinegar or red wine vinegar
- 2 tablespoons harissa , or 1 tablespoon harissa powder
- 1 tablespoon honey, or maple syrup for a vegan option
- 1 clove garlic, minced
- ½ teaspoon kosher salt
- ¼ teaspoon ground black pepper
For The Toppings
- 6 cups salad greens, washed and spin dried
- 1 cup cucumbers, diced
- 1 cup cherry tomatoes, halved
- ½ cup Pickled red onions
- 1 cup hummus
- ½ cup Crazy Feta, or crumbled feta cheese
- 1 cup Kalamata olives
- 1 cup Tzatziki
- 1 cup corn, grilled or canned (and drained)
- Pita bread chips, optional
Instructions
- To Make The Harissa Honey Chicken: Pat dry chicken thighs with paper towels and season them with salt and pepper on both sides. Set aside.
- In a large bowl, whisk together the harissa sauce, garlic, lemon zest, lemon juice, and honey until fully combined.
- Add the chicken thighs and toss to ensure that they are fully coated with the harissa mixture. Cover and refrigerate for at least 30 minutes. If preferred, you can do this a day in advance.
- Place an oven rack in the center of the oven. Preheat the oven to 400 degrees F/204 degrees Celsius. Line a baking sheet with parchment paper.
- Arrange the chicken thighs evenly on top. Brush any leftover sauce over the chicken.
- Bake for 13- 15 minutes or until the internal temperature of a chicken thigh is 165 degrees F when a meat thermometer is inserted into the thickest part of it.
- Cover with foil and rest for 10 minutes. Cut the chicken into bite-sized cubes and set aside.
- To Cook The Rice: Place your cooking liquid, olive oil, and salt in a medium-sized saucepan over high heat. Cover and bring it to a boil.
- Add the rice and bring it to a boil. As soon as it reaches a boil, put the lid on and turn the heat down to low. Simmer for 30 minutes without peaking.
- At the end of 30 minutes of simmering, open the lid and check whether the liquid has been fully absorbed. If it hasn’t, continue to simmer at 5-minute increments until no liquid is left.
- Turn the heat off and let it rest for 10 minutes with the lid on.
- When ready to serve, gently fluff it with a fork. Season with black pepper and garnish with chopped parsley.
- For the harissa vinaigrette: In a mason jar, combine the olive oil, lemon juice, harissa, honey, garlic, kosher salt, and pepper.
- Cover and shake until emulsified, about 30 seconds. Adjust seasoning to your desired taste. Keep it in the refrigerator until ready to use, and shake well before using.
- To assemble the Cava Bowls: Divide cooked rice among 6 bowls, followed by a handful of spring mix, harissa chicken, and your preferred toppings.
- Using a cookie scoop or a serving spoon, top each bowl with a dollop of tzatziki, hummus, and Crazy Feta (or crumbled feta). Add tomatoes, cucumbers, pickled red onions, olives, and corn.
- Drizzle each bowl lightly with harissa vinaigrette and serve with pita bread or pita chips on the side.
Video
Notes
- Yields: This recipe makes 6 servings, but it could be a little more or less based on the toppings you use. The nutritional values below are per serving, but keep in mind that they are estimates and can change based on the toppings you use.
- Prep and cook time: The abovementioned timing does not include the time needed to prepare the toppings. I would recommend checking the individual recipe and plan accordingly based on the toppings you plan to use in your grain bowl.
- Save on time: I highly recommend prepping the toppings and marinating the chicken a day in advance to make it a quick and easy meal.
- Storage: When storing leftovers, it is best to place them in individual containers and store them in the fridge. Most components of this DIY CAVA bowl recipe should store well for up to 3 days.
Nutrition
Nutrition information is automatically calculated, so should only be used as an approximation.


Made everything from the recipe, it was beyond amazing!!! We will have this again for sure, can’t wait to entertain with a buffet of this!
This is music to my ears Jennifer. Thanks for taking the time to leave a review.
Thank you for sharing this recipe! I am obsessed with CAVA, but the nearest one from our house is at least a 20-minutedrive on a good day. I crave a good Harissa Avocado Bowl almost every week (if not every day), and your recipe totally hit—and even surpassed—the mark! My husband and I have declared that we could eat this everyday. Thanks again and more power to you!
Hello Jae,
This is truly music to my ear. I am thrilled to hear that you liked this recipe.
Like you, I am a huge fan as well and can eat it every day, if I had my way.
Thanks for coming by and taking the time to leave a review.
Cheers,
Aysegul
Had a girls get together this past weekend and thought this would be a great kitchen bonding session. We all made components of the Cava bowl and set out a great buffet. We even made your pita bread recipe. What a fun time we had! Great flavors and worth the work! Thanks for going the extra step! I would much rather make this at home than go to the restaurant.
Hello Monica,
This is music to my ears. Thank you so much for coming by and taking the time to leave a review.
I haven’t eaten at CAVA but our favorite restaurant is a family owned Mediterranean Restaurant that offers bowls that can be customized with different proteins.
Would like to try this recipe. Is 15 to 20 minutes in the oven long enough to cook boneless skinless chicken thighs?
Hello Maureen,
While I call it a Copycat CAVA Bowl recipe, it is actually a Mediterranean bowl, so hopefully it won’t be too far off from your local restaurants’ food.
The answer to your question is yes. We have tested this recipe many times and never failed us.
Please let me know if I can answer any other questions.
Best,
Aysegul