

The Turkish Eggs Once Served to Ottoman Sultans

If you have ever been in a Mediterranean country, you would know that strained yogurt (what most people call Greek yogurt) is a staple that is used as a companion to many savory dishes. As a Turkish native living in the US for over 25 years, I feel like most people are just catching up to the savory goodness of yogurt thanks to its popularity on social media.
While it has recently become a global brunch sensation, this savory yogurt breakfast actually dates back to the 15th-century Ottoman Empire, where it was served to sultans. What I am sharing here is my mother’s recipe, the authentic version passed down through generations, modernized so you can make it with ingredients from your local grocery store.
What Are Turkish Eggs (Çılbır)?
Çılbır is a Turkish breakfast dish built on three components: a creamy garlic yogurt as the base, Turkish poached eggs with runny yolks, and a warm chili butter sauce drizzled on top.
The tang of the yogurt and the zing of the chili sauce give the eggs a surprising pop that will leave you wanting to lick the plate. The best part is that while it looks like something you would be served at a top-tier brunch restaurant, it comes together in about 25 minutes on any given morning.

Ingredients and Substitutions
One of the reasons I love making Turkish eggs with yogurt is that the ingredient list is surprisingly simple and made with everyday staples.
While you can find the full ingredient list with measurements in the recipe card below, I want to walk you through a few important details before you begin.
I have divided everything into three simple parts: the garlic yogurt base, the poached eggs, and the chili butter sauce (plus a few serving essentials). Here is what to keep in mind:
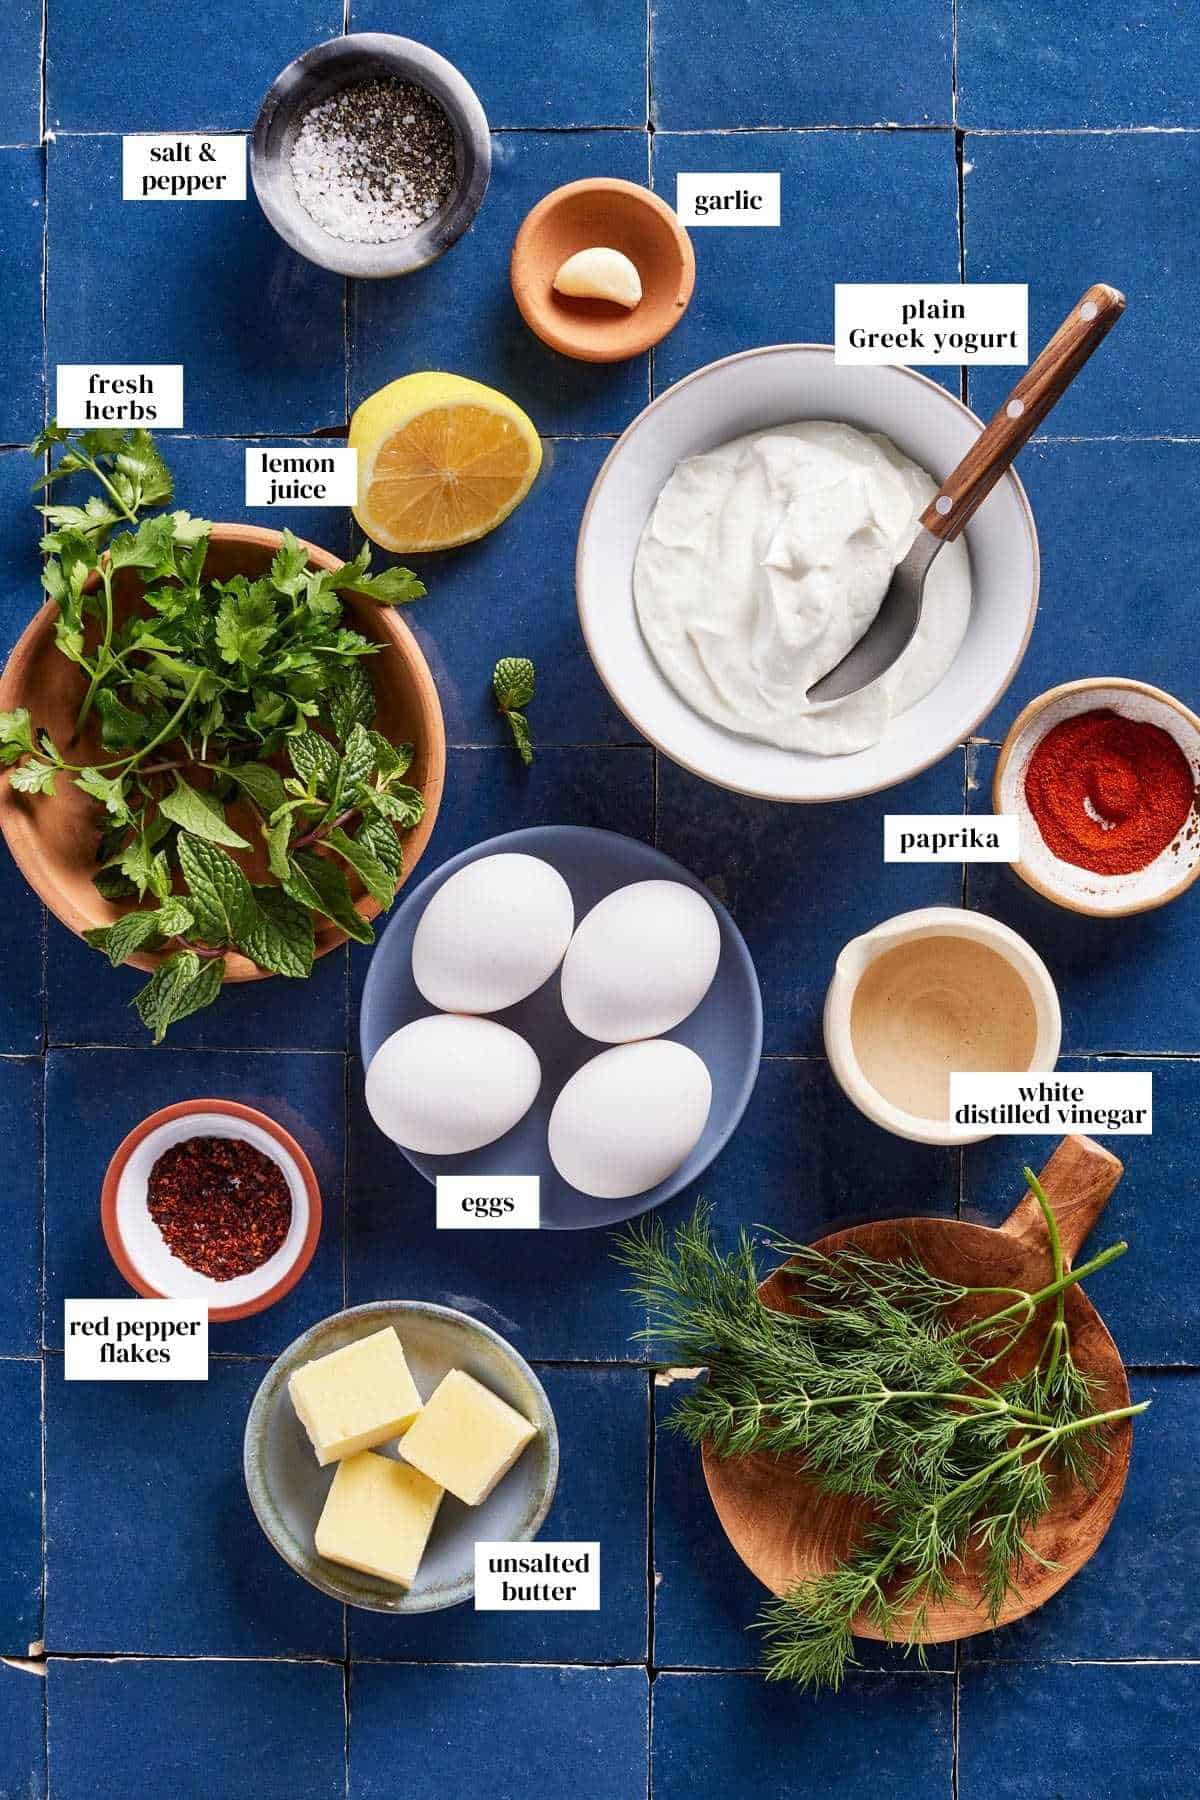
For the Garlic Yogurt Sauce:
Greek yogurt: Go for a thick, plain, whole milk Greek yogurt with no added sugar. I always recommend full-fat for the best creamy texture.
In a pinch, although it is not traditional, regular yogurt can be used; just make sure it is unsweetened.
Fresh Garlic: I recommend skipping the garlic powder and using freshly minced garlic in this Turkish egg breakfast. I use just one clove in this recipe, but if you love garlic as much as I do, you can add one more for an intense garlic flavor.
Lemon juice: Most çılbır recipes do not use it, but my mom always did. As a matter of fact, this was her secret ingredient for the best-tasting Turkish eggs.
A squeeze of citrus balances the creaminess coming from the dairy. Use fresh lemon juice for the most nuanced citrus flavor. I recommend skipping bottled if you can.
For the Poached Eggs:
Distilled white vinegar: If you do not have any on hand, apple cider vinegar will work as well.
Eggs: The fresher the eggs, the better the result. I use large eggs, but extra-large eggs would also work.
For the Chili Butter Sauce:
Unsalted butter: I always reach for unsalted butter so I can control the seasoning myself. If you only have salted butter, simply adjust the salt later. And while butter is the traditional option (and my preference), you can use olive oil or even do a half-and-half mix.
Turkish red pepper flakes (Aleppo or Urfa): If you can find Aleppo pepper or Urfa biber (isot), use them for the most authentic chili flavor. This is what I grew up with in Türkiye. If you can not get your hands on either of them, regular red pepper flakes will work. And if you are serving little ones or anyone sensitive to heat, you can omit it and use more sweet paprika instead.
Sweet paprika: I prefer it here for its mild taste. I would not recommend using smoked paprika, as it will alter the taste and overpower the chili butter flavor.
For serving:
Fresh herbs: Finish this dish with a sprinkling of fresh dill, parsley, or mint. Sumac is also an excellent Turkish seasoning to garnish this dish.
Before You Start: 3 Things That Make or Break This Recipe
People love watching short videos of this recipe on Instagram, but when it comes time to actually make it, the worry sets in.
Let me assure you: if you pay attention to a few basics and understand the why behind them, you will almost certainly succeed on your first try.
- Yogurt must be at room temperature: In the morning, when I plan to make this Turkish yogurt eggs recipe, the first thing I do is take the yogurt out of the fridge. Even 30 minutes on the counter is enough to take the chill off.
Why does it matter? Because freshly poached eggs placed on cold yogurt will lose their heat almost instantly, and when the hot chili butter hits cold yogurt, it hardens rather than pooling into that beautiful, glossy sauce. Room-temperature yogurt keeps everything warm and silky, exactly how it should be.
- Heat the butter gently, just until it sizzles. Because of its deep red color, people often assume we are browning the butter here. We are not. The color comes from the Urfa or Aleppo pepper. All you need is gentle heat until the butter begins to foam and sizzle; then it is ready. Walk away for even thirty seconds too long, and it burns.
- Master the poach with these three non-negotiables. I know poaching eggs can feel intimidating if you have never done it before, but follow these three steps, and it is hard to fail.
- Use a sieve. Straining the egg before poaching removes the thin, watery part of the egg white, which is what creates those wispy strands in the water. What remains wraps neatly around the yolk, giving you a compact, tidy poached egg.
- Add a splash of white vinegar. Vinegar helps the egg whites set and firm up the moment they hit the water. And let me assure you, since we are using a very small amount, your poached eggs will not taste like vinegar.
- Create a vortex. Stirring the water before you drop the egg in creates a gentle swirl that encourages the whites to wrap naturally around the yolk, keeping the egg compact and round rather than spreading across the pan.
How to Make Turkish Eggs
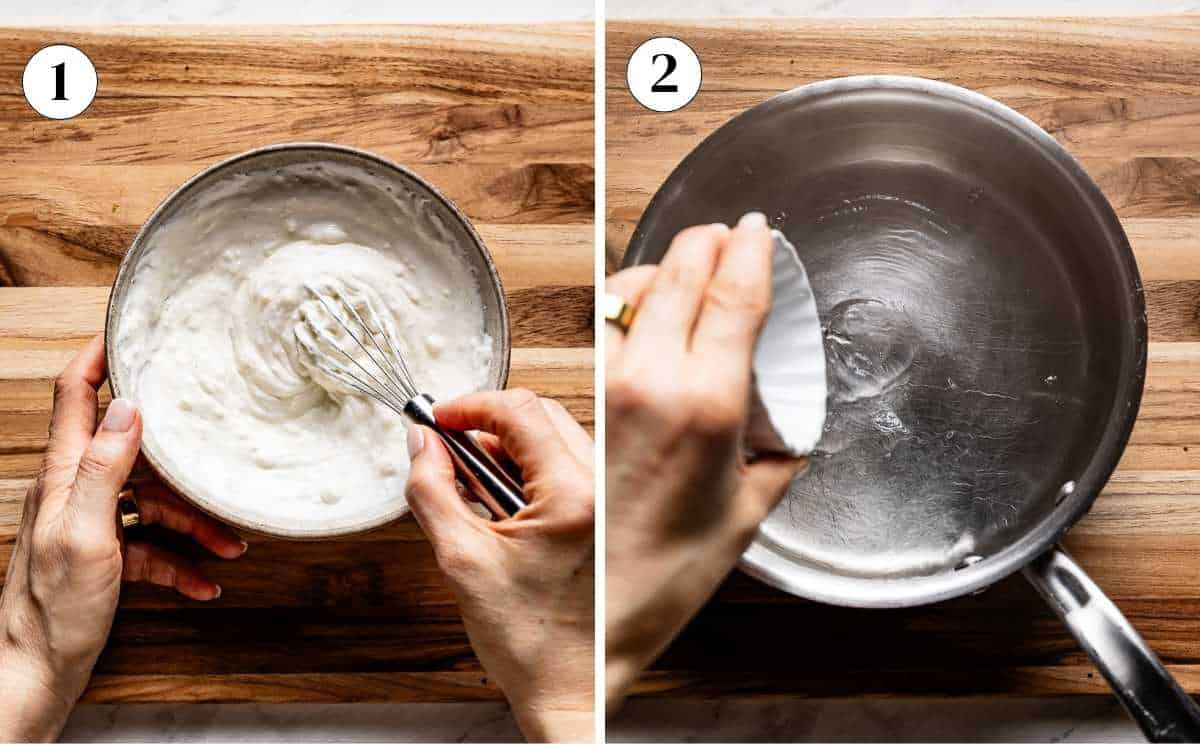
Step 1 – Make the garlic yogurt base: In a bowl, whisk together the room temperature Greek yogurt, finely minced garlic, fresh lemon juice, salt, and black pepper until completely smooth.
This sauce is the foundation of this dish, so take a moment to taste and adjust the seasoning if needed.
Cover and let it sit at room temperature on the counter while you prepare the eggs.
Step 2 – Bring the water to a gentle simmer: Fill a medium saucepan with at least 4 inches of water and bring it to a boil. Once boiling, reduce the heat to a gentle simmer. Once it is simmering, add the vinegar.
Pro Tip: It is imperative that the water is simmering as if it is not at a rolling boil; your eggs will fall apart.
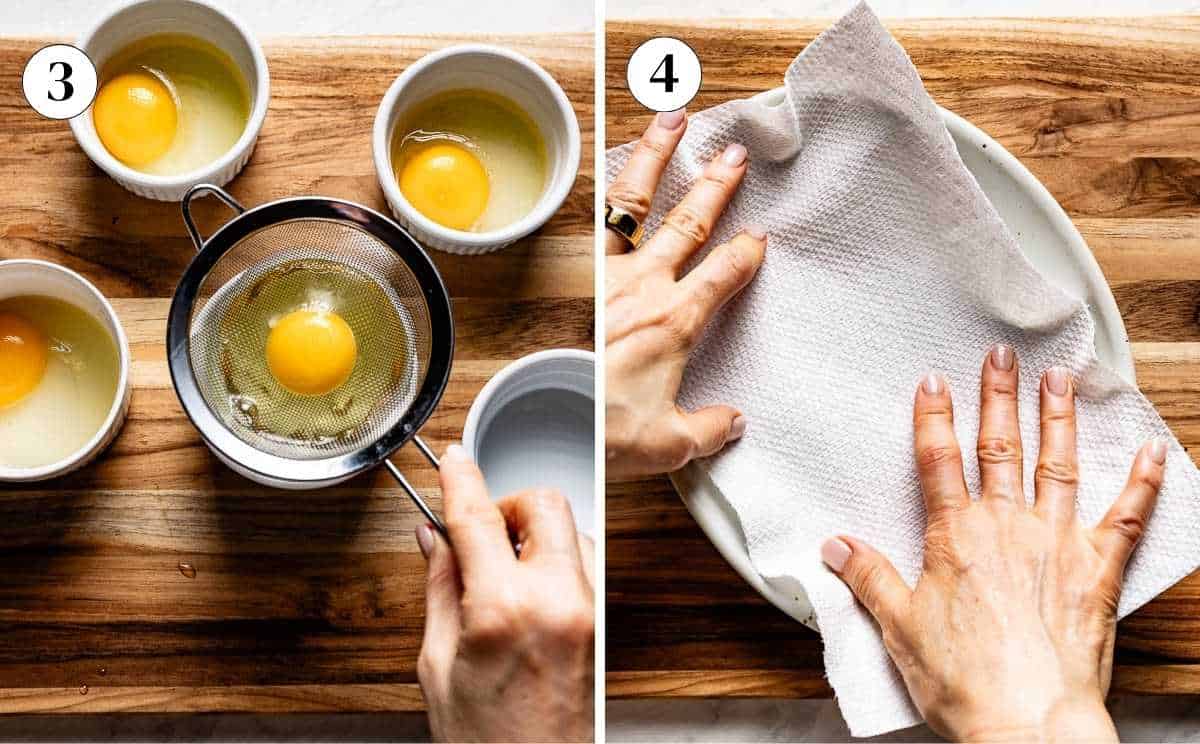
Step 3 – Strain the eggs: This is my go-to trick. While the water heats, crack each egg into a fine-mesh strainer set over a small bowl to drain the watery liquid. Transfer the now-drained egg to a ramekin. Repeat with the remaining eggs.
Pro Tip: Getting rid of the watery liquid in the eggs will ensure the egg whites stay intact during poaching, so you do not end up with those white strands in the water. This may seem like an unnecessary step, but it is the secret to those restaurant-worthy, perfectly poached eggs.
Step 4 – Prep your landing spot: Line a large plate with paper towels and set it aside. We are setting this up now, as we will need a place for the poached eggs to rest and drain.
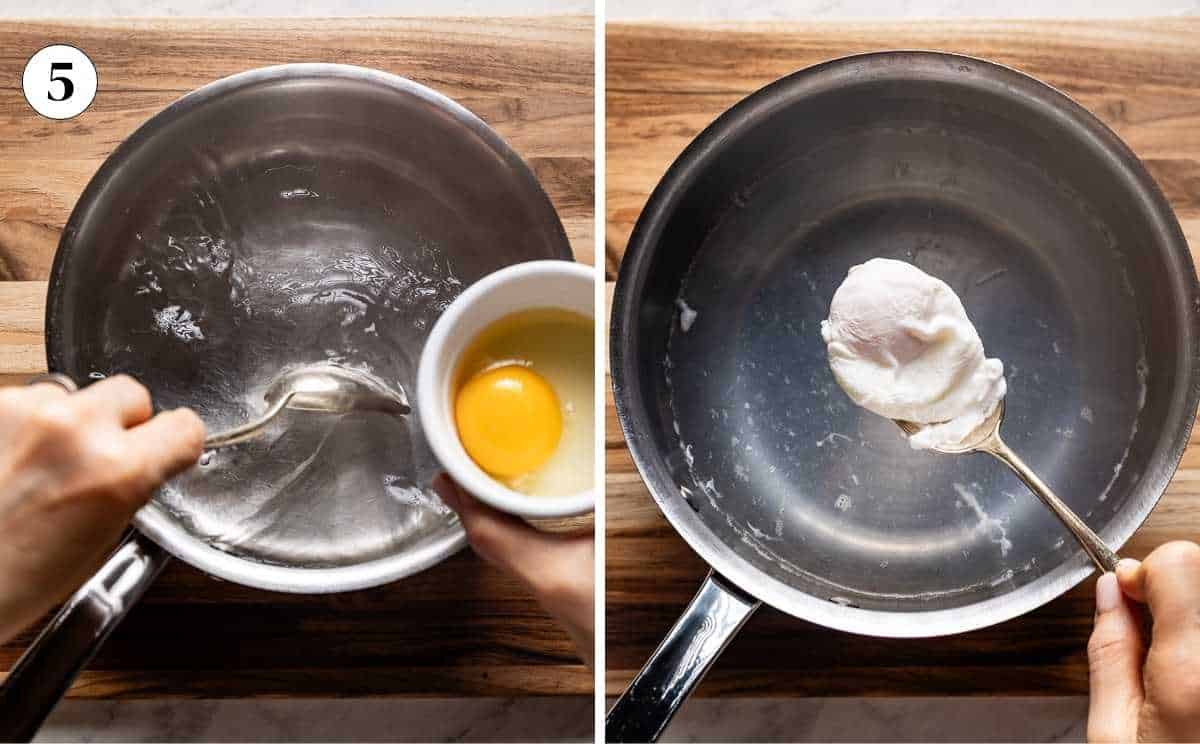
Step 5 – Poach the eggs: While you can poach two at a time, if you are new to poaching, I recommend poaching one at a time (at least until you get the hang of it).
Using a large spoon, stir the simmering water to create a gentle whirlpool (or a vortex) in the center. Carefully slide one egg into the middle.
Let it cook for about 3 to 3½ minutes, until the whites are set, but the yolk is still soft and runny.
How Long to Poach an Egg (Soft, Medium, or Hard) to make an authentic Turkish Eggs Recipe?
One of the signature characteristics of Turkish Çılbır is the silky, runny yolk melting into the creamy yogurt sauce. You have probably seen people dip a piece of crusty bread into the yolk and scoop a large portion of the creamy yogurt. That soft and creamy bite is truly the essence of this dish.
So, if you want to do it the way we do in Turkiye, you should cook the eggs for no more than 3 to 3 ½ minutes. I find that the 3-minute mark usually gives you the perfect runny yolks.
However, I know some people prefer their eggs a bit more cooked. In general, poaching eggs for 4 minutes will give you more of a medium, not-so-runny yolk. And if you want it fully cooked through, 5 minutes will do it.
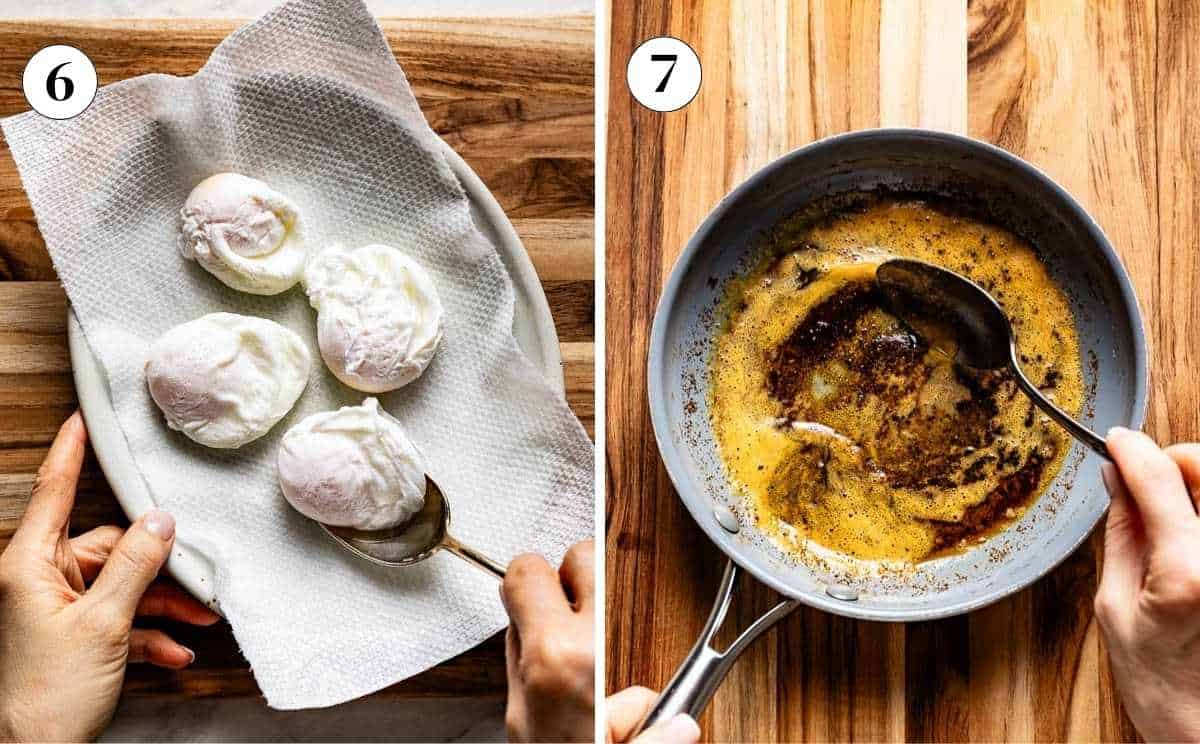
Step 6 – Drain and repeat: Use a slotted spoon to carefully lift the egg out of the water, letting any excess water drip off. Transfer it to the paper towel-lined plate you prepared earlier.
Repeat the same process with the remaining eggs.
Step 7 – Make the chili butter: Right before serving, melt the butter in a small pan over medium heat. I like to cut it into smaller pieces so it melts quicker.
Once melted, stir in the Turkish red pepper flakes (Aleppo or Urfa chili pepper if you have them) and a pinch of salt. Let it gently sizzle, stirring gently with a wooden spoon, for 15-20 seconds until it is fragrant and foamy.
Keep a close eye on it, as it can burn fast.

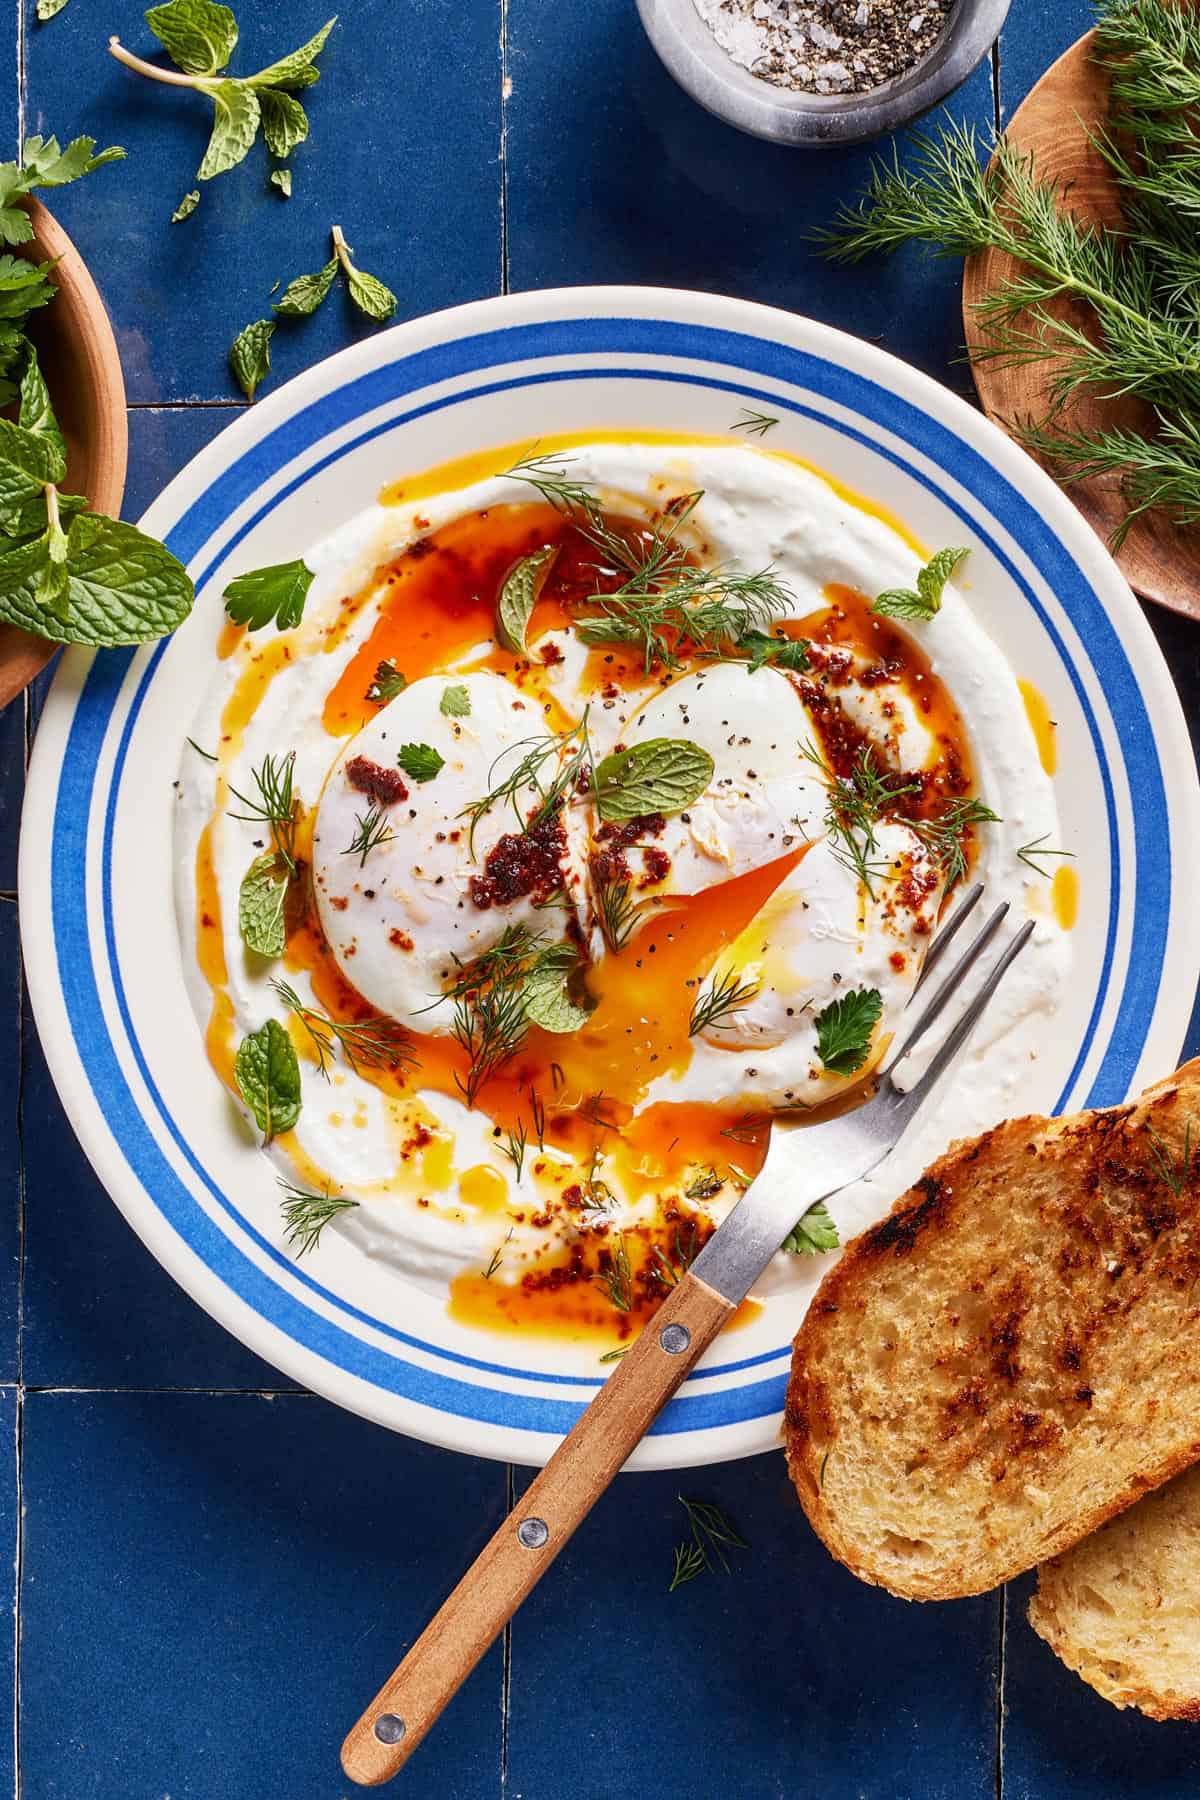
Step 8 – Assemble the plate: Spread half of the yogurt sauce onto a wide plate using the back of a spoon. Place two poached eggs right on top and spoon the warm chili butter on top.
Step 9 – Garnish and serve: Finish with freshly chopped herbs like dill, parsley, or mint. Then add a sprinkle of salt and black pepper. If you have sumac, a pinch over the top adds a very traditional touch.
Presentation matters: This is one of those dishes that deserves a little extra love on the plate. For that beautiful, Instagram-worthy finish, spread the yogurt in swoops using the back of your spoon, place the poached eggs gently on top, drizzle the warm chili butter over everything, and add fresh herbs and a sprinkle of sumac at the end.
Serve immediately with warm bread for scooping.
Expert Tips from My Turkish Kitchen:
Making this recipe is not hard, but if you want to succeed on your first try and get results similar to those in these pictures, there are a few things I recommend. These are things I learned from my mother as I watched her make this dish throughout my childhood:
Use the freshest eggs you can find: Fresh eggs have firmer whites and yolks that hold their shape better in the water, giving you that tight, compact poached egg with a perfectly runny center.
A note on poaching multiple eggs at once: If you are new to poaching, I highly recommend poaching one egg at a time, at least until you get the hang of it. The process moves more quickly than you think. Once you feel like you are familiar with the process, you can start poaching two at a time. However, I would not recommend doing more than that, as it becomes harder to maintain the timing and doneness.
Get two pots going at the same time: When I have friends over and need to poach more than 4 eggs, I usually get two pots so I can poach them faster.
Variations
Try different egg styles: While it is not traditional, if poaching eggs feels intimidating, you can make a sunny-side-up fried egg, or even halved soft-boiled eggs to serve over the yogurt sauce. This should give you that signature runny yolk.
Olive oil version: Traditionally, this chili sauce is made with butter. That is how my mom always made it. However, I have seen some versions of it made with olive oil, and I think that is a great lighter alternative. And if you want the best of both worlds, you can use half butter and half olive oil.
Dairy-free yogurt: This is definitely not traditional, but if you follow a dairy-free diet, you can use a plain, unsweetened dairy-free yogurt. I prefer unsweetened almond milk yogurt (to coconut yogurt), but you can choose any plant-based yogurt with a neutral taste and thick consistency.
Spice it up: On my last trip to Istanbul, I had a version of this dish with ground cumin added to the yogurt sauce. Later, I found out that many young Turkish chefs use their own spice blends to give it a modern twist.
Since then, I have been experimenting with my favorite spices to make this dish my own. So far, I love using za’atar, baharat, and even everyone’s favorite, everything but the bagel seasoning.
How To Make Ahead and Store?
The truth is, this dish is meant to be made and enjoyed right away. The good news is that this Turkish poached egg recipe is simple enough and does not require too much advance prep.
To make ahead: To make it even faster, you can prepare the garlic yogurt sauce the day before. Simply mix it together and refrigerate.
To store: You can technically store the leftovers in an airtight container and keep them in the fridge. However, I strongly recommend against it as the chili butter on top will harden and lose its magical taste. For the freshest Turkish eggs, I recommend enjoying this dish right after it is cooked.
What to Serve it With?
If your travels take you to Istanbul and you find yourself at a restaurant that serves Turkish breakfast, you will likely be presented with a menu full of Turkish classics. The good news is that I already have many of these recipes on the blog to help you build a table right in your own home:
Bread: Good bread is essential for dipping and scooping. A good sourdough would work perfectly, but if you want to do it our way, try making a batch of my Simit Recipe. This classic sesame-crusted Turkish bread is the most iconic pairing I can think of.
That said, warm Pita, Lavash, or a classic No-Knead Bread would also help you scoop up that delicious yogurt, runny yolk, and chili butter all at once.
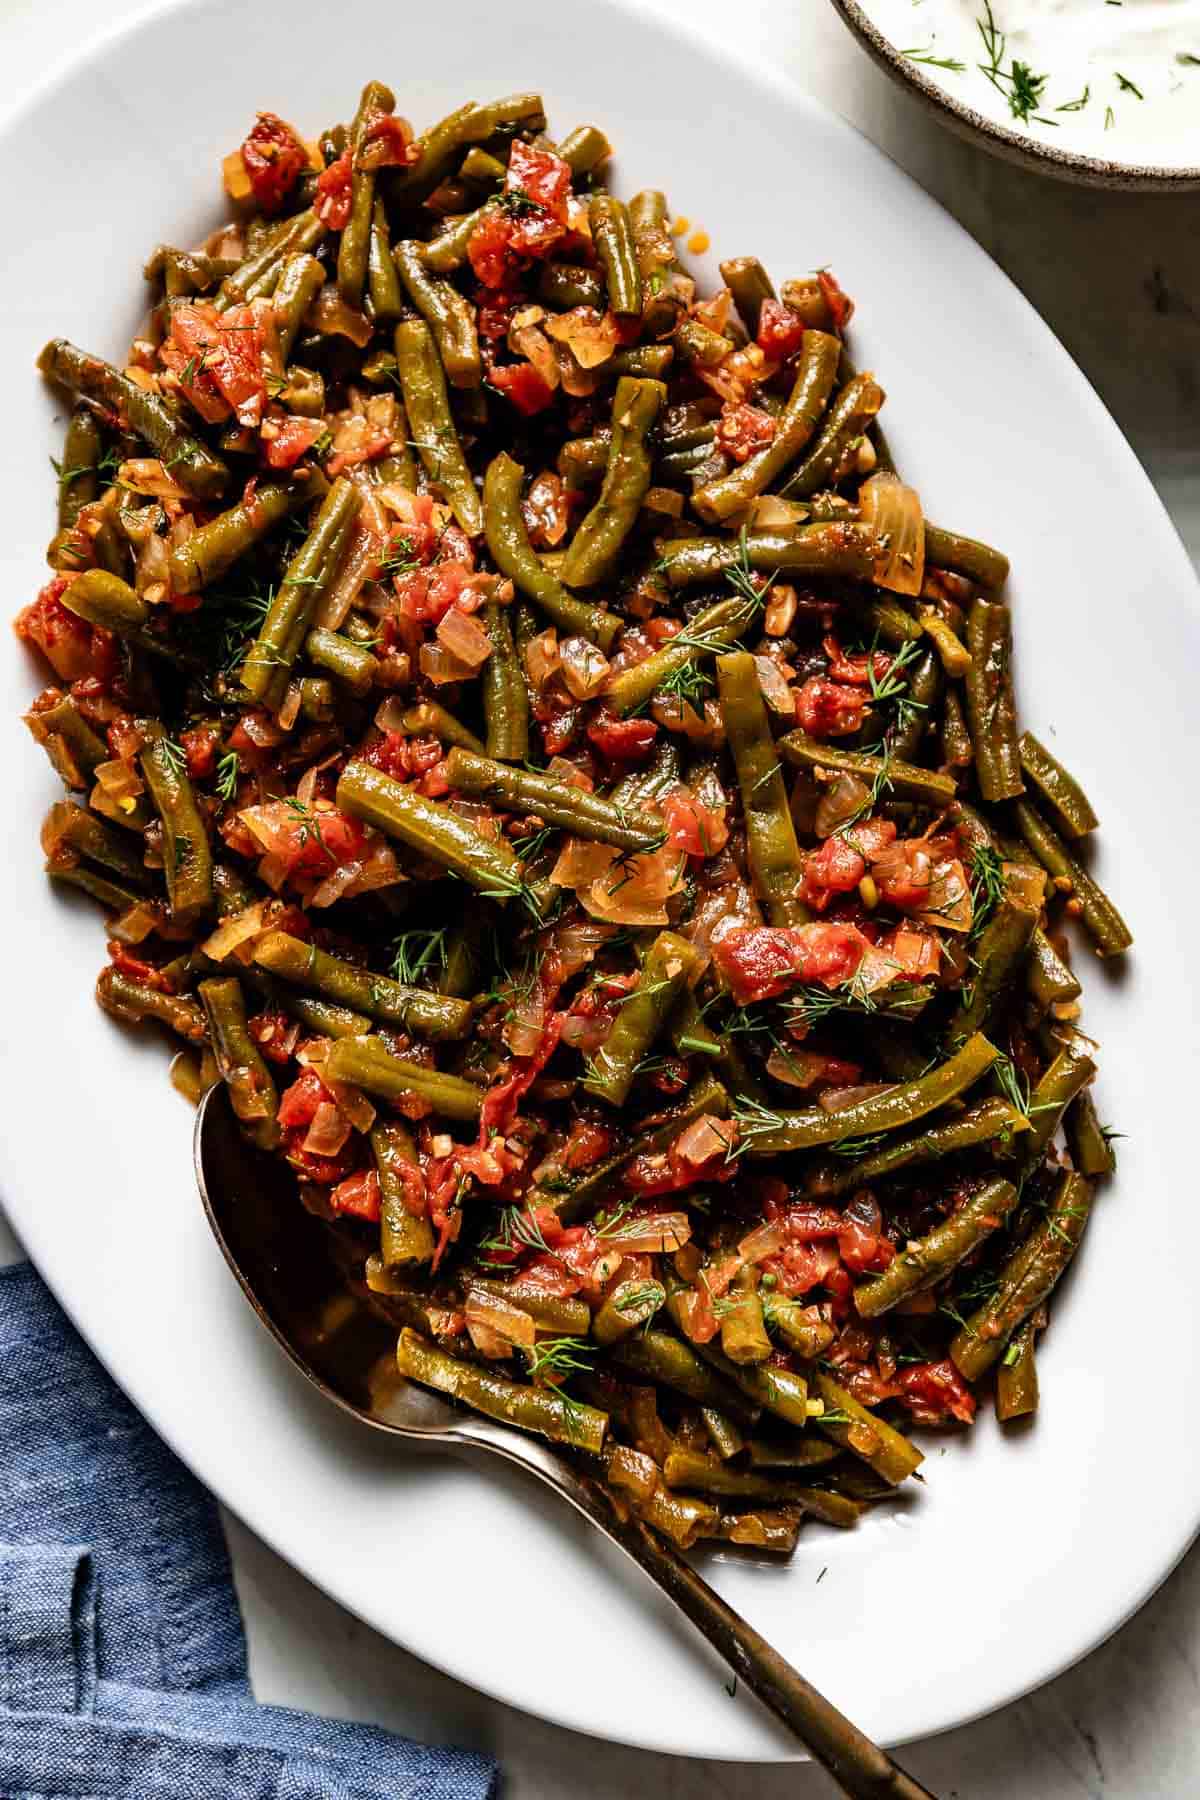
A simple side salad: No Turkish breakfast is complete without a cucumber and/or tomato salad. I love serving it with Piyaz (a traditional white bean salad) or a simple Cucumber Tomato Salad dressed with olive oil and lemon.
Drinks: Strong Turkish tea is the most traditional choice. Ayran (a chilled yogurt drink) is another classic pairing, especially for brunch.
Extras for the table: You can also add a small plate of feta cheese, a bowl of black and green olives, some homemade jam, or honey. These sweet-and-salty bites round out the spread, making the whole breakfast feel complete.
Other Mediterranean Egg Dishes You Might Also Like:
A Classic Turkish Skillet Breakfast: My Menemen is the quintessential breakfast of Türkiye. It is a one-pan dish of lightly scrambled eggs cooked into a base of sautéed onions, green peppers, and tomatoes.
A Veggie-Forward One-Pan Option: This Green Shakhuka is a one-pan, low-acid alternative to the classic tomato-based version. It is a beginner-friendly recipe that works for breakfast, brunch, lunch, or even a quick weeknight dinner.

Turkish Eggs Recipe (Çılbır)
Ingredients
For the Garlic Yogurt Sauce:
- 1 cup unsweetened plain Greek yogurt, at room temperature
- 1 clove fresh garlic, minced
- 1 teaspoon lemon juice, freshly squeezed – more to taste
- ½ teaspoon kosher salt, or more to taste
- ¼ teaspoon ground black pepper
For the Poached Eggs:
- 1 tablespoon white distilled vinegar, or apple cider vinegar
- 4 large eggs
For the Chili Butter Sauce:
- 3 tablespoons unsalted butter*, cut into pieces
- 1 teaspoon Urfa or Aleppo pepper, any red pepper flakes you have on hand
- ½ teaspoon sweet paprika
- ¼ teaspoon kosher salt
For Serving:
- 1 tablespoon of fresh herbs, such as parsley, dill, and/or mint
- Sliced bread or toast
Instructions
- To make the yogurt sauce, whisk together the yogurt, garlic, lemon juice, salt, and pepper in a bowl, then cover and set aside. I intentionally do this first so that it can come to room temperature while I poach the eggs.
- To poach the eggs, fill a medium saucepan with water (it should be at least 4 inches deep) and bring it to a boil over medium-high heat. Once it comes to a boil, turn the heat down to low and let it come to a simmer. Stir in the vinegar.
- While you are waiting for the water to come to a boil, place a fine mesh strainer over a small bowl and crack an egg while being super gentle to make sure not to disturb the yolk. Let the excess loose (watery) egg whites drop through and then transfer into a ramekin. Repeat the same process for the rest of the eggs.
- Place a sheet of paper towel on a large plate and set it aside.
- When ready to poach the eggs, stir the simmering water to create a vortex in the middle, carefully drop the egg in the middle, and cook for 3 to 3 ½ minutes until the whites are firm and the yolk is set but still soft and runny. For a medium yolk, cook 4 minutes. If you prefer the yolks to be fully set, cook for 5 minutes.
- Carefully remove the egg with a slotted spoon, then transfer it to the paper-towel-lined plate. Repeat the process with the remaining eggs*.
- Right before serving, melt the butter in a small skillet over medium-heat. Add the Urfa chili pepper (or any red pepper flakes) and salt. Let it cook, stirring gently with a wooden spoon, for 15-20 seconds until fragrant, lightly foamy, and a reddish color from the pepper, but not browned.
- To assemble: Using the back of a large spoon, spread half of the yogurt sauce on a plate. Add two poached eggs on top and drizzle them with the sizzling chili butter sauce.
- Garnish with fresh parsley or chopped dill; sprinkle it with a pinch of salt and pepper to taste. Repeat the same process for the second serving. Serve immediately while still warm.
Video
Notes
- Yields: This recipe serves 2 people, with each portion serving two eggs. The nutritional values below do not include the optional bread or toast serving.
- Butter: You can use salted butter, but if you do, omit the additional salt.
- Cooking eggs: I recommend poaching no more than two eggs at a time for the best results.
- Eggs: While this Turkish egg recipe is traditionally made with poached eggs, you can also serve it with fried or soft-boiled eggs.
- Make Ahead & Storage: You can make the garlic yogurt sauce a day in advance and store it in an airtight container in the fridge. While you can technically store the leftovers in an airtight container, I highly recommend consuming this dish as soon as possible, while it is still warm and fresh.
Nutrition
Nutrition information is automatically calculated, so should only be used as an approximation.
Hero images by Tanya Pilgrim.


I loved this recipe so much! The taste was perfect and the eggs came out so well eventhough it was my first time poaching eggs !
Your recipes never disappoint 🙂
YAY! This makes me SO happy Yoshita. Thanks for coming by and taking the time to leave a review.