My video journey started back in 2014. At the time, a lot of big bloggers that I followed were talking about the fact that video is going to be the next big thing. Not knowing what I was getting myself into, I set my tripod with my Canon Rebel camera on its auto mode and shot my first video (which you can find in this Nutella and Banana Clafoutis recipe.)
Since then, I have shot over 75 recipes with videos ranging from hands & pans style to videos with me in it. Nowadays, I no longer publish new recipes without a video component because what they were saying was so right. Video is the next big thing, and I think it will continue to be important as technology and social media advance.
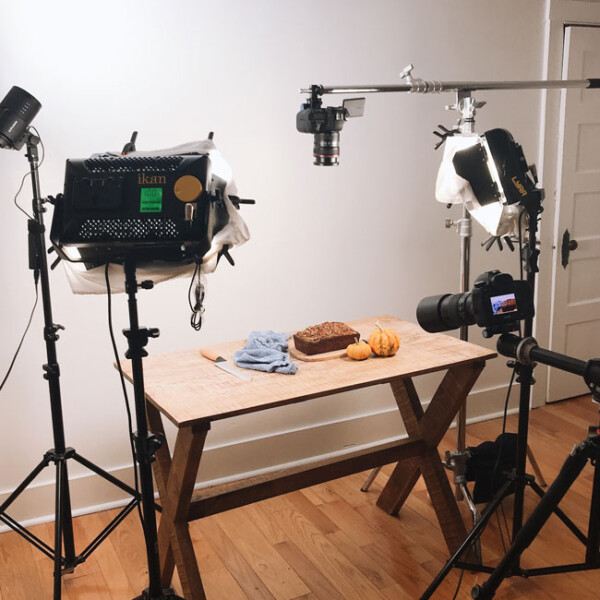
Throughout the years, I have been asked about the equipment I used by many people, so I thought I would put together a resource guide to help those of you who might need some ideas to make the leap and start shooting your own videos.
Below is a list of the equipment I use. Please be aware that the ones with an asterisk are affiliate links. If you make a purchase using these links, I will get a commission at no cost to you.
I plan on updating this list in the months and years to come as I upgrade and/or change my video equipment.
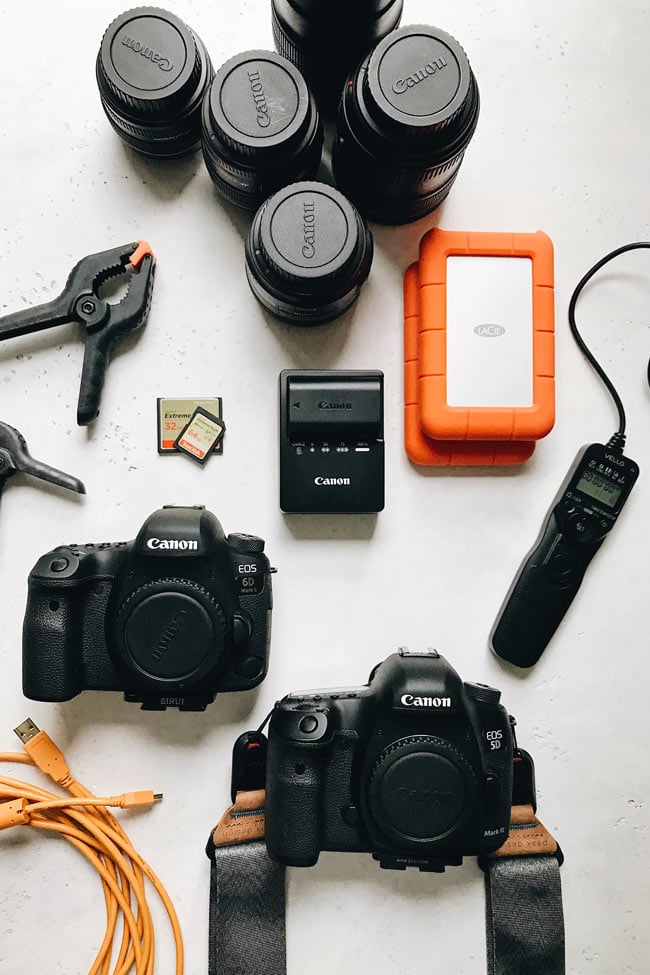
CAMERA BODIES
CANON REBEL T4I *
Even though this was my first camera and they no longer produce this model, I still use this camera to this day. It has a built-in auto focus feature and a flip screen that makes shooting so much easier.
Though it is not my first camera of choice when it comes to shooting videos, I like that I can use it when I need a third angle.
CANON 6D MARK II *
This is the camera I use for most of the overhead view shots. Similar to the Canon T4i, it has a built-in auto focus feature and a flip screen that makes shooting by myself easy.
It also is a full-frame camera that I can also use for photography.
** MY RECOMMENDATION **
If your budget allows you to buy only one camera body for your recipe videos I highly recommend this camera as it:
- is affordable (compared to most other full-frame cameras)
- is a full-frame camera- Great for photography
- is very light – easy to carry around
- has great auto focus capabilities
- has a flip screen allowing to see your hands as you shoot
- works with all Canon lenses
The only downside of this camera is that you cannot tether to Lightroom when shooting photos. That is why, if you shoot tethered to Lightroom and edit at the time of shooting like I always do, then this camera might not be work for both video and photography.
CANON 5D MARK III *
This camera is the main camera I use for photography, but I also use it for front view shots with my Canon EF 100mm f/2.8L.
It does not have an autofocus feature so I would have to set it manually to focus before I start shooting a scene.
I PHONE 7 PLUS
I often use my iPhone for videos especially if it is a simple recipe. I also use it for shooting Instagram and Facebook stories. I find it to be easy and convenient. I can also edit them on my phone right after shooting, which also makes my workflow fast.
Need examples? I shot the below videos using my iPhone:
LENSES
Canon EF 24-70mm f/4.0L *
This is the main lens that I use for my videos. I usually pair it with my Canon 6d Mark III. Since it is a zoom lens I can easily adjust it to capture the scene I am going for without having to move my tripod/c-stand.
If you can invest in one lens for your videos, I would recommend getting this one as it does a wonderful job of shooting videos without you having the camera too much.
Canon EF 100mm f/2.8L *
I use this lens for close-up shots and pair it with my Canon 5D Mark III. It is a very fast lens that is quite affordable (for the quality).
** MY RECOMMENDATION **
While I do not own Canon EF 70-200mm f/2.8L * just yet, in the coming years I plan on investing in it. I love that it is a zoom lens that allows you to get those beautiful close-up shots with a blurry background.
If you are a fan of those close up shots and have some money to spare, I cannot recommend this lens enough.
If I have a 3 camera set up, I sometimes use a third lens. However, it depends on what I am trying to do. You can see the rest of the lenses I own on my photography equipment page.
TRIPOD & C-STAND
C-STAND
If you do not know what a C-Stand is, you are not alone. A friend of mine, who is a staff photographer at The New York Times, introduced me to C-Stands years ago. I bought one in 2016 and since then it has been a great tool that I use on a daily basis.
A C-Stand is basically a stand that holds things. Think of it as a large tripod. It is mostly used to hold lights in studio photography. Similar to the tripod, you can attach arms and other devices to hold things in place.
I use my C-Stand for overhead shots. It has a long arm (also called a boom arm) that holds the camera above my scene making it easier to get overhead shots in a stable way.
I use my C-Stand both for photography and videography. If you are planning to invest in a C-Stand, I recommend you buy everything listed below to make it work to shoot similar videos like mine.
- Base: Avenger Turtle Base C-Stand (9.8′, Chrome-plated) (No longer available)
- Arm: Avenger D600 Mini Boom (No longer available)
- Adapter: Manfrotto 014-38 Rapid Adapter – 5/8″ Stud to 3/8″ Thread – This is what you use to attach the camera to the boom arm.
- Sirui K-20X Ball Head: This is the ball head I use to attach to the boom arm to hold the camera. It has multiple controls that make it very easy to move the camera safely.
TRIPOD
Manfrotto MT190XPRO3 *
This is the main tripod that I use for front and side shots. This was the first tripod I purchased when I started photography and I still use it. It is durable and lightweight.
It also works perfectly with my Siriu K-20X Ball Head.
MEMORY CARDS
When you do videography, you need memory cards that can record data fast. Below are the two cards that I use. I have two of each.
- SanDisk Extreme PLUS 64GB SDXC UHS-I/V30/U3/Class 10 Card with Adapter (SDSDXWF-064G-ANCIN)
- SanDisk Extreme 32GB Compact Flash Memory Card UDMA 7 Speed Up To 120MB/s- SDCFXS-032G-X46
PRO TIP:
I always format my memory cards after I stored their data on my computer or on the cloud. Regular formatting allows the camera to write information more efficiently to the card.
ARTIFICIAL LIGHTS
During the first few years of my videography journey, I used natural daylight. However, as time went by I realized that I would have a faster workflow if I didn’t have to depend on the daylight, especially during the winter months when the daylight is so short.
Nowadays, I only shoot my videos using artificial lights. Below are the two lights I use:
IKAN LYRA BI-COLOR 3200K-5600K Soft Panel*:
I own two of these half-panel lights and love them. I place them on each side of the table I am shooting on and make sure that they are directed to the food.
I find that two of them are enough, but if I was buying it now I would buy three as nowadays I like shooting from several angles using multiple cameras. Having three lights is handy when you are trying to eliminate shadows.
Profoto B10 AirTTL, Off Camera Flash and Continuous Light*:
I mostly use this light for photography. However, it does offer continuous lighting for shooting videos. So I use it as a fill light with Profoto OCF Softbox 2×3′ * when I am trying to avoid shadows in my videos.
HOT PLATES
For recipe videos, you need hot plates that are durable. I have two of them:
Duxtop 1800W Portable Induction Cooktop Countertop Burner*:
This induction cooktop was the first hot plate I purchased. It is durable, lightweight and it heats evenly and quickly.
However, it only works with induction-ready cookware such as cast aluminum enameled iron and steel, stainless steel with a magnetic bottom, or cast iron (Such as Staub, Le Creuset, and Lodge pots and pans). That is why, if you have pots and pans that do not fit the bill this might not be the best option for you.
Cadco PCR-1S Professional Cast Iron Range, Stainless*:
I bought this hot plate mostly because of it being lighter in color and smaller in size. However, I do love the fact that I can use it with my pots and pans that are not cast iron.
Portable Fan*:
It took me a while to invest in a portable fan, but as soon as I bought one I regretted the fact that I didn’t get it sooner.
If you have ever shot a recipe video you know that steam is a big issue. You do need to show the food as it cooks, but you do not want the steam to damage your equipment. That is why you need a portable fan.
This one is small and it conveniently clips on to the side of the table you are shooting on. Plus, you can easily rotate it so that you can easily adjust where it is blowing air.
CAMERA SLIDER
If you are a fan of smooth movements and transitions in your videos, a camera slider is a good investment. While I do not think that you need a slider as soon as you start, once you get the hang of shooting videos and feel like it is time to try new things you can start using more advanced tools like a camera slider.
The one I use (listed below) is a motorized slider that works via a mobile app so I can cook while the slider slides and my camera records as I am cooking. It is easy to manage and takes the video quality to a whole new level.
The downside of sliders is that it takes a while (at least 10 minutes) to set them up, especially if you do not have a tripod that is dedicated to your videos. Plus, just getting the motorized slider is not enough. It has a bunch of accessories that you need to invest in to make it work seamlessly.
Still, while it is quite the investment I think it makes my work look so much more professional. Below are my slider and all the accessories that make it work:
MUSIC FOR VIDEOS
I currently use Epidemic Sound for finding music for my videos. However, in the past, I also used AudioJungle and Premium Beat as well.
TELEPROMPTER
If you have been following me for a while you probably know that my first language is not English. This presents a problem because between making the recipe, managing two cameras (sometimes three), and a microphone, I usually forget what I am supposed to say when I am shooting recipe videos.
And let me tell you, it is not fun to have to shoot, what is supposed to be, a quick intro and outro over and over again when you have done a full day of shooting recipe videos.
For that reason, I decided to invest in a teleprompter. Nowadays, I script all my videos before I start shooting. Then after I am finished with the recipe part, I do a quick intro and outro reading the script through the teleprompter. I find that not having to think about what I have to say makes my shooting process much faster.
The teleprompter I have is called Caddie Buddy (affiliate link). I use it with my Ipad but I believe you can also use it with an I-phone as well.
I use an app to help me read it, but I am not very happy with it. I am currently looking for another one and will update this post as I try more apps and settle in one.