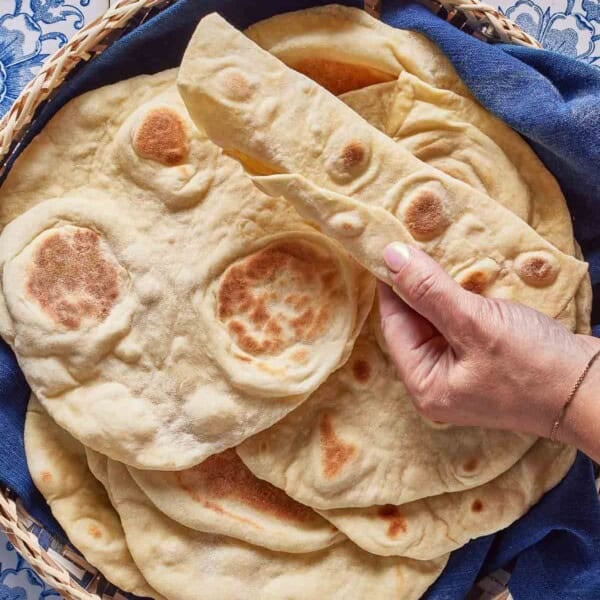

If you’ve ever been to a Middle Eastern or Mediterranean restaurant, chances are you’ve had lavash. Similar to pita, it’s the go-to bread for serving with kebabs, dips, and salads. Growing up in Turkey, I learned early on that you simply don’t eat kebab without a piece of warm lavash.
Yes, you can find it at the store, but once you taste a freshly cooked, puffed-up lavash straight from the skillet, there’s no going back. And the best part? It’s easier to make than you think.
In this post, I’ll walk you through the step-by-step process of making lavash bread, complete with foolproof tips and troubleshooting advice, so you can confidently make it at home anytime.
What is Lavash? A Journey Through This Ancient Flatbread
Lavash (or lavaş, as we call it in Turkey) is a soft, thin flatbread with ancient roots stretching across the Middle East and Central Asia. While the lavash bread recipe may vary slightly from region to region, it is a staple in many countries across the region, including Armenia, Iran, Kazakhstan, Azerbaijan, and Turkey.
At its core, lavash is as simple as bread gets: just flour, water, salt, sugar, milk (optional), and yeast. But despite the short ingredient list, the result is anything but basic.
Depending on where it’s made, lavash can be thick and chewy or paper-thin and crisp.
My version here sits right in the middle; soft enough to wrap around your favorite kebabs but sturdy enough to use it as a utensil to scoop up dips and salads just like we do in Turkey.
Essential Ingredients for Lavash Bread
The traditional lavash bread recipes you’ll find in cookbooks are usually made with just three ingredients: flour, water, and salt.
While that version is beautiful in its simplicity, it can take a bit more time and technique to get right. In my version, I use a small amount of yeast to help the dough rise more easily, a splash of milk for a softer texture, and a touch of sugar (or, in my case, honey) to feed the yeast and get it bubbling faster.
You’ll find the exact measurements of this homemade lavash recipe in the recipe card below, but here are a few essential notes and tips from my testing to help you get the best results every time.

Water: We use lukewarm water (around 110 °F – 43 °C) to activate the yeast. The temperature is important here because if it is colder, the yeast will not activate, and if it is hotter, it will kill it.
Yeast: I use instant yeast in this recipe, but I still bloom it in warm water with a bit of honey to give it a head start. This step isn’t always necessary with instant yeast, but I’ve found it helps create a better rise and a more reliable dough.
If you only have active dry yeast, you can use it the same way, just make sure it foams up before moving on.
Sugar: A small amount of sugar helps feed the yeast and encourages it to bubble up during the resting period. You can use granulated sugar, but I like to use honey to keep this recipe free of refined sugar. Either one will do the job.
Extra Virgin Olive Oil: I use a little bit of extra virgin olive oil, mostly for flavor. It adds a subtle richness to the dough and helps keep the lavash soft.
Milk: A small amount of milk makes the dough softer and adds a slightly richer texture. I use whole milk, but any kind you have on hand will work. Just make sure it’s at room temperature so it doesn’t interfere with the rising time.
If you prefer a dairy-free version, you can use water instead.
All-Purpose Flour vs. Bread Flour: The recipe I am sharing here is made with all-purpose flour, which yields a soft and pliable dough that is perfect for rolling kebabs. If you prefer a sturdier, chewier texture, you can swap in bread flour instead. It has a higher protein content, which gives the dough more structure.
Kosher salt: I used Diamond kosher salt, which is less salty than most kosher salts. If you use other brands, such as Morton’s, be sure to use half the amount.
Step-by-Step: How to Make Lavash Bread at Home
Whenever I make any kind of bread, I always want to know how far in advance to start, especially if I’m planning to serve it for dinner. This easy lavash recipe takes about 1.5 hours from start to finish, including time to knead, rise, and cook. So if dinner’s at 7, starting around 5:30 pm is just right.
This recipe makes 10 lavash, just in case you are planning ahead or cooking for a crowd.
Here’s how to make lavash at home, step by step:

Step 1 – Activate the Yeast: Place the lukewarm water (around 110°F / 43°C) and honey (or sugar) in a measuring cup. Stir well to make sure the honey is fully dissolved. Add the yeast and let it sit for 5 minutes, or until you see a grey-ish thick layer of bubbly foam on top. Then stir in the olive oil and milk until fully combined.

Step 2 – Combine Wet & Dry Ingredients: In a large mixing bowl, combine the flour and salt. Pour in the yeast mixture and knead the dough with clean hands for about 5 minutes, or until no dry flour remains.
At this point, the dough (and your hands) will be sticky, and that is totally normal. As you knead, turn the dough frequently to ensure everything comes together evenly.

Step 3 – First Rise: Cover the bowl with a clean kitchen towel (or loosely with plastic wrap) and let it rise in a warm part of your kitchen for 20 minutes. By the end of that time, it should look a little smoother and slightly puffed in volume.
Step 4 – Knead the Dough: Lightly flour your kitchen counter and transfer the dough over. Knead it for about 5 minutes.
You don’t really need much of a technique here, but when I’m kneading it, I usually press the whole dough with the heel of my hand, push it away, fold it back over, and give it a turn. Then I just keep repeating that motion until the dough feels smooth and stretchy.
It shouldn’t be too sticky, but if it is, go ahead and sprinkle in a bit more flour, just a little at a time (no more than a tablespoon). You don’t want to use too much flour, as this can make your lavash too dry or stiff.
Alternatively, you can knead the dough in a stand mixer using the dough hook. However, keep in mind that you might not need to knead it as long. The visual cue to pay attention to is for the dough to be smooth and no longer sticking to the sides.

Step 5 – Divide the Dough: Shape the dough into a log approximately 12 inches long and divide it into 10 equal pieces. When you go with 10, each lavash ends up being about 9 to 10 inches in diameter once it is rolled out and cooked. If your skillet is smaller, you can divide the dough into 12 and make slightly smaller ones.
You can totally eyeball it, but if you want all your lavash to be about the same size, a kitchen scale helps.
Grab a dinner plate and sprinkle it with a little flour. Roll each piece into a ball and place them on the plate. Then cover them loosely with a kitchen towel and let them rest for 20 minutes.

Step 6 – Heat the Skillet & Roll Out the Dough: When you are ready to cook, heat a large (10- or 12-inch) nonstick or cast-iron skillet over high heat until it is really hot. This part is essential because if the pan isn’t hot enough, the dough will stick. You’ll know it is ready when a few drops of water sizzle and disappear almost instantly.
While the pan heats up, start rolling out the dough. Take one ball at a time and roll it into a 9- to 10-inch circle using a rolling pin. Do your best to keep it round, but I’ll be honest; it is a little tricky at first.
The good news? It gets easier the more you do it, and honestly, a slightly wonky lavash still tastes just as good.

Step 7 – Cook the Lavash: Before you start rolling, grab a basket (a tortilla warmer works beautifully if you have one) or a bowl and line it with a kitchen towel. We need a place to store the freshly cooked lavash and keep it soft and warm. Set that aside.
Carefully transfer the rolled-out dough to the hot skillet. Within 10 to 15 seconds, you should see little bubbles start to form on the surface. Give it a flip, cook for another 10 seconds, then flip again. As it cooks and puffs, you’ll see golden brown spots start to appear, which is exactly what we want.
Keep flipping every 10-15 seconds, and cook for about 40-50 seconds total, or until both sides are cooked and it has some nice color.
Transfer the freshly cooked lavash to your prepared basket and cover it with the towel to keep it warm. Then just repeat the process (roll, cook, and store) for the remaining dough balls.
Expert Tips
Roll it out thin: The key to getting soft, pliable lavash is rolling the dough really thin. I know it is tempting to focus on making a perfect circle, but honestly, thinness matters more than shape. Even if your lavash isn’t perfectly round, it will still taste great.
And if you have a pasta machine, that is a great shortcut to get an even, thin sheet of dough without too much effort.
Go easy on the extra flour: It is tempting to keep adding flour if the dough feels sticky, but try to trust the process and the visual cues I mentioned earlier. Only add more flour when the dough really starts to stick (especially while rolling), and try to work quickly. Too much flour can lead to stiff, dry lavash, and we definitely don’t want that.
Keep it warm: Don’t skip setting up a spot to keep the cooked lavash warm. Otherwise, while you are busy cooking the rest, the earlier ones will cool down and lose their soft, pliable texture. And you don’t need anything fancy; a basket or a bowl lined with a clean kitchen towel works perfectly.
Work faster with a buddy: The most time-consuming part of this recipe is rolling and cooking the lavash. But it goes a lot quicker (and is honestly more fun) if you have someone helping out. I usually rope my husband in. He is in charge of the skillets and cooks two at a time while I roll out the dough. Teamwork makes it so much easier.
Stay close while it cooks: These flatbreads cook fast, so it is important to keep a close eye on them, even while you are multitasking. I know you’ll likely be rolling out the next one while one is cooking (I do the same), but try not to turn your back on the skillet. It gets very hot, and things move quickly, so just stay aware, especially if you have young kids around.
Troubleshooting Common Lavash Baking Issues
While this lavash flatbread recipe is pretty straightforward, I ran into a few hiccups during testing, so I wanted to share some tips in case you experience the same. Here are a few common issues and what might be causing them:
Dough isn’t rising: After the first 20-minute rest, your dough should be slightly larger and less sticky. If that is not happening, chances are your yeast was not properly activated. This usually comes down to the water being too cold or too hot. If you don’t see bubbles on top during the blooming stage, it is best not to add that mixture to the flour and just start fresh with a new batch.
Dough is too sticky or too dry: Before the first rise, the dough will be sticky, and that is completely normal. After it rests and you begin kneading, it should smooth out and become easier to handle.
A little flour on the counter is fine if it is sticking too much, but try not to overdo it. Too much flour can dry the dough and make the lavash stiff.
Lavash isn’t bubbling in the skillet: If you are not seeing bubbles after placing the dough in the pan, there are usually two possible reasons: either the skillet isn’t hot enough, or the dough was rolled too thick.
Serving Suggestions:
If you’re wondering how to use lavash, the short answer is anywhere you’d use your favorite flatbread. But like most bread recipes, there are so many other ways to enjoy it. Below are a few of my favorite recipes to pair with lavash:
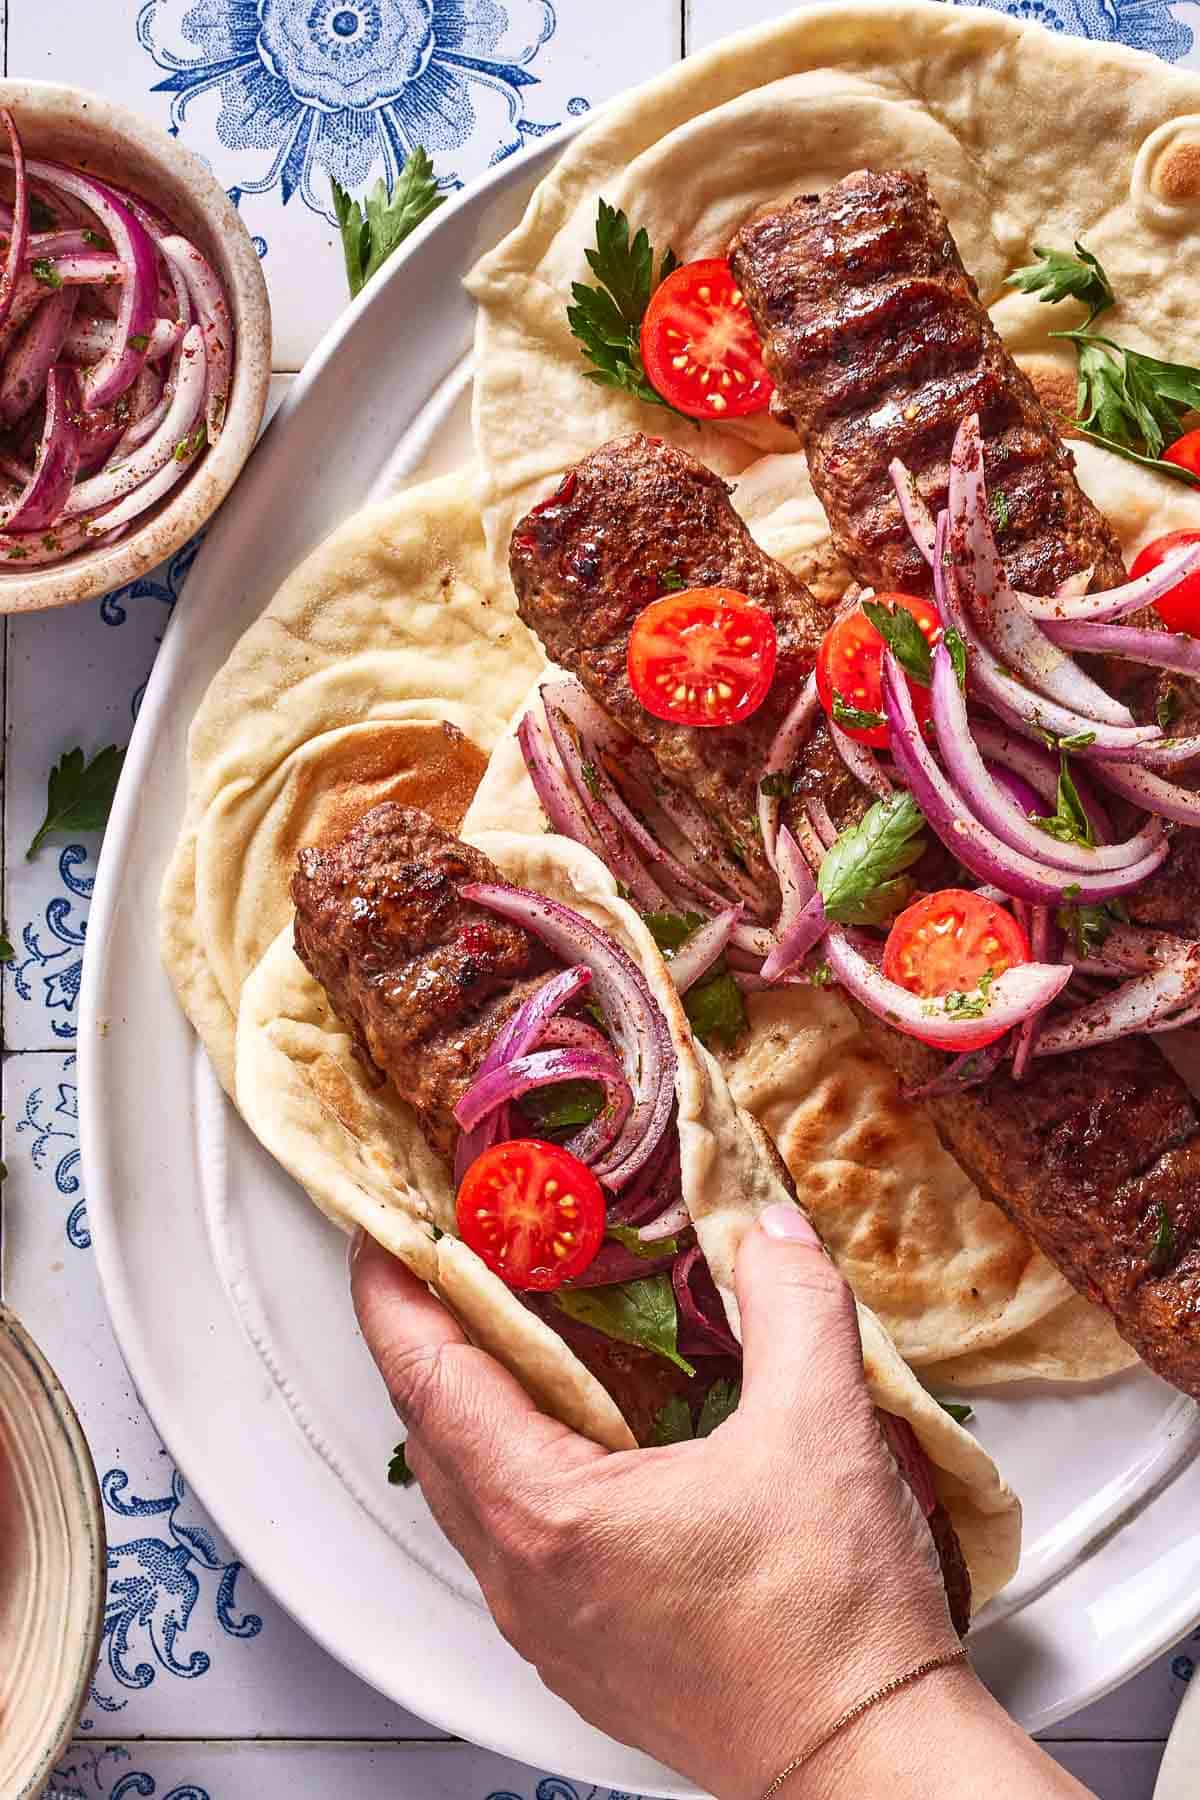
Kebabs: The most traditional way to serve lavash is as a wrap for kebabs, like my Turkish Adana Kebab and Homemade Doner Kebab. Its thin, soft texture makes it perfect for rolling, and it does a great job soaking up all the delicious juices from the meat. That said, you don’t have to stop at kebabs. Any grilled meat, like my Shish Tawook, works beautifully wrapped in lavash.
Shawarma: Beyond kebabs, homemade lavash is the perfect wrap for your favorite shawarma recipes, such as my Chicken Shawarma or Beef Shawarma. Just roll up the meat with your favorite toppings for a delicious, handheld meal.
Scooping Mezes and Dips: While pita is often the go-to for serving with meze like baba ganoush, hummus, or muhammara, warm lavash is just as good, if not better. Tear off a piece and use it to scoop up the dips right off the plate. No spoon needed.
Breakfast: Lavash is also fantastic with a simple Turkish breakfast spread. I love serving it alongside cheeses, olives, Turkish eggs, and freshly sliced tomatoes and cucumbers. And if I feel like treating myself a bit, I sometimes even brush it with some melted butter while it is still warm.
Other versatile uses: Lavash is one of those breads you can serve with just about anything. Use it to dip into soups and stews, wrap up leftovers, or even turn it into a quick wrap. Any time you find yourself reaching for bread, lavash will do the job beautifully.
How to Store, Freeze and Reheat Lavash
I’ll be honest, lavash is best on the day that it is made while it is still warm. As it cools, it tends to lose its softness. That said, if you store it properly, it is still great the next day. Here’s how I do it:
Storage: Let the lavash cool to room temperature, then place it in an airtight container or sealable zip-top bag. Keep it in the fridge for up to 3 or 4 days.
Freezing: Once cooled, place the lavash in a freezer-safe container or freezer bag with sheets of parchment paper between each piece. Try to remove as much air as possible before sealing. It will keep in the freezer for up to a month. When you’re ready to use it, thaw overnight in the fridge.
Reheating: You have two options here:
- In the oven: Preheat the oven to 325°F. Lightly spray the lavash with water, place it on a baking sheet, and warm for 8 to 10 minutes or until heated through. You can reheat multiple pieces using this method.
- In the microwave (my favorite method): Lightly wet two sheets of paper towel and wrap the lavash in between. Microwave for 30 seconds, then carefully remove the towels. If it needs a bit more time, repeat for another 10 to 15 seconds. When using this method, it is best to reheat your lavash one piece at a time.
Frequently Asked Questions
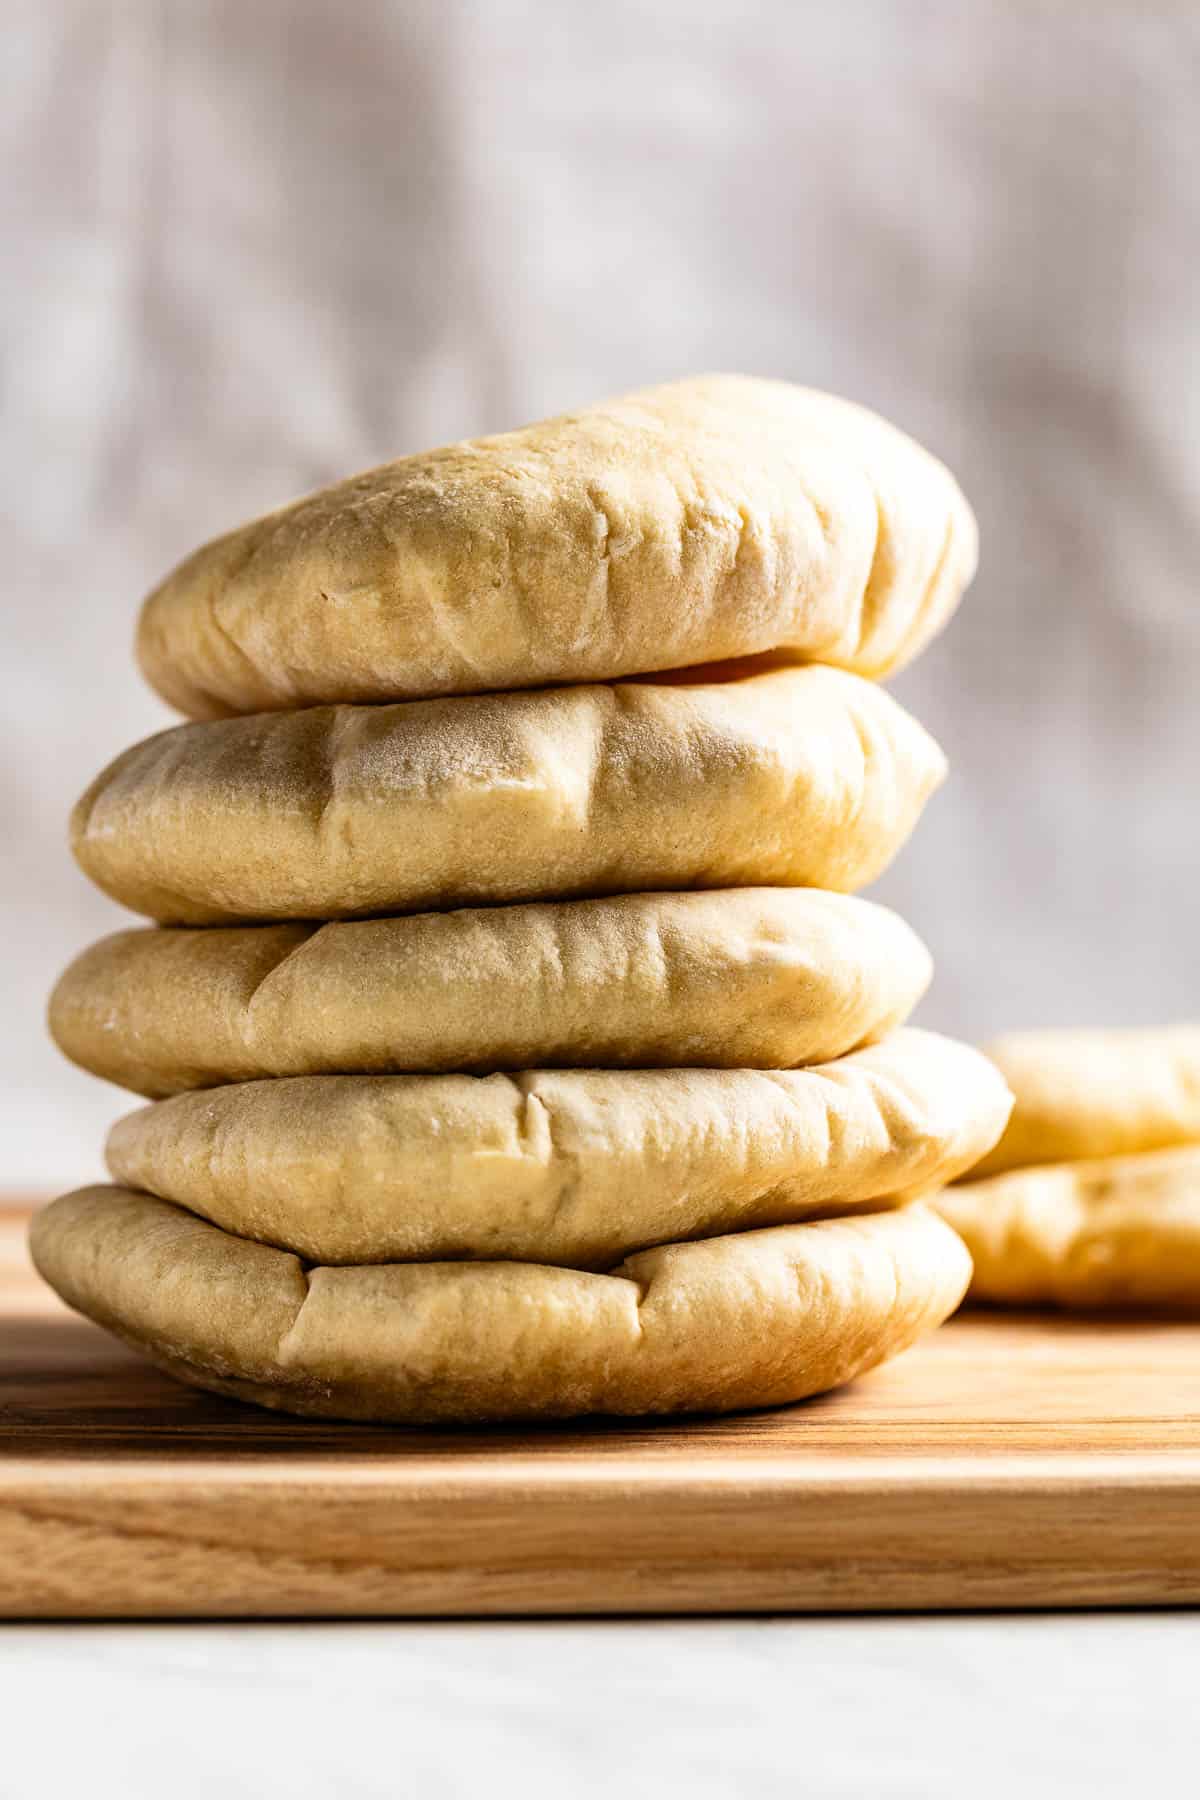
Lavash and pita are both Middle Eastern flatbreads, but they’re not quite the same. Pita is usually thicker and bakes up with a pocket in the center, which makes it great for stuffing. Lavash, on the other hand, is thinner, softer, and more flexible, making it easier to use as a wrap.
Additionally, pita is usually cooked in a very hot oven, whereas lavash bread is often cooked on a skillet, griddle, or traditionally (especially in Armenia) in a tonir (or tandoor) oven.
Yes, you can. I like to use yeast because I find yeasted dough to be easier to work with, but you can make lavash using only flour, salt, and oil.
Yes, you can. A griddle works just as well as a skillet, especially if you want to cook more than one lavash at a time. Some people even prefer to roll the dough into an oval shape to fit better on a rectangular griddle.
Other Bread Recipes You Might Also Like:
If you’re a fan of lavash, chances are you love Middle Eastern breads just as much as I do. Here are a few more recipes from the archives:
- Stop buying pita at the store and try making your own. It’s easier than you think. Check out my post on how to make pita bread, complete with foolproof tips perfect for beginners.
- If you’ve ever had a traditional Turkish breakfast, you’ve probably had simit. Some people call it Turkish bagels, and once you try it, you’ll understand why it’s such a favorite. This one’s worth your time.
- No sourdough starter? No problem. My no-knead olive bread is one of the easiest, most hands-off bread recipes you can make. Just mix, let it rest, and bake.
Photos by Tanya Pilgrim.

Lavash Bread Recipe
Ingredients
- ¾ cup warm water, at 110 °F degrees
- 1 teaspoon honey
- 1 ½ teaspoon instant yeast, aka quick rise yeast – (5g)
- ¼ cup extra virgin olive oil
- ½ cup whole milk, at room temperature
- 3 ¼ cups all purpose flour, plus more for rolling (423 g)
- 1 ¼ teaspoons kosher salt, 8g
Instructions
- Place ¾ cup of warm water and 1 teaspoon of honey in a measuring cup. Stir to ensure that the honey is fully dissolved.

- Add the yeast and stir until it is well combined. Let it rest for 5 minutes. It will have a thick layer of bubbles on top.
- In the same measuring cup, add ¼ cup olive oil and ½ cup milk. Give it a good stir. Set it aside.
- Combine 3 ¼ cups all-purpose flour and 1 ¼ teaspoons kosher salt in a large bowl.
- Add the yeast mixture and knead for 5 minutes, first mixing the dough until no flour remains and then turning it into a ball. In the end, it will be a very sticky dough, and that is normal.
- Cover the dough with a clean kitchen towel and let it rest in a warm part of your kitchen for 20 minutes. It will get slightly larger in size.
- Transfer the now-rested dough to a lightly floured surface.
- To knead the dough, press it with the heel of your hand, then push it away, fold it back over, and rotate it 45 degrees. Repeat this process for 5 minutes or until the dough is smooth. If it’s too sticky to work with, sprinkle in a bit more flour, 1 tablespoon at a time.
- Shape the dough into a log and divide it into 10 equal pieces.
- Roll each piece into a ball, dust it with flour, and transfer it onto a plate. Loosely cover the plate with a kitchen towel and let it rest for 20 minutes.
- When you’re ready to cook, heat a large (12-inch) nonstick or cast-iron skillet over high heat for 5 minutes. The pan needs to be very hot to keep the dough from sticking. To test, flick a few drops of water into the skillet. If they sizzle and disappear right away, it’s ready.
- While the pan heats up, roll out one dough ball into a 10-inch circle using a rolling pin and more flour as needed. As you roll, it might be tricky to keep a perfect circle, and that’s totally fine. Just do your best.
- Carefully transfer the rolled dough to the hot skillet. Cook for 10 seconds (you’ll see bubbles forming), then flip. Cook for another 10 seconds, then flip again. Repeat for a total of 3-4 flips or until it looks fully cooked and has golden spots.
- As soon as it’s done, wrap the warm lavash in a clean kitchen towel and place it in a basket to keep warm. Continue adding each cooked piece to the basket, keeping them wrapped so they stay soft and warm while you finish the rest.
- Repeat the same rolling and cooking process with the remaining dough balls.


Video
Notes
- Yields: This recipe yields 10 lavash, each approximately 9 to 10 inches in diameter. The nutritional values below are per piece.
- Storage: Bring the leftover bread to room temperature and store in an airtight container (or a Ziploc bag) for up to 4 days.
- Reheating: You can reheat in a low-heat oven (325°F) for 8-10 minutes, or until thoroughly warmed through. Or you can wrap it in a lightly wetted paper towel and microwave for 30 seconds.
- A word on the yeast: I used instant rapid yeast as I find that it blooms faster but active dry yeast can also be used.
- This recipe was adapted from Betul Tunc’s cookbook Turkuaz Kitchen’s lavash recipe with minor changes.
Nutrition
Nutrition information is automatically calculated, so should only be used as an approximation.


This was great! Tasted just like the bread I had at kebab restaurants. However, I got confused by the steps. Shouldn’t step 8 be after step 5? Because I almost kneaded the dough twice and every other bread making recipe kneads it once.
Hello,
I am happy to hear that you liked it.
The recipe is correct though. We need to yeast to do its job first before we start kneading the dough.
Hope this helps.
Thanks for coming by and taking the time to leave a review.
Aysegul
Looks fantastic but I haven’t tried it yet. I’m just getting tired of using tortillas for my kebabs. Since I am single and cook for one, is it possible to freeze these after cooking? I just can’t eat even half this many in 4 days and still keep my figure. :o)
Hello Marty,
You can freeze them. Though I have to be honest, they are best when they are freshly cooked.
To freeze, bring them to room temp, place them in a freezer-safe container or freezer bag with sheets of parchment paper between each piece. Do your best to remove as much air as possible before sealing. They will keep in the freezer for up to a month. When you’re ready to use it, thaw overnight in the fridge.
Hope this helps.
Thank you so much for this recipe! The instructions were easy to follow and straightforward, and the bread turned out soft and delicious 😋 Definitely going on my dinner rotation.
This makes me so happy to hear Izzy. Thanks for coming by and taking the time to share your experience.
pretty good. I added some butter on it. 10/10 would do it again.
Thanks.