Making lasagna rolls with zucchini is an easy way to enjoy fresh, healthy, and tasty Italian cuisine flavors any night of the week. This easy vegetable lasagna rolls dish is also a healthier alternative and a fun take on rolls made with traditional lasagna noodles.
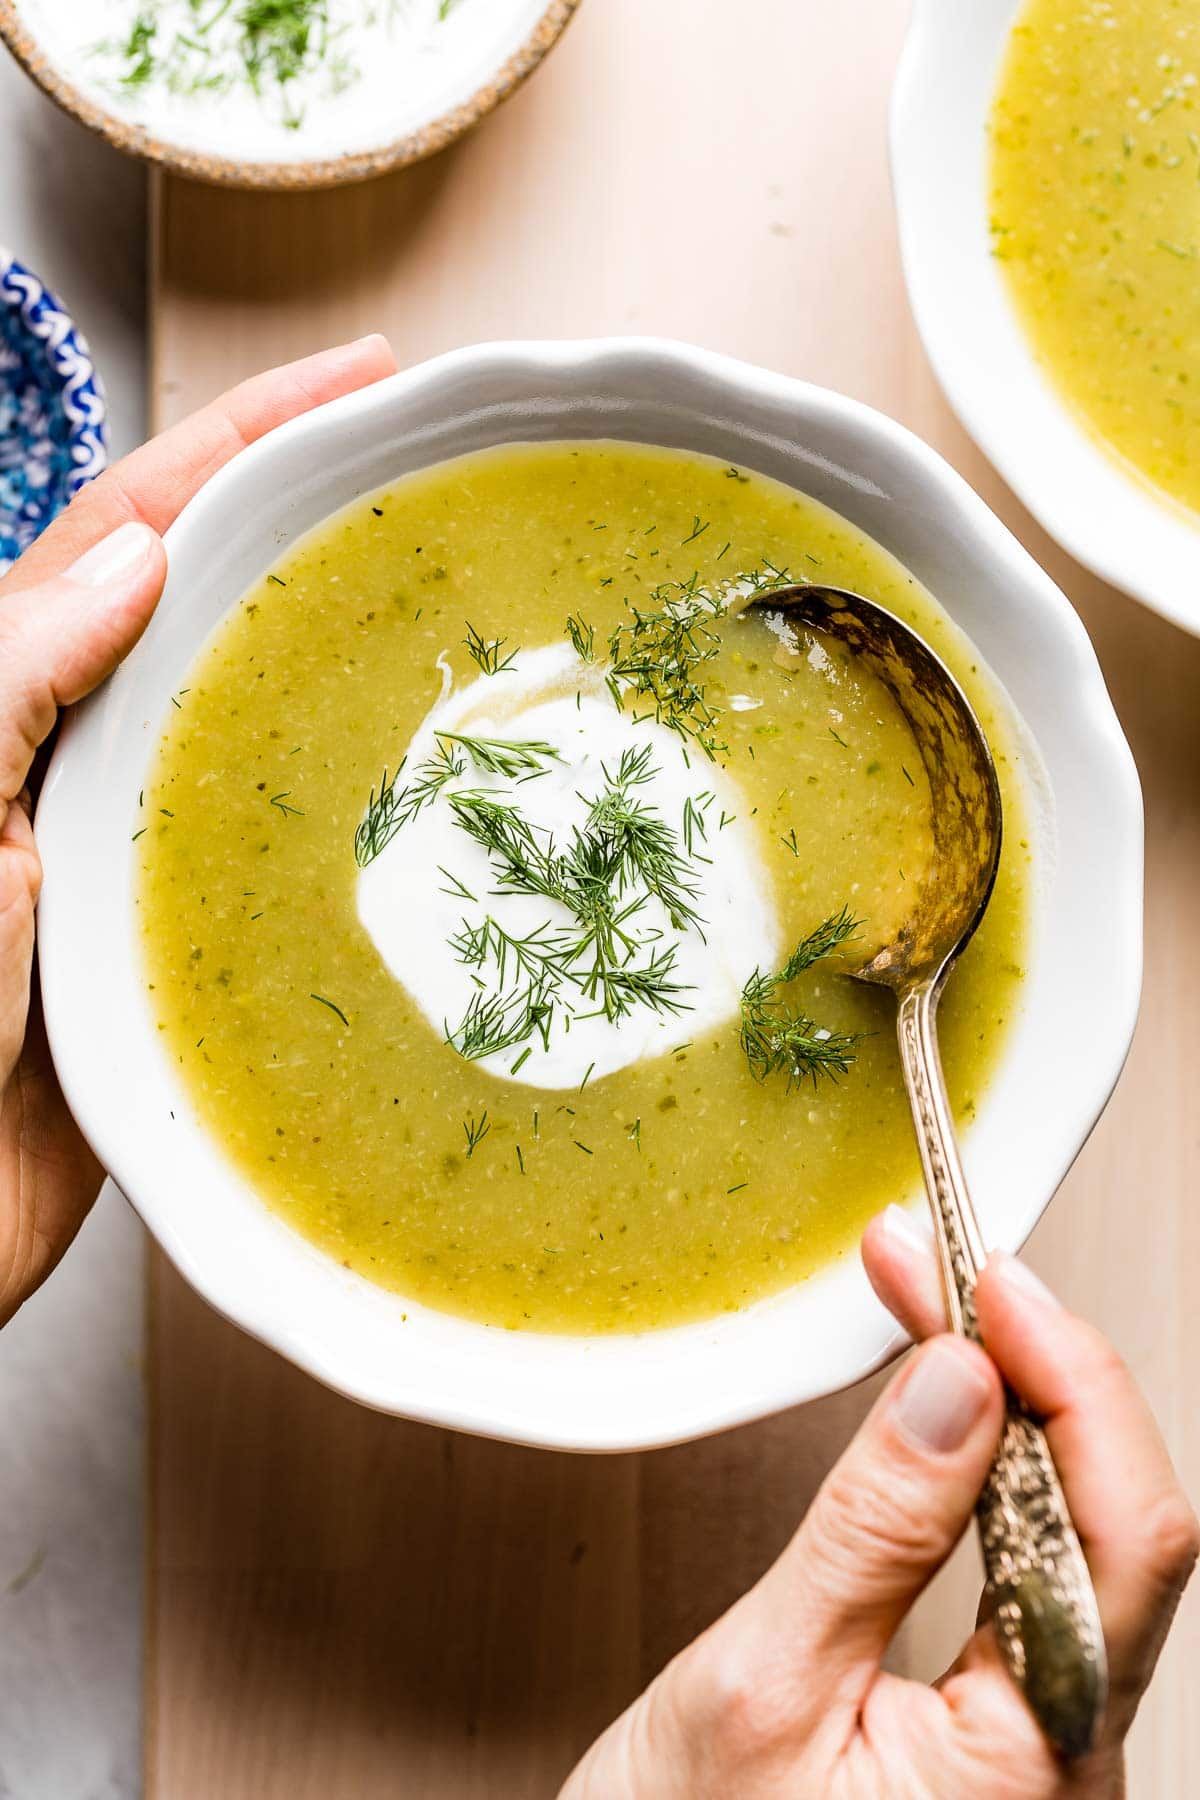
The versatility of zucchini is truly impressive! It can be transformed into a variety of healthy dishes: consider our Turkey Zucchini Meatballs for a healthy weeknight meal, whip up a Cream of Zucchini Soup in just 30 minutes, or bake a batch of Baked Zucchini Fritters for a crisp, tangy appetizer that will disappear in minutes.

Ingredients You’ll Need to Make Zucchini Rolls
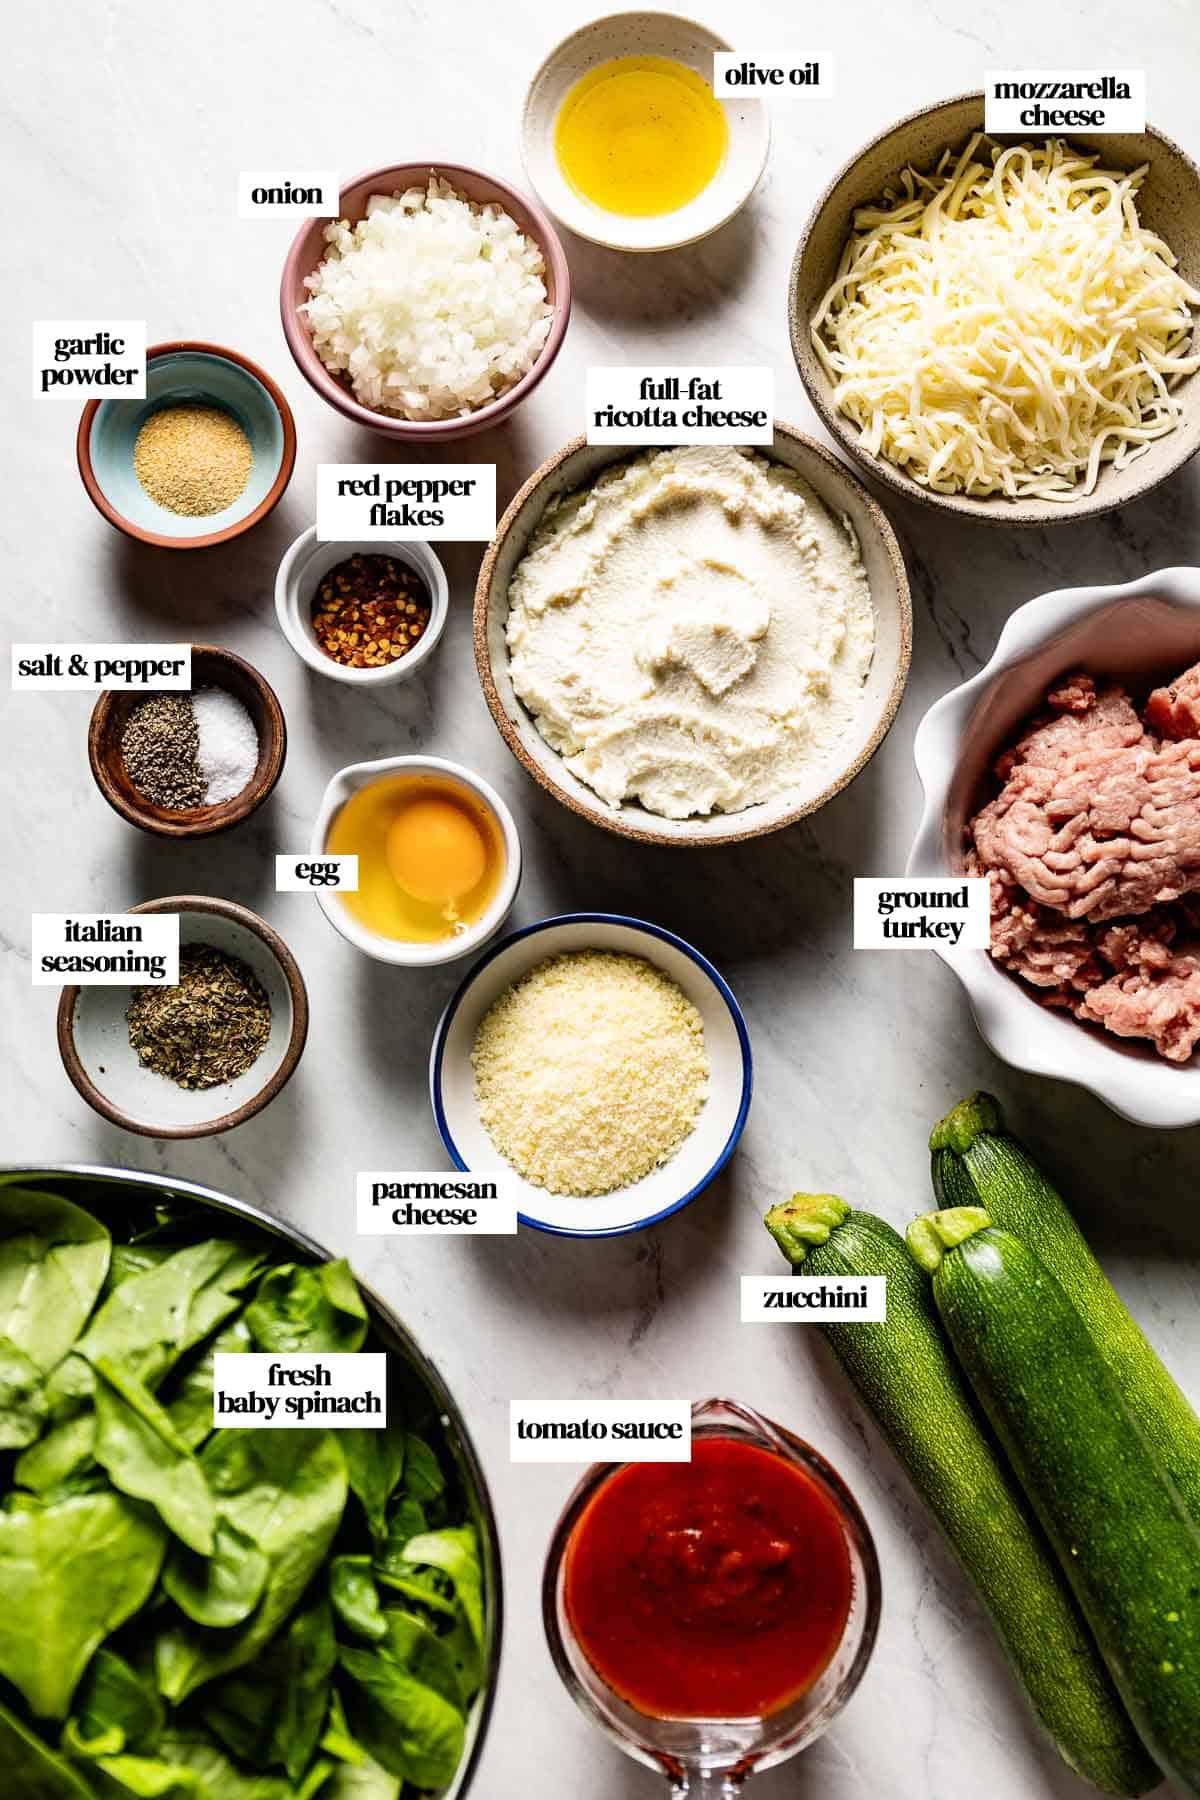
You’ll only need a small collection of fresh, simple ingredients for this zucchini roll ups recipe.
- Zucchini: You’ll need three small- or medium-sized zucchini to make your rolls. I recommend avoiding large zucchini, as they’re often more watery and contain a higher concentration of seeds. You also don’t need to peel your zucchini before adding them to your recipe, particularly if you’re using them during summer (AKA zucchini season!).
- Ricotta: Full-fat ricotta cheese is my go-to for this dish, as the extra creaminess gives rolled zucchini an incomparably rich, gooey flavor. You could also make Homemade Ricotta if you prefer making your cheese from scratch. However, no matter what type you choose, drain any excess liquid before preparing your filling.
- Olive oil
- Onion: It’s essential to mince your onion finely to allow for a more even distribution of this ingredient throughout the ricotta filling.
- Ground turkey: Making zucchini lasagna rolls with meat is a great way to give this dish a savory, protein-packed base. I prefer using ½ pound of ground turkey for a leaner alternative to ground beef, though any ground meat would work. For a slightly spicier take, you could also use Italian sausage or chicken sausage, separated into small chunks.
- Fresh baby spinach
- Egg
- Parmesan cheese
- Seasoning: To give your zucchini ricotta rolls their iconic Italian flavor, you’ll need garlic powder, Italian seasoning, Kosher salt, and ground pepper. You may also include red pepper flakes for a kick of spice, though this ingredient is optional.
- Tomato sauce: You can use your favorite marinara sauce (affiliate link) in your lasagna rolls for a quick, store-bought option. If you want to add bold, herby undertones to your dish, you may also use my Homemade Tomato Basil Sauce instead.
- Shredded mozzarella cheese
- Fresh herbs: Garnish it with fresh basil or any other herbs you have on hand. Thyme, Italian parsley, or oregano would all work.
Optional Add-Ins and Substitutions
- Use low-fat or skim cheese: Looking for a way to make these low-carb lasagna roll ups even lighter? To reduce calories, you may use low-fat or skim cheese instead of whole-milk cheese.
- Frozen spinach: You may use frozen spinach instead of fresh baby spinach in this recipe if you don’t have any fresh leaves on hand. It’s important, however, to let the spinach fully thaw and squeeze out all of its juices before incorporating it into your rolled zucchini lasagna.
- Cottage cheese: If you want to make your zucchini roll ups without ricotta, substituting the ricotta cheese with cottage cheese is an easy way to add irresistible tanginess (and protein!) to this recipe. You could also purchase dairy-free cottage cheese from brands like Kite Hill for a vegan option. Regardless of what cottage cheese you use, eliminate as much liquid as possible before adding it to your recipe, preferably by straining it in a colander.
- Vegetarian: It’s easy to transform this meaty dish into vegetarian zucchini roll ups. Simply omit the meat in this recipe and prepare as usual.
- Vegan: To make your zucchini roll-ups vegan, first omit the egg. Then, substitute the cheese with dairy-free alternatives, such as your favorite vegan ricotta, parmesan, and mozzarella. You could also make vegan tofu ricotta and vegan parmesan at home if you have nutritional yeast on hand.
How to Make Zucchini Lasagna Roll Ups?
There’s no secret to making zucchini roll ups with ricotta and spinach. These expert instructions will give you rich, mouthwatering results without hassle.
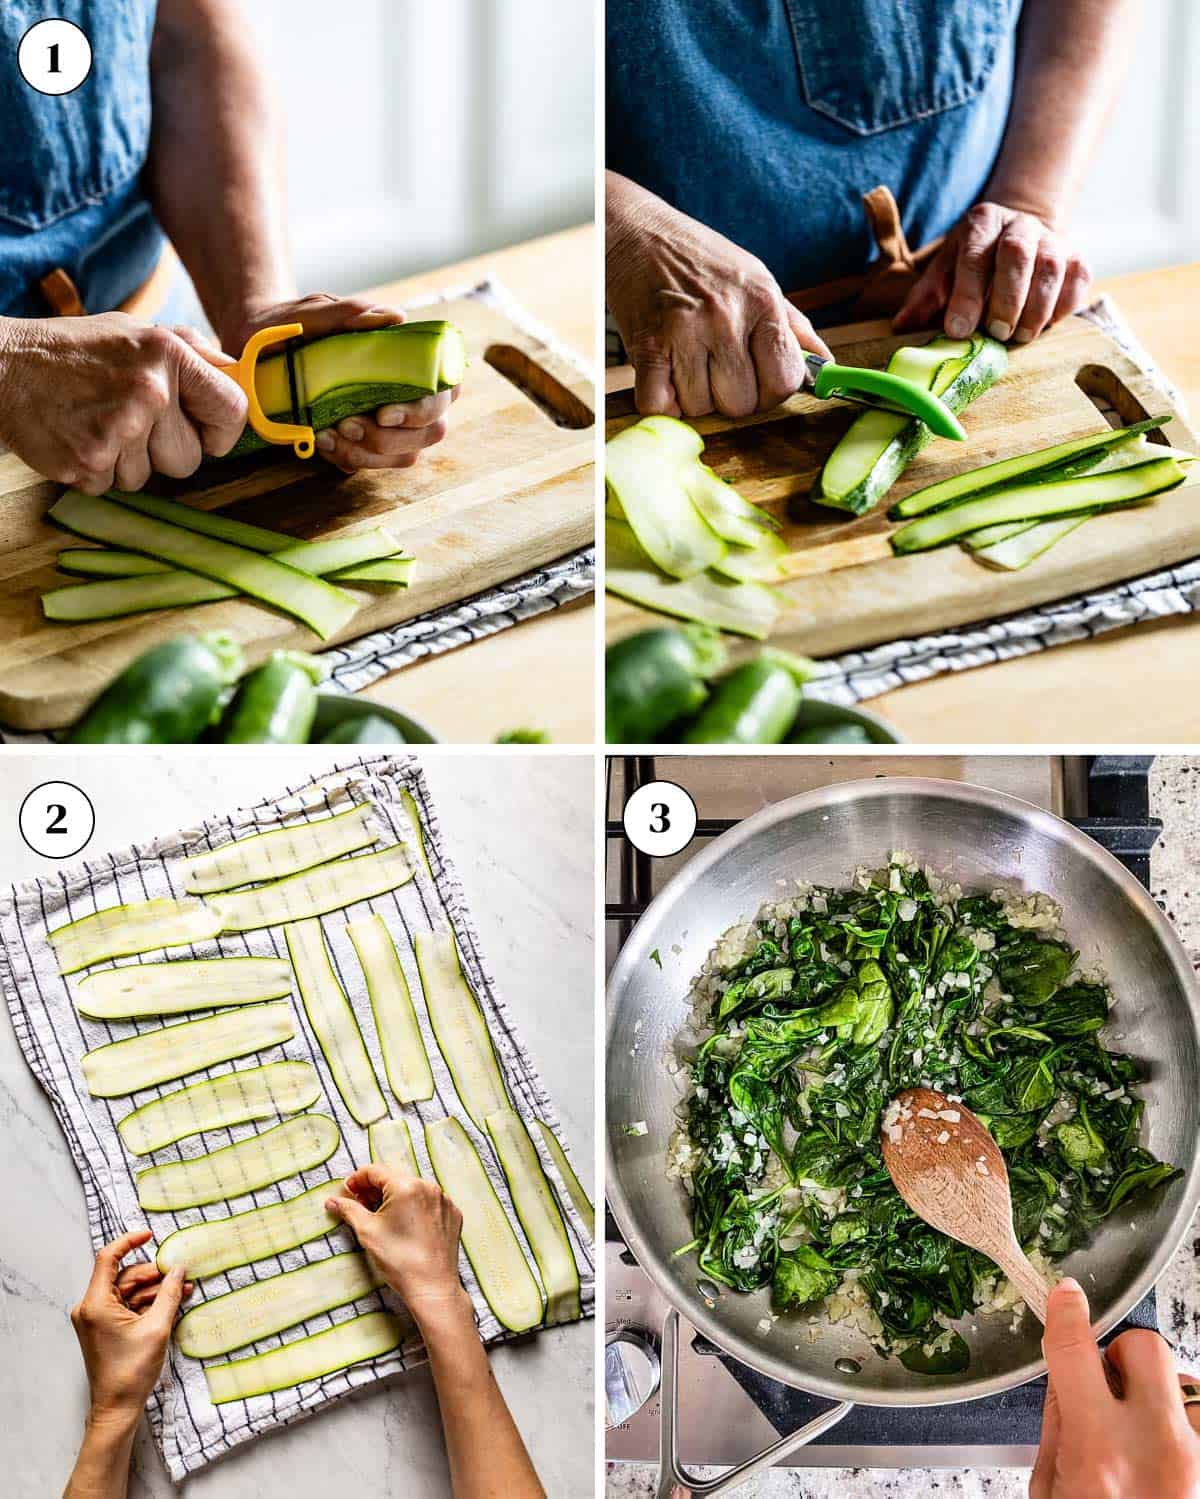
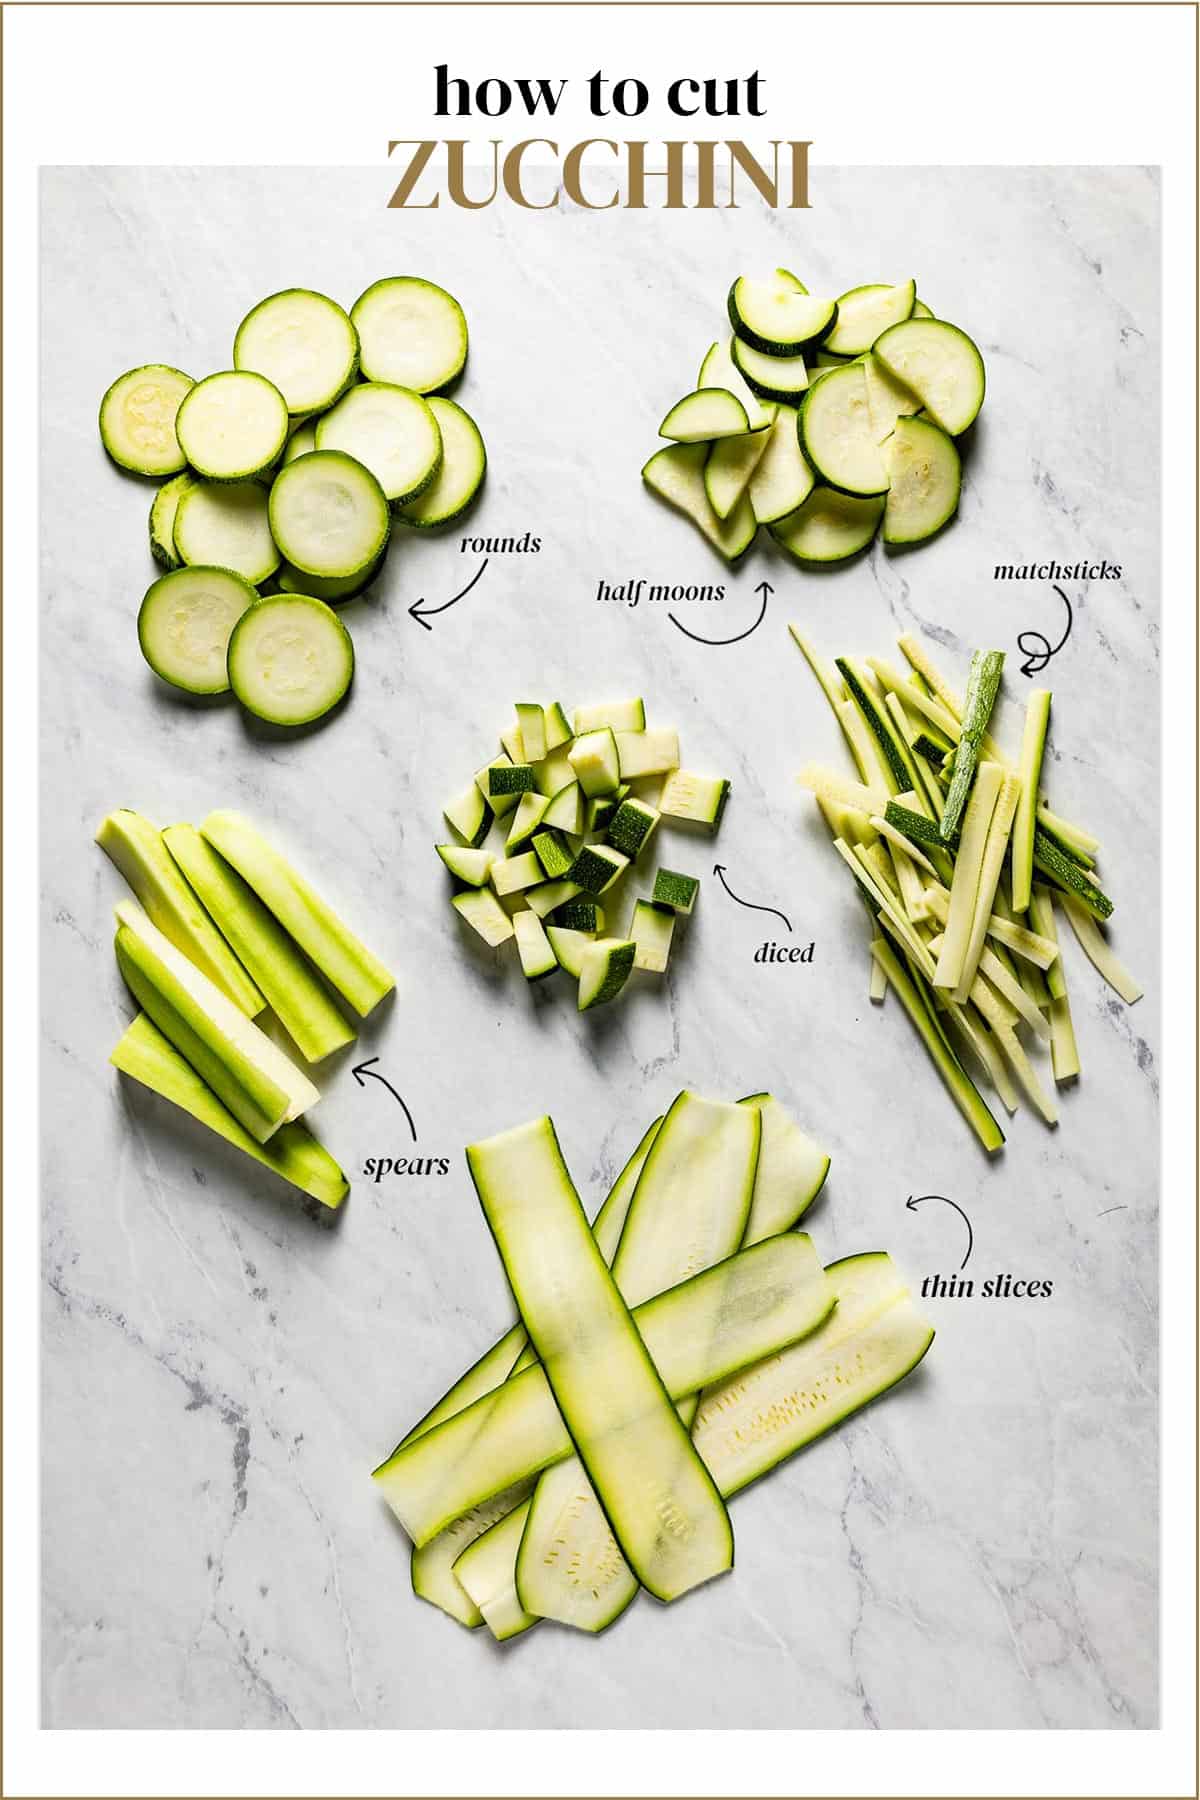
- Prep the zucchini: We’re going to use my signature method of slicing zucchini noodles for lasagna, which you can read more about in my guide on How to Slice Zucchini Thinly. In a nutshell, you’ll begin by slicing off a small portion of each vegetable from its top and bottom. Then grip the end of one vegetable and use your other hand to slice off thin strips—preferably ⅛-inch thick—using a Y peeler, mandoline, or a sharp knife. Keep in mind that we are cutting the zucchini lengthwise. Once the zucchini becomes too thin to hold, rest it lengthwise on your cutting board and use it to support you as you make the rest of the slices. Make sure, too, that your pieces are whole and as uniform as possible.
- Let the zucchini slices rest: Arrange your strips of zucchini in a single layer on a clean kitchen towel or a few sheets of paper towels. This resting time will allow the zucchini to sweat out excess moisture while you prepare the remaining ingredients. Then, pat dry the top of the strips before assembling your roll-ups.
- Saute the meat and spinach: Heat the olive oil in a large skillet over medium-high heat. Once the pan is hot, add the onion and turkey and saute the mixture. Break up any large pieces of meat and cook until crumbled and browned (about two minutes). Then, add the spinach to the skillet and heat until wilted, about 1-2 minutes. Remove the pan from the heat, let it cool, and drain away any excess liquid.
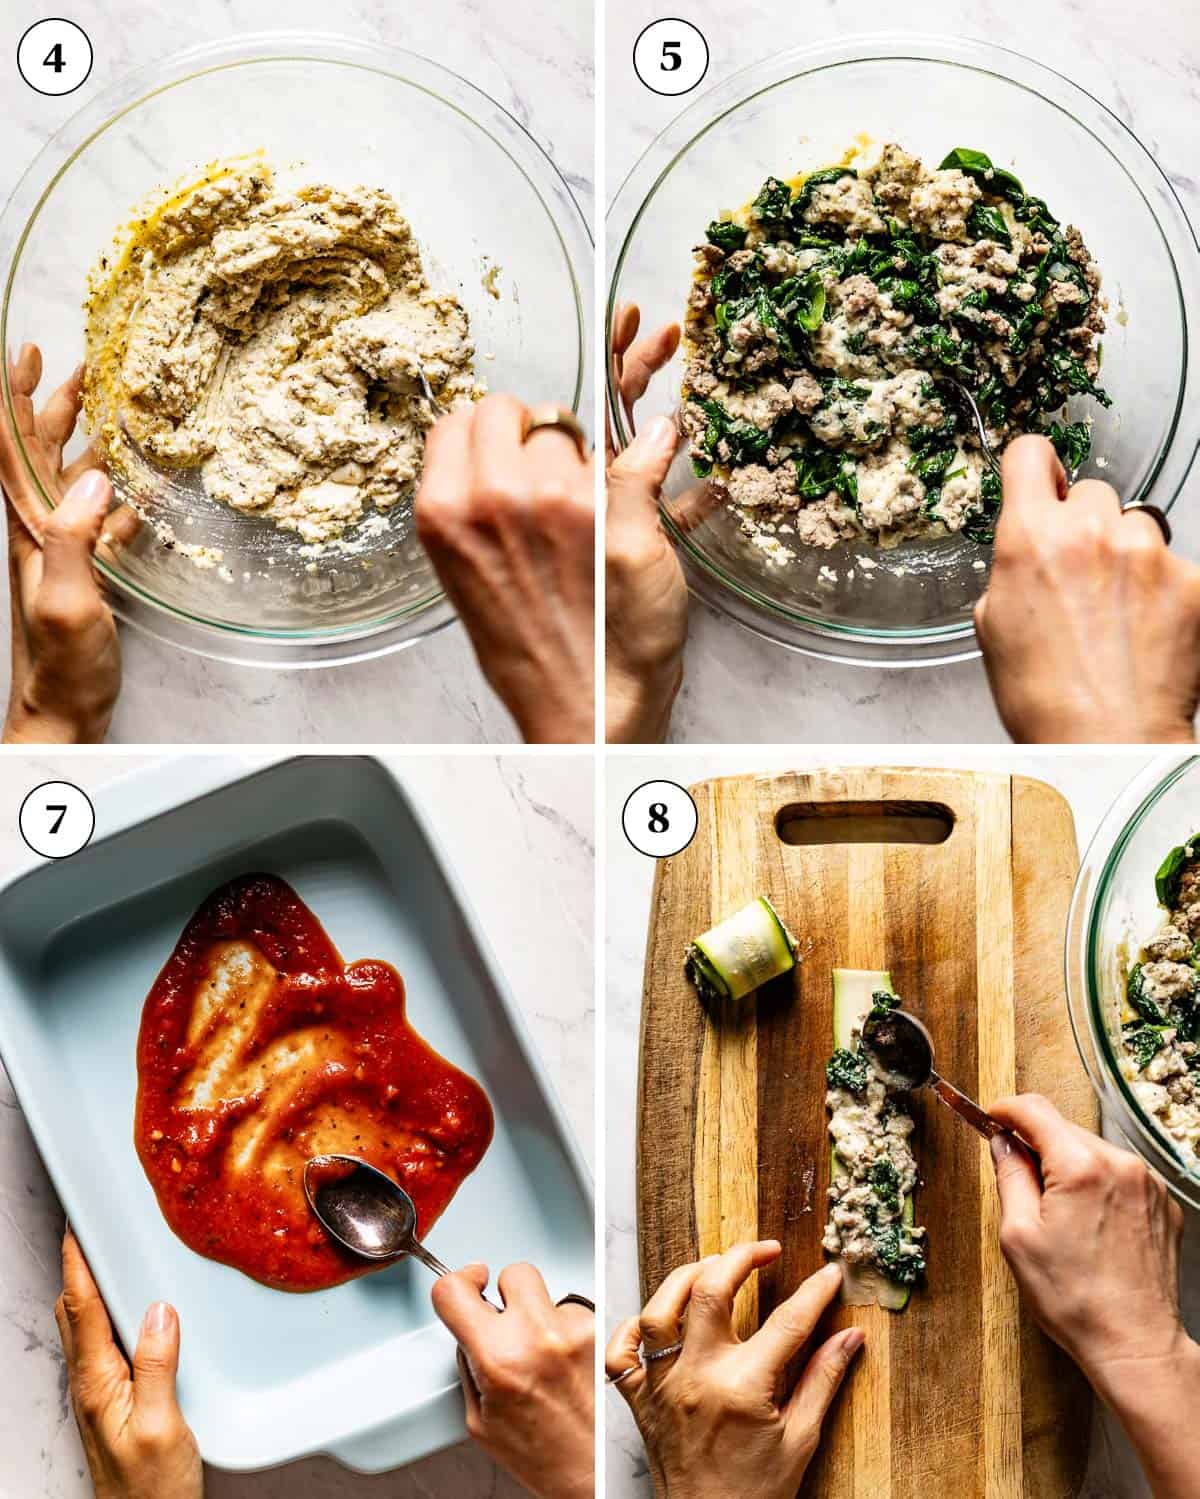
- Prepare the filling: Add the ricotta cheese, egg, parmesan cheese, garlic powder, Italian seasoning, salt, and black pepper to a large bowl. Mix until thoroughly incorporated.
- Add the meat: Transfer the cooled ground turkey to the ricotta mixture and mix until combined.
- Prep the oven: Preheat the oven to 375 degrees F.
- Coat the baking dish: Spread ½ cup of tomato sauce at the bottom of a large baking dish (preferably a 9×13-inch casserole dish).
- Spread the zucchini: Lay one slice of zucchini flat on its surface. Place one tablespoon of the ricotta filling at one end of the strip and use the back of a spoon to gently spread it across the veggie’s surface, leaving ½ inch uncovered at its end. If any filling spills over the edges of the zucchini, gently push it toward the slice’s center.
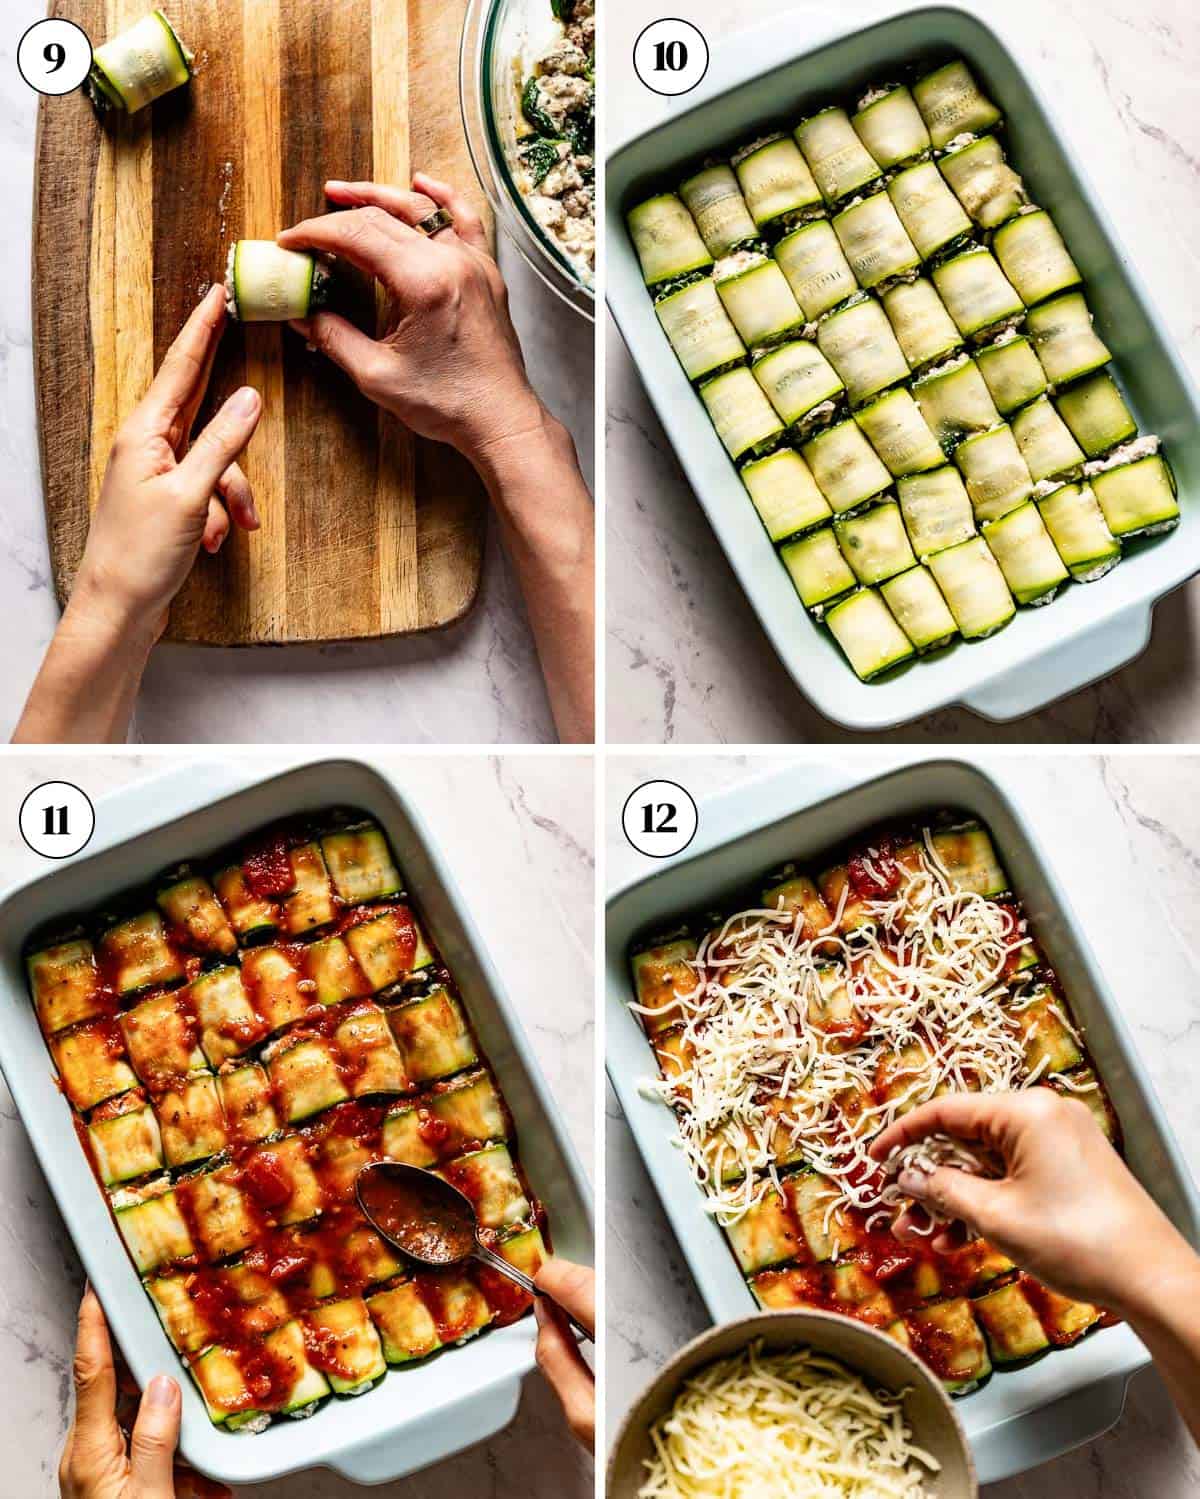
- Roll the zucchini: Beginning at the coated end of a zucchini, gently roll the slice toward the opposite, uncovered end. As you proceed, use your fingers to keep the filling inside.
- Arrange the baking dish: Transfer the roll, seam-side-down, into the baking dish. Repeat this process (Steps 8-10) for the remaining rolls, arranging them in the baking dish such that you begin along the short side and work your way across the surface in rows. By the end of the assembly process, you should have approximately 36 roll-ups (granted, you are using a 9X13 baking dish.)
- Add the toppings: Spread the remaining tomato sauce in an even layer over the zucchini rolls. Then, sprinkle the top with mozzarella cheese.
- Bake: Bake the lasagna roll-ups uncovered for 20 minutes or until bubbly brown.
- Serve: Remove the dish from the oven and let them rest for 15 minutes before serving.
How to Make Ahead and Store It
Meal prep is a cinch with this keto zucchini roll ups recipe. This simple guide will help you every step of the way, whether preparing this dish to serve a crowd or saving leftovers to enjoy later.
- Make ahead: To make this zucchini roll lasagna ahead of time, assemble and bake the dish as instructed. Then, let the rolls cool to room temperature and remove any excess liquid. Cover the dish as tightly as possible with several layers of plastic wrap and store for up to three days in the refrigerator.
- Store: Once your dinner roll-ups reach room temperature, drain any extra liquid and transfer them to an airtight container. You may then store them in the refrigerator for up to three days.
- Freeze: To freeze your zucchini rollups, let the dish reach room temperature and remove as much excess liquid as possible. Then, transfer them to an airtight container or wrap your dish as tightly as possible with a few layers of stretch film to avoid freezer burn. You can then freeze this recipe for up to a month.
- Thaw: To thaw your frozen roll ups, transfer them to the fridge overnight. Then, drain off any excess liquid and reheat them at 350 degrees F. until warm (about 20-30 minutes).
- Reheat: When reheating it, first remove as much excess moisture as possible. Then, place them in a 350-degree F. oven for 20-30 minutes or until heated.

Serving Suggestions
Ricotta zucchini roll-ups are amazing when it comes to delicious menu ideas. This collection of tasty dishes will fill your table with brilliant color, bright flavors, and finger-licking taste.
- Serve it on its own: This zucchini lasagna roll recipe—healthy, filling, and delicious—works spectacularly as a main dish. Or, you could use toothpicks to turn this recipe into bite-sized appetizers ready to serve a dinner party crowd.
- Grains: All you need is a tasty grain to transform your lasagna rolls into a balanced meal. Lemon Quinoa adds a note of bright zest, while Bulgur Pilaf takes less than 30 minutes to give your spread a robustly seasoned Turkish edge.
- Salads: Spring Mix Salad is a classic if you make zucchini roll ups with ricotta and want to balance your table with something light and crisp. Or, add tangy, herbaceous flavors to your meal with the iconic Friends Salad or my Yogurt Cucumber Salad.
- Bread: If you love dipping toasty, crisp bread into hearty pasta sauce, you’ll adore serving a loaf of my Crusty No-Knead Bread alongside your zucchini dinner roll-ups. I also love to serve my zucchini rolls with Garlic Bread prepared in the air fryer to cut prep time in half and ensure robust, garlicky flavor in every bite.
Expert Tips
This zucchini roll recipe is a boon for beginner cooks and master Italian chefs alike. Using this pro guide, anyone can prepare rich and tender lasagna rolls any day of the week.
- Thin slices: You must cut your zucchini into thin pieces, about ⅛-inches thick, to be able to roll them easily. A mandoline or a vegetable peeler is the easiest way to get these delicate, even slices. However, if you don’t have these tools on hand, you can cut your zucchini with a knife, though your pieces might be a little thicker than desired. If you end up with rather thicker slices of zucchini, I recommend precooking them before adding them to your recipe to ensure they’re as dry and pliable as possible. Simply line a baking sheet with parchment paper, arrange your zucchini strips in a single layer, and bake them in a 350-degree F. oven for 5-7 minutes, flipping them halfway through.
- Do not skip resting the zucchini slices: This stage is critical for eliminating some of the zucchini’s liquid to avoid ending up with watery lasagna roll ups. In certain renditions of this recipe, one would sprinkle the zucchini slices with salt, an approach we have experimented with, though it did not seem to make a difference in the outcome.
- Filling and rolling: Before rolling your lasagna pieces, I highly recommend spreading your ricotta mixture across each zucchini strip, leaving a small, empty space on one end (preferably about ½ inch). This technique for filling and rolling will ensure that the filling is evenly distributed throughout each roll-up and allow for easier assembly. I also suggest only using one tablespoon of filling per roll. Though you may feel the urge to add more, too much of the ricotta mixture will result in it spilling out the edges, and your zucchini slices will likely be too thick to roll properly.
- Sauce at the bottom: Spreading a thin layer of sauce at the bottom of the casserole dish is a must when cooking in a pan without oil. This layer creates a safe barrier to keep your zucchini lasagna roll-ups from burning and adds more rich tomato flavor to your recipe.
- Arranging the rolled-up lasagna noodles: Don’t worry about placing your lasagna rolls too close to one another in the baking pan. Because this recipe uses such thinly-sliced zucchini, your strips will be delicate enough to cook in the oven without as much exposed surface area.
- Excess water: Zucchini naturally contains a lot of water, so many people worry about coming out with watery zucchini lasagna rolls. Though some excess water is inevitable, if you follow my steps for letting the veggie slices rest and removing as much liquid from your ingredients as possible, you should be able to avoid an overly watery zucchini dish. Don’t be afraid, too, to drain excess water from your lasagna rolls before serving and after storage.
FAQs
There’s no reason to stress out over this easy zucchini lasagna rolls recipe. This easy FAQ will answer any questions you have, from proper zucchini prep to expert storage tips.
Whether you peel zucchini before cutting it is completely up to personal preference. I prefer to leave the skin on, as it’s extremely mild-tasting and has many antioxidants. However, if you dislike the texture, remove the skin with a vegetable peeler before incorporating it into your zucchini lasagna rollups.
Yes! To freeze your lasagna rolls, let them cool to room temperature and drain away any excess moisture. Then, either transfer them to an airtight container or wrap their dish tightly with several layers of plastic wrap to avoid unwanted freezer burn. After freezing, you can thaw your dish overnight in the fridge and reheat it at 350 degrees F. for 20-30 minutes.
Other Zucchini Recipes You Might Also Like
Tender, sweet, and healthy, zucchini is the ultimate summer ingredient. You’ll love this tasty collection if you’re looking for more veggie recipes as delicious as these stuffed zucchini rolls.
- Skinny Shrimp Scampi with Zoodles
- Vegan Zucchini Bread
- Almond Flour Zucchini Bread
- Classic Zucchini Bread
If you try this Zucchini Lasagna Rolls recipe or any other recipe on Foolproof Living, please take a minute to rate the recipe and leave a comment below. It is a great help to others who are thinking of making the recipe. And if you took some pictures, be sure to share them on Instagram using #foolproofeats so I can share them on my stories.

Zucchini Lasagna Rolls Recipe
Ingredients
- 3 medium zucchini, thinly sliced* (36 slices/rolls in total)
- 8 ounces full-fat ricotta cheese, excess liquid drain if there is any (skim cheese would also work)
- 1 tablespoon olive oil
- ½ small onion, finely minced, or a small onion (½ cup)
- ½ pound ground turkey
- 6 oz. fresh baby spinach, or frozen spinach thawed and drained
- 1 large egg
- 3 tablespoons grated parmesan cheese
- 1 teaspoon garlic powder or one minced garlic
- 2 teaspoons Italian seasoning
- ½ teaspoon Kosher salt
- ½ teaspoon ground pepper
- 2/3 cup Tomato Basil Sauce, or your favorite Marinara Sauce
- 1/2 cup mozzarella cheese, shredded
- ½ teaspoon red pepper flakes, optional
- Handful of fresh basil leaves, as garnish
Instructions
- Slice zucchini lengthwise using a y-peeler, mandolin slicer or a sharp knife as thinly as you can. We recommend zucchini slices to be ⅛-inch thick if possible.
- Arrange the zucchini slices in a single layer on a kitchen towel or a few sheets of paper towels. As they rest, you will notice a trace amount of moisture emerging on the surface. Let them sit on the counter while you are working on the rest of the ingredients, and be sure to pat dry before the assembly stage.
- Meanwhile, make the filling: Heat the olive oil in a large skillet over medium-high heat. Add onion and turkey. Sautee, break up the large chunks of the meat using a wooden spoon and cook until it has crumbled and browned, approximately for 2 minutes. Add the spinach and cook until fully wilted, for 1-2 minutes. Remove from the heat and set aside to cool. Drain off any excess liquid, if there is any, in the skillet.
- To prepare the filling: In a large bowl, add the ricotta cheese, egg, parmesan cheese, garlic powder, Italian seasoning, salt, and pepper. Mix until fully incorporated.
- Add the now-cooled turkey spinach mixture to the filling and stir to combine.
- Preheat the oven to 375 degrees F.
- To assemble, start by spreading the bottom of a 9×13 inch baking dish with half of the tomato sauce.
- Next, bring a sheet of zucchini, place a tablespoon of the filling mixture towards the bottom, and gently spread it using the back of a spoon, leaving approximately ½ inch of the slice uncovered (this will help avoid the filling from squeezing out when rolling.) If some of the filling spills over the side of the slice, gently push it into the center of the slice.
- Gently roll the slice toward the uncovered end. As you roll, using your fingers, try to keep the filling in the roll.
- Place the roll seam side down into the baking dish. Repeat the process until all slices are rolled. In the end, you should have approximately 36 rolls.
- Spread the remaining tomato sauce on top and sprinkle the mozzarella cheese evenly over.
- Bake uncovered for 20 minutes or until bubbly brown.
- Remove from the oven and let it rest for 15 minutes. Garnish with basil and serve.
Notes
- Yields: This recipe makes 36 zucchini rolls, which we think is ideal for 6 servings. The nutritional values below are per serving.
- Make ahead: To make it ahead of time, assemble and bake the dish as instructed. Then, let the rolls cool to room temperature and remove any excess liquid. Cover the dish plastic wrap and store for up to three days in the refrigerator.
- Store: Bring the leftovers to room temperature, drain any extra liquid and transfer them to an airtight container. You may then store them in the refrigerator for up to three days.
- Freeze: To freeze, let the dish reach room temperature and remove as much excess liquid as possible. Then, transfer them to an airtight container or wrap your dish as tightly as possible with a few layers of stretch film to avoid freezer burn. You can then freeze this recipe for up to a month.
- Thaw: Thaw it in the fridge overnight. Then, drain off any excess liquid and reheat them at 350 degrees F. until warm (about 20-30 minutes).
- Reheat: When reheating your zucchini rolls, first remove as much excess moisture as possible. Then, place them in a 350-degree F. oven for 20-30 minutes or until heated.
Nutrition
Nutrition information is automatically calculated, so should only be used as an approximation.