
Recently, a local reader challenged me to share how to make this iconic kebab at home. Having grown up in Turkiye and with a good friend who owns a kebab restaurant in Adana (and serves nothing else!), I felt uniquely qualified to take on the challenge.
In this post, I will walk you through every aspect of creating these juicy, flavorful skewers with confidence. I’ll share how to choose the right meat, the true authentic seasonings, essential shaping techniques, and foolproof grilling tips I’ve picked up through my own recipe testing.
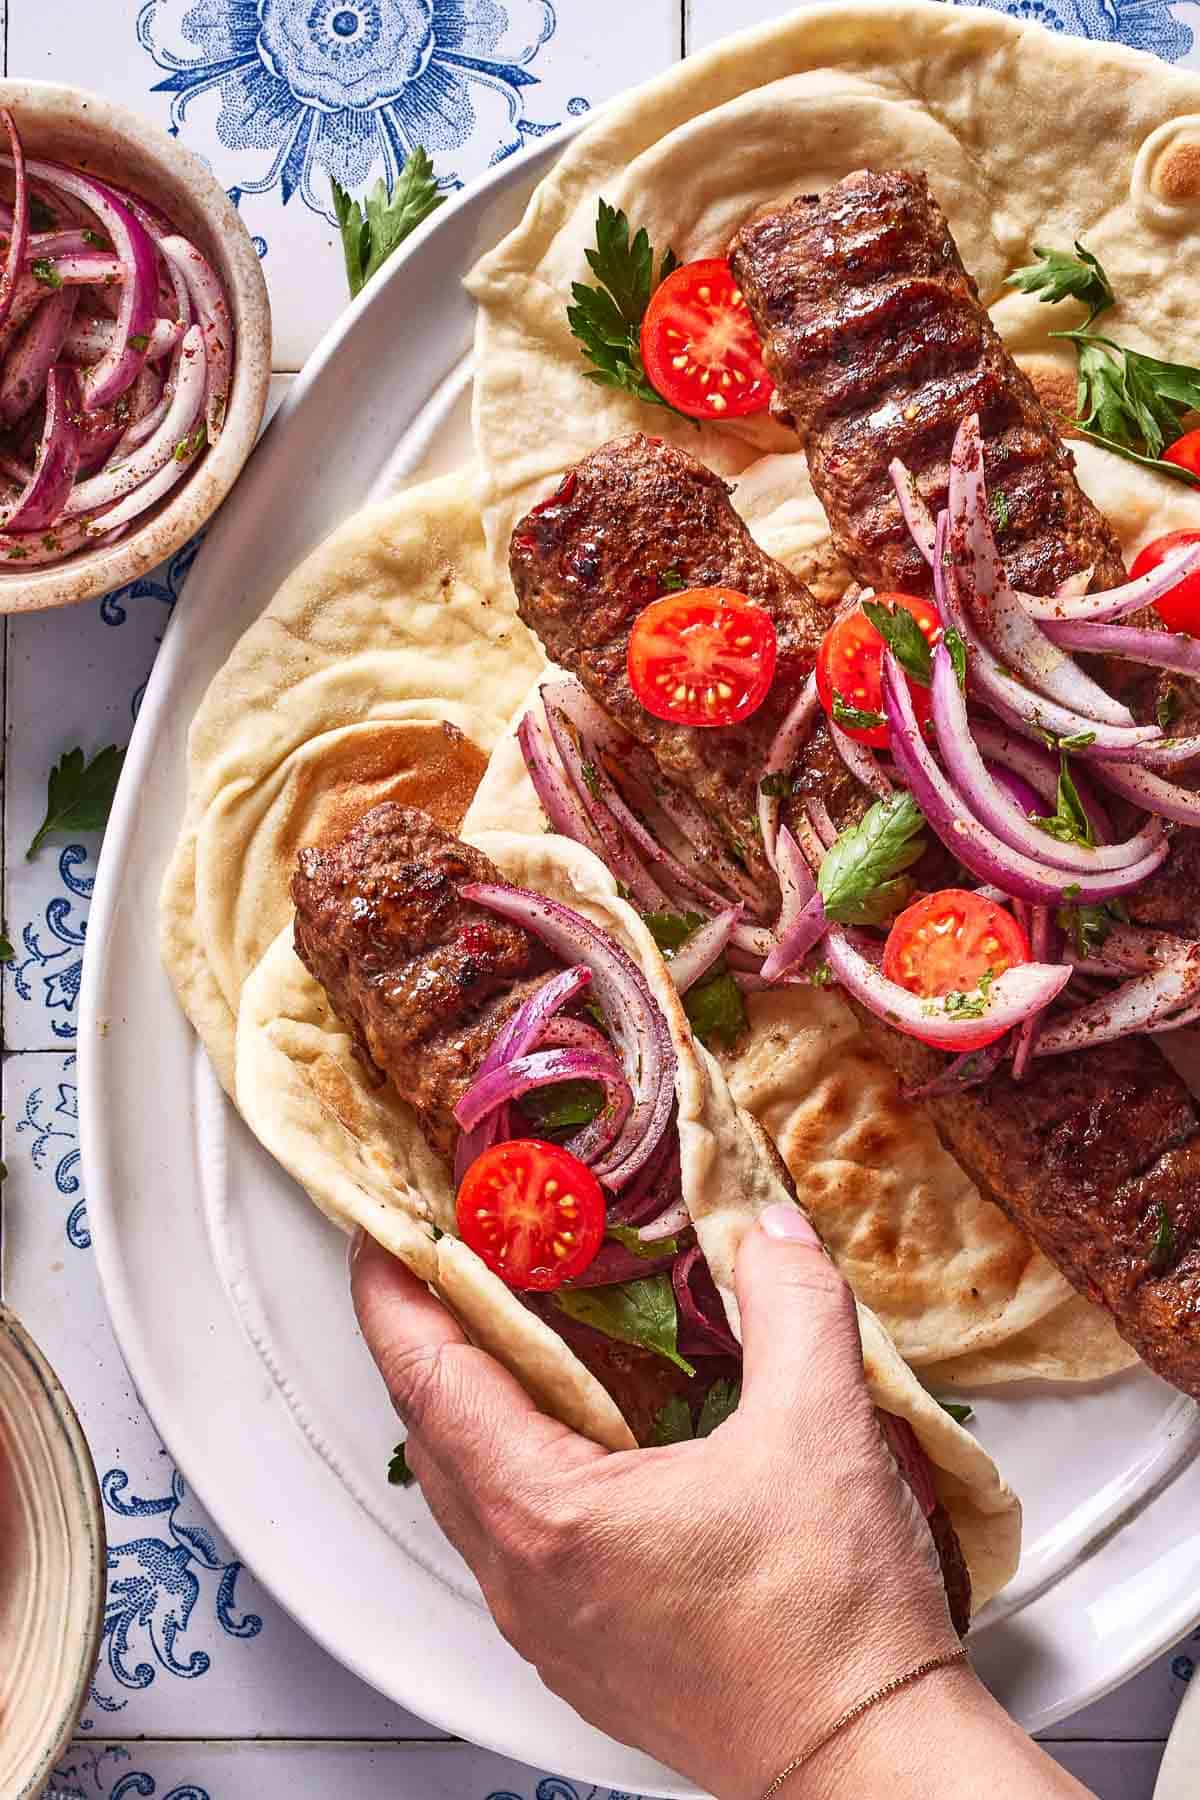
Table of Contents
- What Is Adana Kebab?
- The True Secret of Adana Kebab: Ingredients and Their Role
- The Essential Tool Worth Investing in for Home-Style Adana Kebab
- How to Make Adana Kebab at Home
- Expert Tips: Troubleshooting Adana Kebab
- How to Serve Adana Kebab: Authentic Turkish Pairings for a Complete Meal
- Adana Kebab Recipe
- Storing, Reheating and Freezing Instructions:
- Can You Make Adana Kebab Without a Grill? (Oven & Stovetop Alternatives)
- FAQs
- Other Authentic Turkish Recipes You Might Like:
What Is Adana Kebab?
At its essence, Adana Kebab (or as we call it, Adana Kebap) is Turkey’s most iconic grilled lamb skewer. Hailing from the city of Adana, this traditional recipe is made with just a handful of core ingredients: finely ground lamb, tail fat, a specific Turkish red pepper called kapya, fiery Urfa chili flakes (or Aleppo pepper), salt, and black pepper.
Although many online versions include aromatics and spices like onion, garlic, or cumin, the authentic recipe adheres to those five basics.
The traditional method also calls for hand-mincing the meat with a special curved knife called a zırh (affiliate link), threading it onto wide metal skewers, then grilling it over charcoal for a deeply smoky, rich result.
The True Secret of Adana Kebab: Ingredients and Their Role
When it comes to the ingredient list for this Turkish classic, the most important thing to remember is that less is more.
Sure, you can add onion, garlic, or spices like cumin and coriander. But my suggestion is to first master the basics of the authentic recipe, and then tweak it to your own preferences from there.
You can find the full list of ingredients in the recipe card below, but here is a more detailed breakdown of what you will need.
The Meat: Lamb, Beef, or Both?
That said, even though I just made a case for sticking to tradition, I’ll be the first to bend the rules a bit, starting with the most important part of the recipe: the meat.
The authentic version is made by chopping lamb (typically from the shoulder) and tail fat with a curved knife called a zırh (in the US, it is referred to as a cleaver knife).
The goal with using a tool like zırh is to chop the meat and fat together, back and forth, so that it (almost) forms a paste. In a way, you’re grinding the meat yourself, by hand, until the fat and muscle bind naturally.
Now, as much as I love the idea of sticking to the original, even as someone who cooks for a living, I don’t own a zırh.
And as for tail fat? Let’s just say it’s not exactly easy to find.
So, in the spirit of making this Turkish skewers recipe doable for home cooks (dare I say it, even on a weeknight), I use ground lamb instead. I know it’s not quite the same, but I truly believe it’s the next best thing.
Now, you might be wondering: can you use ground beef instead, or a combination of both? The answer is yes and yes. But there’s one very important detail to keep in mind: fat content.
What makes Adana Kebab so iconic, and so delicious, is the fat. Fat doesn’t just add richness. It also helps the meat hold together and cling to the skewer as it cooks. It’s the secret to that signature juicy texture and the reason these kebabs don’t dry out or fall apart on the grill.
Since ground lamb naturally has more fat than beef, you’ll need to make adjustments if you’re using beef. Look for a fatty grind, ideally a 60/40 ratio if possible.
If you’re buying from a butcher, ask for ground chuck with extra fat, or see if they can add in some beef fat trimmings for you.
Signature Seasonings of Adana: Red Pepper, Urfa Chili, and Salt
There’s a common belief that most kebab recipes rely heavily on aromatics like onion and garlic, along with spices such as ground cumin, coriander, and paprika.
Red Pepper
While that might be true for many types of kebab, this ground lamb skewer recipe challenges that idea. Instead of layering in lots of spices, it highlights one very specific ingredient: a red pepper called kapya. Native to Turkey, kapya peppers are known for their sweet and smoky flavor and add a distinctive depth to the original recipe.
I would have loved to use Kapya here, but since it’s not widely available in the US, I went with the next best thing I could find: red Fresno peppers.
If you can’t get your hands on those, a red bell pepper will also work.
Urfa Chili Flakes (Pul Biber)
The next signature ingredient is Urfa chili pepper (affiliate link), also known as Aleppo-style red pepper flakes. Urfa chili has a deep, earthy heat that’s mild yet complex, and it complements the richness of the lamb beautifully.
If you can find it, it is absolutely worth using. That said, you can use any red pepper flakes you have on hand. And, of course, feel free to adjust the heat level to suit your preferences.
Paprika
To help round out the flavor of the red pepper, especially when using substitutes like Fresno or bell pepper, I like to add a little extra depth with paprika. I use two teaspoons of my favorite kind to help bring in some of the sweetness and smokiness that kapya naturally offers.
This is also a great place to put your own spin on the recipe. Use sweet paprika, smoky paprika, or a combination of both, depending on what you prefer and have on hand.
Salt & Pepper
Finally, we have salt and black pepper.
And I’ll say this upfront. The amount of salt might surprise you. The recipe calls for one tablespoon of kosher salt for two pounds of ground lamb. It may sound like a lot, but it is essential.
Salt not only enhances the taste, but it also helps the meat bind and hold its shape on the skewer.
Of course, not all salts are created equal. I use Diamond Crystal kosher salt (affiliate link), which is lighter and less salty by volume than many other brands. If you are using something like Morton’s kosher salt, I recommend starting with half the amount and adjusting to taste.
I also add a touch of black pepper to round out the simple seasoning.
The Essential Tool Worth Investing in for Home-Style Adana Kebab
Whenever I share a recipe here on the blog, I try to avoid using tools or gadgets that most home kitchens don’t already have.
But in the case of this Turkish lamb skewers recipe, I wanted to stay as true to the original as possible, which meant making one small exception; I had to buy the thick, flat metal skewers (affiliate link) traditionally used in Adana.
My thinking is this: if you enjoy making kebabs at home, this is a worthy one-time investment that will more than pay off in the long run.
During my recipe testing, I first attempted to make these kebabs using thin bamboo skewers commonly found in most households. I had such a hard time getting the meat to stick and hold that signature thickness. The mixture kept slipping off or falling apart during grilling, which made the whole process stressful.
That’s when I realized that the people who have been making this Adana recipe for generations must know what they’re doing. So, I ordered a set of one-inch-wide kebab skewers (affiliate link), and the difference was night and day.
Here is how it is helpful:
- The thicker skewers give you more surface area to work with when shaping the meat.
- Their width helps the meat cling better, and the longer body allows you to form a full-length kebab that cooks evenly over the grill.
- They also help the meat stay intact when exposed to high heat, which is especially important when working with a high-fat mixture like this one.
How to Make Adana Kebab at Home
Once you have your ingredients prepped and your skewers ready, the rest comes down to technique. It’s not difficult, just a few key steps to follow for the best results. Here’s how I break it down:
Preparing your kebab mixture:
Step 1 – Chop and Drain the Red Peppers
Start by removing the seeds and chopping the red peppers as finely as you can. This helps them blend seamlessly into the meat mixture, rather than showing up as visible chunks.
After chopping, place the peppers in a fine mesh strainer and press gently to release their juices. This step is essential as we want to remove as much liquid as possible so the mixture doesn’t become too wet or soggy when it’s time to shape.
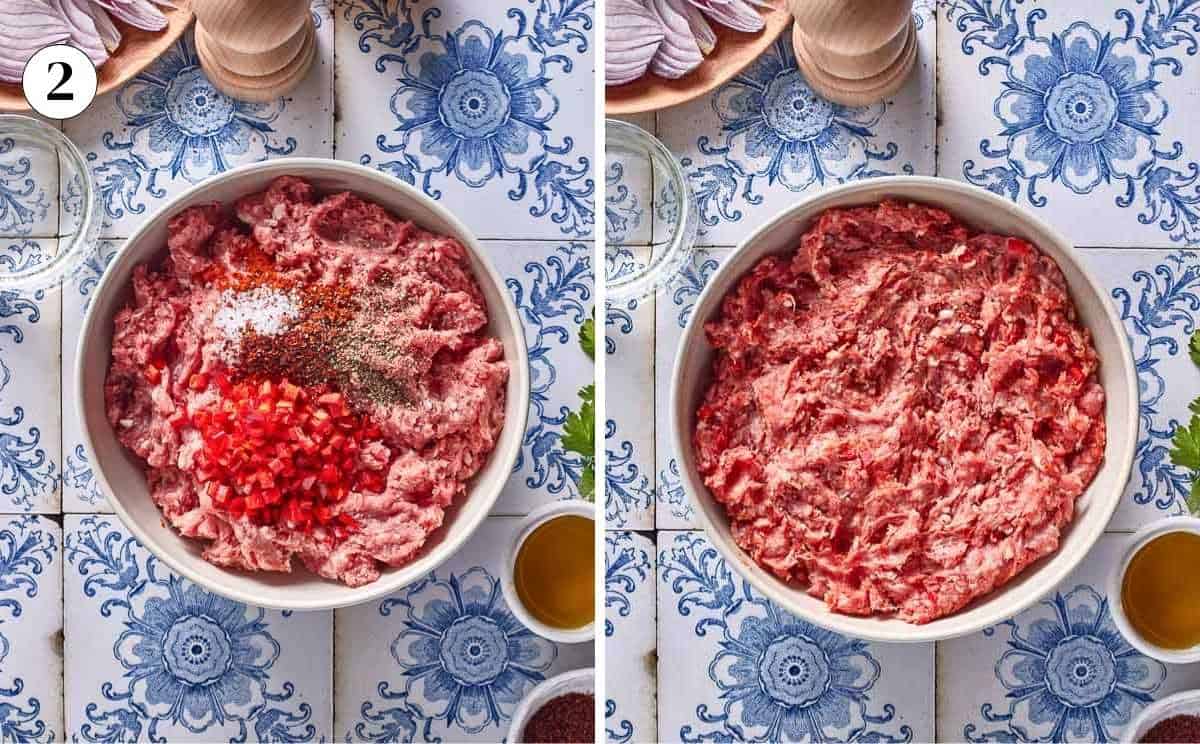
Step 2 – Prepare the Meat Mixture
In a large mixing bowl, combine the drained chopped peppers, ground lamb, paprika, red pepper flakes, salt, and black pepper. Using clean hands, mix everything together until fully combined and evenly seasoned.
Once it’s mixed, divide the meat into equal portions based on how many skewers you plan to use. My set came with three skewers, so I divided the mixture into three even parts. You can eyeball it or, if you prefer precision, weigh the portions using a kitchen scale.
If you want to make it ahead, just cover the bowl and place it in the fridge. In fact, if you can plan ahead, I highly recommend it. Giving the mixture a chance to rest helps the flavors come together and settle into the meat. An overnight rest (up to 24 hours) can really make a difference.
Shaping your Adana Kebabs

Step 3 – Thread Onto the Skewers
When you’re ready to thread the meat, start by setting up your workstation. Grab your skewers, a small bowl of water to wet your hands, and bring out the meat mixture from the fridge.
To thread, take one portion of the ground lamb mixture, shape it into a ball, and gently insert the skewer through the center. Using your hands, press and spread the meat down the length of the skewer, turning it as you go to create an even shape.
If or when the mixture starts to feel sticky, lightly wet your hands to prevent the meat from sticking too much. Just be careful not to overdo it. A little water goes a long way, and too much can make the mixture too soft to hold together.
As you work, do your best to keep the thickness even from top to bottom. Once you’ve shaped the kebab, take a moment to gently press and seal the top and bottom ends of the meat onto the skewer.
Step 4 – Create the signature ridges
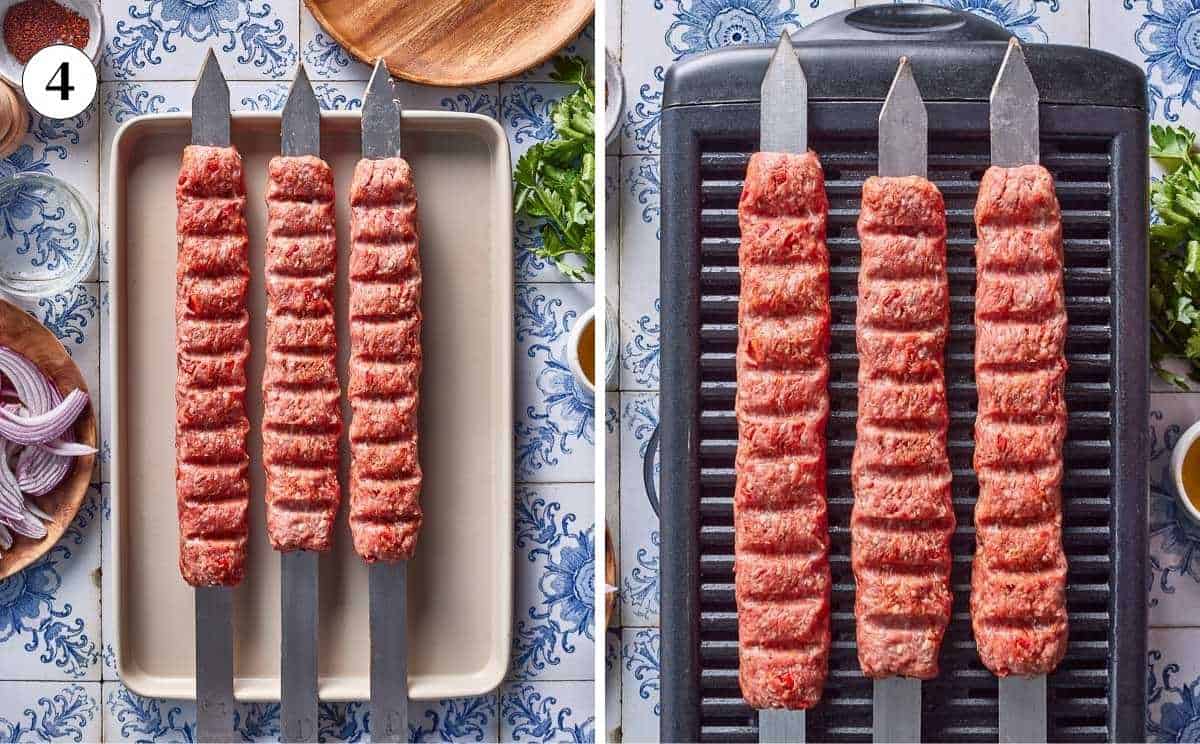
If you’ve had Adana Kebab before, you’ve probably noticed the pattern of shallow ridges pressed into the surface. They’re not just for appearance. These indentations help the meat cook more evenly over high heat and give the kebab its signature look.
To make them, use your thumb and forefinger to gently press along the length of the meat, making shallow marks every couple of inches. Rotate the skewer and repeat the same motion on the other side.
Grilling Your Kebabs
Step 5 – Grill
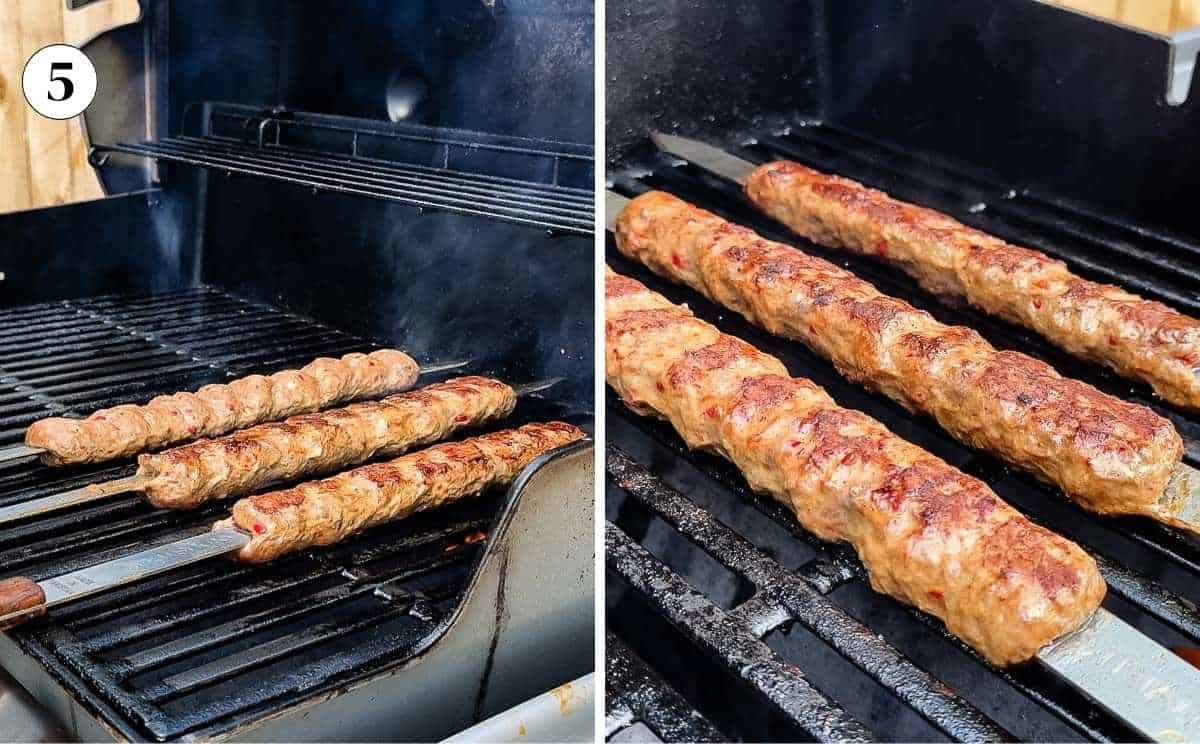
The traditional way to cook Adana Kebab is over a charcoal grill, which gives it that distinct smoky taste and slightly crisp exterior. That said, I used my gas grill for this version to keep it simple and approachable for home cooks. Both methods work well, and below you’ll find tips for each.
If using a gas grill: Preheat your grill to 400°F to 425°F. Clean the grill grates thoroughly and brush them with oil to prevent sticking.
Carefully place the Adana kebab skewers on the grates and grill, turning them frequently to ensure even cooking and a nice char on all sides.
Depending on the thickness and length of your kebabs, this will take about 10 to 12 minutes.
Because the meat is rich in fat, you may see flare-ups as it cooks. That’s completely normal, but it’s important to stay close to the grill while they’re cooking.
Adjust the heat as needed and continue rotating the skewers to avoid burning and help them cook evenly.
If using a charcoal grill: Light your charcoal and let the coals burn until they’re covered with a thin layer of white ash.
Spread them out evenly and position the skewers directly over the heat. Grill the kebabs, turning them every couple of minutes to ensure even cooking and that nice, smoky char.
The total time will be similar, around 10 to 12 minutes, again depending on the heat level and the size of your skewers.
Similar to cooking it on a gas grill, keep a close eye during grilling, especially if you notice flare-ups. The goal is juicy, charred kebabs that stay intact from grill to plate.
Step 6 – Let It Rest While Making Sumac Onions
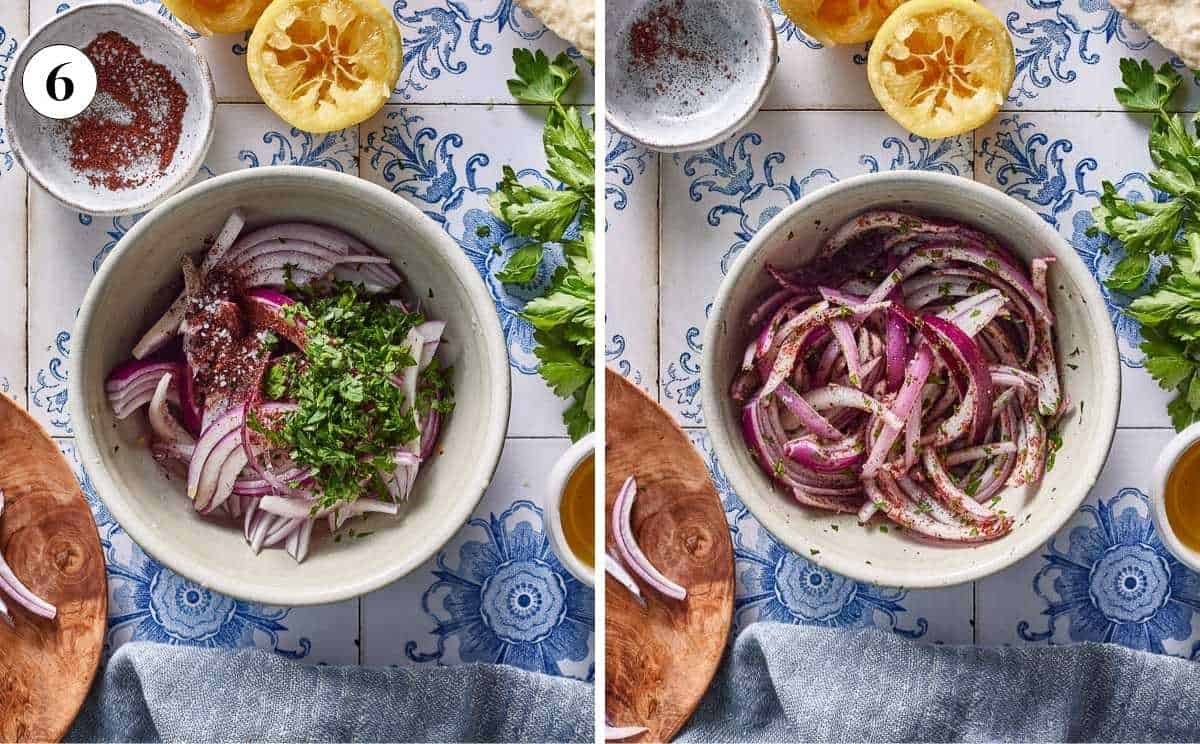
Once the kebabs are grilled, transfer them to a sheet pan and cover loosely with foil. Let them rest for about 5 to 10 minutes so the juices have time to settle back into the meat.
While the kebabs are resting, you can prepare one of the classic accompaniments to Adana Kebab: sumac onions, a traditional onion salad that beautifully balances the richness of the meat.
They’re easy to make, but if you’d like a more detailed breakdown, feel free to check out my Sumac Onions recipe.
To make a quick batch, combine sliced red onion, olive oil, lemon juice, kosher salt, sumac, and a pinch of red pepper flakes in a medium bowl. Using clean hands, gently massage the onions until they have softened slightly. Finish with a sprinkle of chopped parsley.
Assembling and Serving
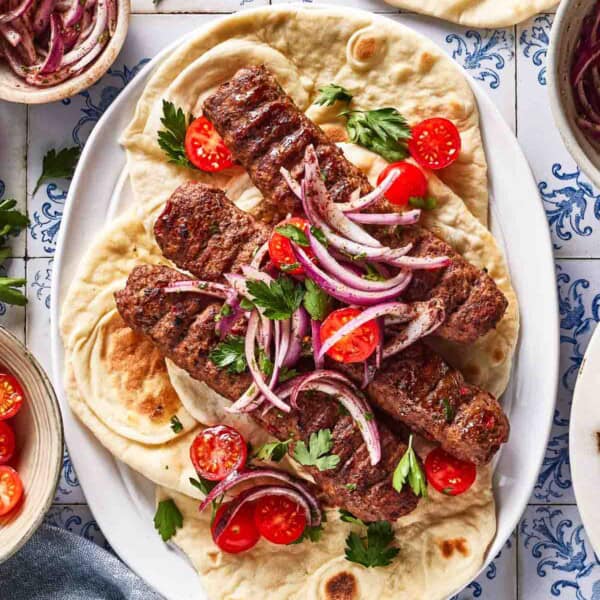
Step 7 – Assemble:
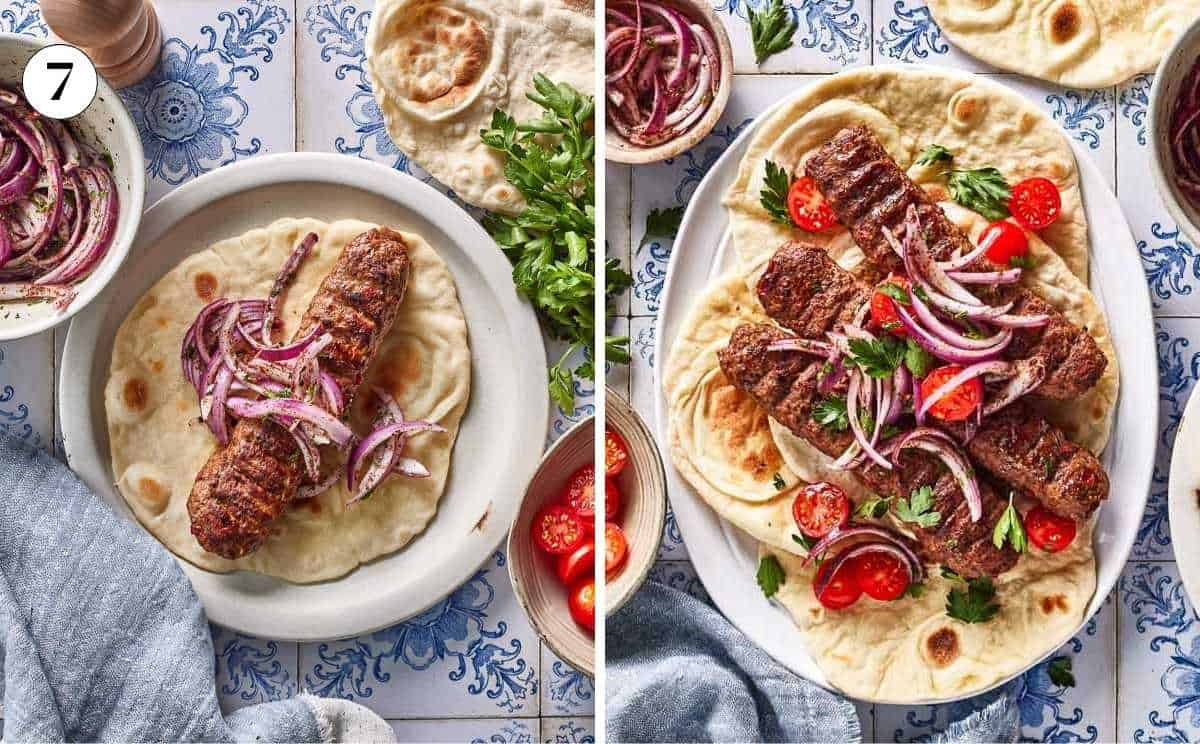
With the meat grilled and your sumac onions ready, all that’s left is the bread. Traditionally, Adana Kebab is served with lavash, a soft Mediterranean-style flatbread.
It’s similar to pita bread, and you can usually find it in most supermarkets. Of course, if you’d like to try making your own, I also have a homemade lavash recipe available for you to follow.
To assemble, place a piece of lavash flat on a plate and use it to slide the meat off the skewer. Since my skewers are quite large, I like to cut the kebab in half while it’s still on the skewer, then slide each half off gently. The meat should release easily.
From there, simply top it with a generous spoonful of sumac onions, a few slices of tomatoes, and a sprinkle of fresh parsley before rolling it up.
Needless to say, it is best to enjoy your Adana wrap while it’s still warm.
Expert Tips: Troubleshooting Adana Kebab
As you can see, making this Turkish Adana Kebab recipe doesn’t require any unusual ingredients or complicated cooking techniques. Still, while preparing this post, I made a few mistakes and learned a few things that I think would be helpful, especially if you’re making it for the first time.
Below are some tips to help you get the best results:
Falling off the skewer during grilling: During my recipe testing, I had a couple of kebabs fall apart on the grill. In the end, I realized there are two main reasons this can happen:
- Not enough fat: If the meat doesn’t have enough fat, it will have trouble sticking to the skewer and keeping its shape. So don’t skip the fat, especially if you’re using ground beef or a beef-lamb mix.
- Ends not sealed properly: Sealing the ends means gently squeezing and securing both the top and bottom of the kebab where the meat meets the skewer. If this step is skipped, the meat may loosen or fall off when exposed to high heat.
Even thickness is key: As you’re threading the skewers, make sure the meat is evenly distributed from end to end. I’ll admit, it takes a little practice, but once you shape your first one, it gets easier. Taking the time to shape the kebab evenly helps it cook properly and stay intact.
Let it rest: As with any kebab recipe, letting the meat rest in the fridge before grilling makes a big difference. That chill time allows the salt to work its way through the mixture and gives the flavors time to meld.
Keep a close eye on the grill: Because of the high fat content, flare-ups are normal while grilling. This is where you may need to manage the heat a bit. Stay close by, and turn the skewers often so they cook evenly without burning.
Using make-shift skewers: During my research for this recipe, I came across a few versions where people used makeshift skewers by wrapping bamboo skewers (or wooden skewers) with aluminum foil.
I’ll be honest, I haven’t tried that method myself. After testing this recipe more than five times, I can say that even with thick metal skewers, getting the meat to stick takes a bit of technique. So while it might work in a pinch, I’d be hesitant to recommend it. In my experience, investing in proper wide skewers makes the process much more reliable and much less frustrating.
How to Serve Adana Kebab: Authentic Turkish Pairings for a Complete Meal
So you made your Adana Kebab, garnished it with sumac onions, and wrapped it in warm lavash. Good for you! But what if you want to take it up a notch?
Below are a few traditional pairing ideas in case you’d like to serve it the way we do in Türkiye:
Pair it with a classic Turkish salad: Turn your kebab into a full feast by serving it alongside a fresh salad like the classic pairing, Turkish Ezme. Alternatively, you can go with a traditional Shepherd’s Salad (Çoban Salatası), a white bean salad like Piyaz, or even my Greek Cucumber Salad for a cooling contrast.
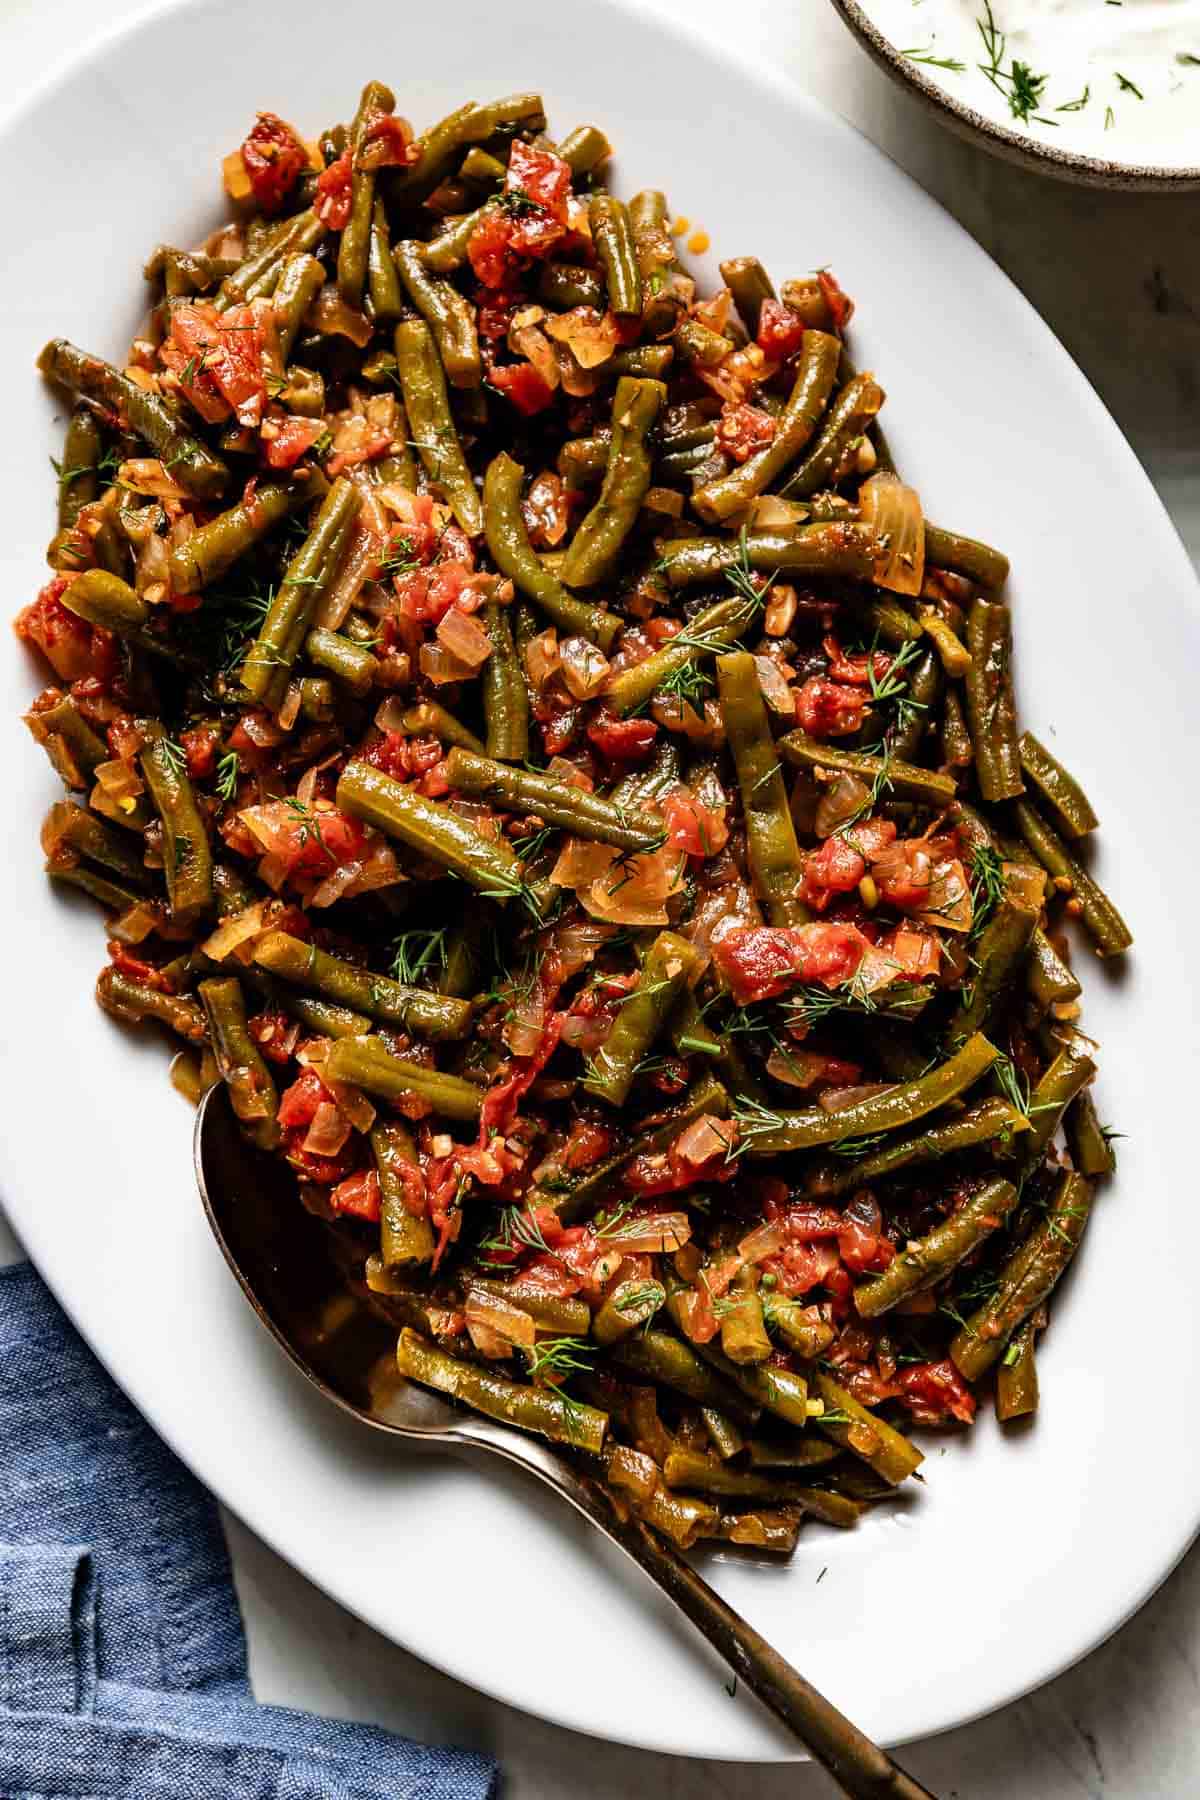
Add grilled vegetables: If you have a little extra time, grill some tomatoes or green peppers on the side while your kebabs are cooking. These simple vegetables add a lovely charred flavor and are often served right on top of the kebab in restaurants across Türkiye.
Serve with rice or bulgur pilaf: For a more substantial meal, pair your kebab with a starch. My Vermicelli Rice or Bulgur Pilaf are both authentic and satisfying options that round out the plate perfectly.
Drizzle it with yogurt sauce: While not traditional, a spoonful of tzatziki sauce or my yogurt mint sauce can be a nice addition, especially if you’re serving this to kids or anyone who prefers a milder dish. The creamy yogurt helps balance the spices and adds a cooling contrast to the richness of the meat.
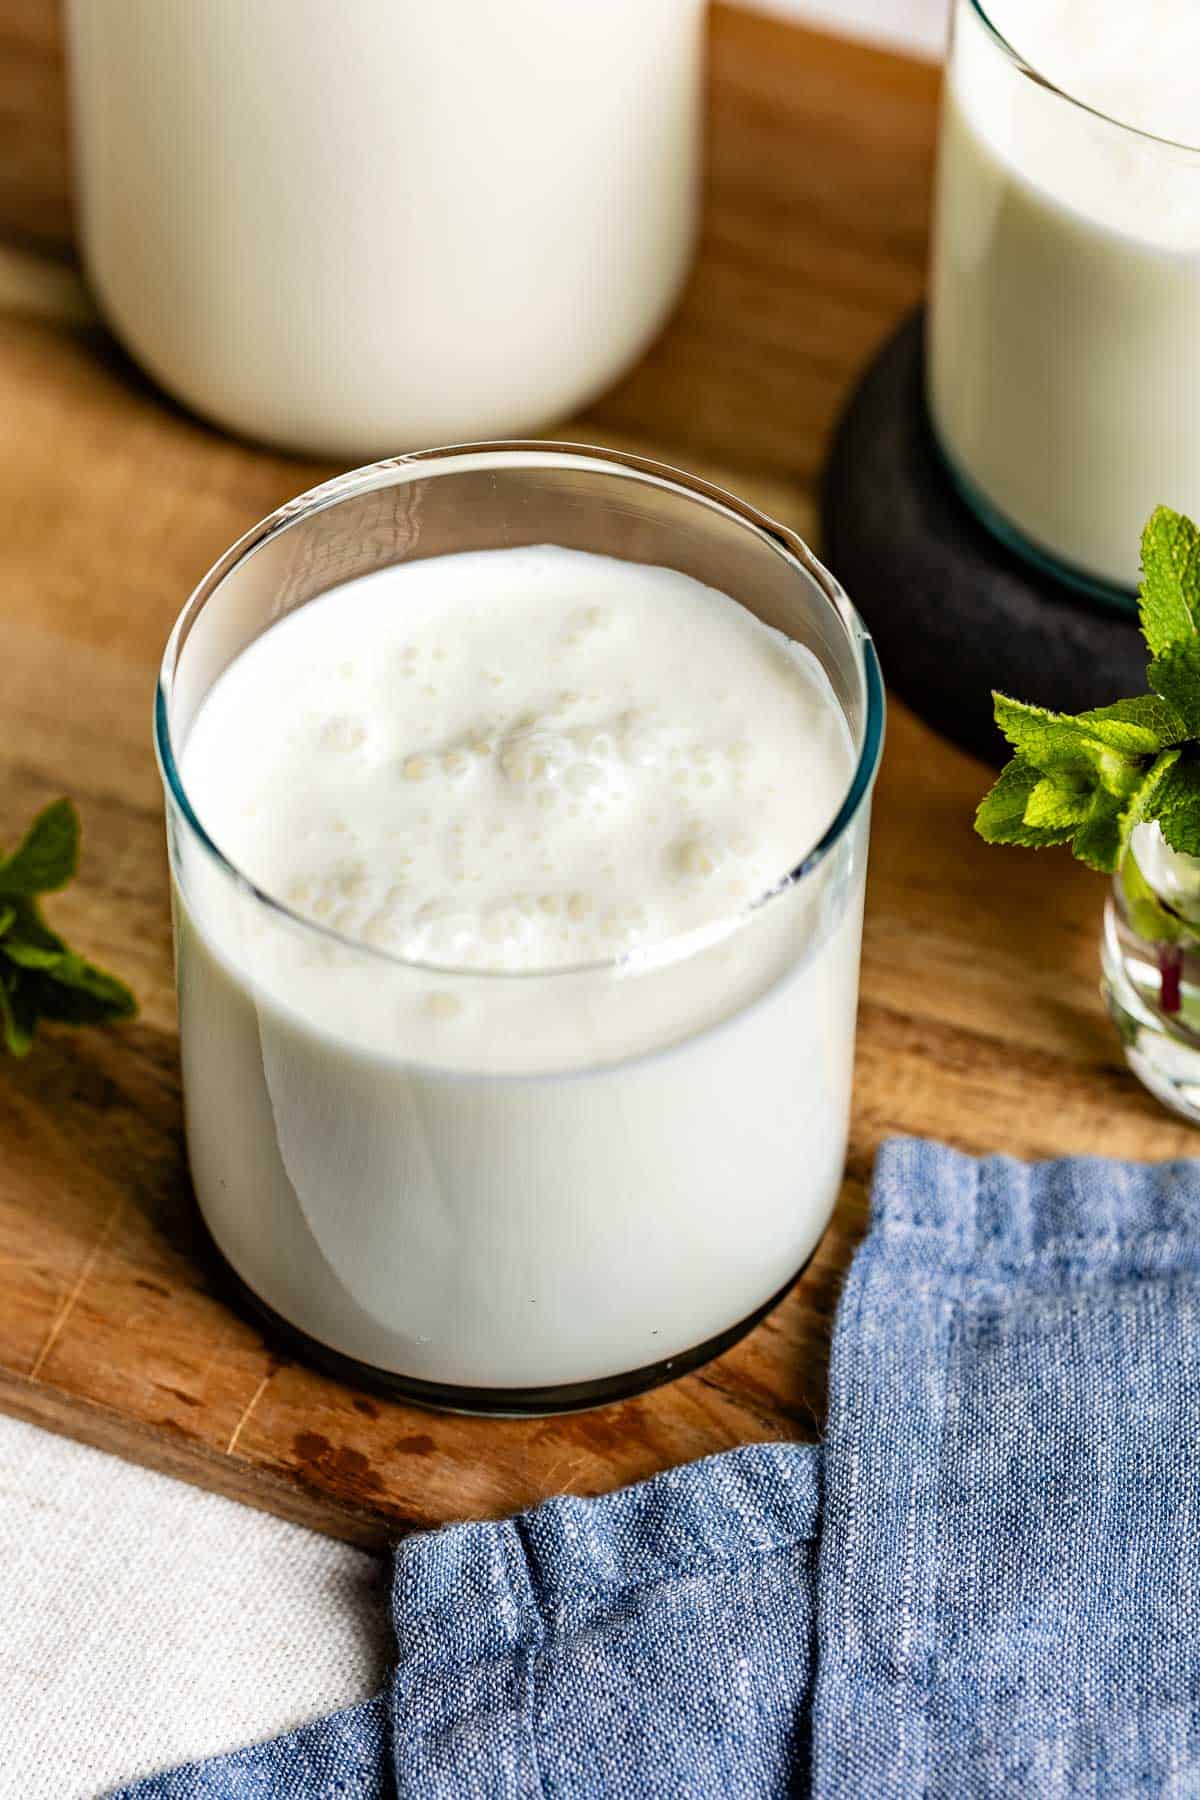
Don’t forget the ayran: In Türkiye, if you order Adana Kebab at a restaurant, chances are your server will bring out a glass of ayran without even asking. This cool, tangy yogurt drink helps balance the spices in the kebab and brings everything together. The good news is you can make ayran at home in just a few minutes.

Adana Kebab Recipe
Equipment
Ingredients
For the kebab
- 2 red peppers, red fresno chilis or ½ red bell pepper
- 2 lbs ground lamb, or 1 lb ground lamb + 1 lb ground beef
- 2 teaspoons paprika
- 1 teaspoon Urfa chili flakes, or Aleppo pepper or red pepper flakes
- 1 tablespoon kosher salt
- 1 teaspoon black pepper
- Water, to wet your hands
For the Sumac Onions
- 1 medium-sized red onion, sliced
- 1 tablespoons olive oil
- 2 tablespoons lemon juice
- ½ teaspoon Kosher salt
- 1 tablespoons sumac
- ¼ teaspoon Urfa chili flakes, Aleppo pepper or red pepper flakes
- 2 tablespoons fresh parsley, chopped
To Serve with
- 6 Lavash or pita bread
Instructions
- Start by preparing the peppers. Remove the seeds and chop them as finely as you can. Place the chopped peppers in a colander set over a bowl and let them drain to release their juices. Once drained, transfer them to a large mixing bowl.
- Add the ground lamb, paprika, Aleppo pepper, salt, and black pepper to the bowl with the peppers.

- Using clean hands, mix everything together until fully combined and the seasonings are evenly distributed.
- Divide the meat mixture evenly based on the number of skewers you have. For example, if you have 3 skewers, divide the mixture into 3 equal portions.
- Take one portion, shape it into a ball, and gently insert the skewer through the center.
- Fill a small bowl with cold tap water and keep it nearby. Using your hands, carefully press and spread the meat down the length of the skewer, turning it as you go to ensure even thickness all around. Lightly wet your fingers as needed to prevent the meat from sticking to your hands. Remember that just a little water is enough to help shape the kebabs without making the mixture too wet.
- Once shaped, gently press and secure the top and bottom edges of the meat where it starts and ends on the skewer. This is an essential step in that it helps prevent the meat from breaking apart during grilling.
- To create the traditional ridges, use your thumb and forefinger to lightly press along the length of the kebab, making shallow marks every couple of inches. Rotate the skewer and repeat on the other side. These ridges help the meat cook evenly and give the kebabs their signature look.
- Preheat your gas grill to 400°F-425°F. Clean the grill grates well and brush them with oil to prevent sticking.
- Once the grill is ready, place the Adana kebab skewers on the grates. Grill for 10-12 minutes, turning them often so they cook evenly and develop a nice char on the outside.
- Keep in mind that because the meat has a higher fat content, you may experience flare-ups. Stay close to the grill and adjust the heat as needed to prevent burning.
- Once cooked to your liking, cover the meat with foil and let it rest for 5-10 minutes.
- While the meat is resting, make the sumac onions. In a medium-sized bowl, mix the sliced onions, olive oil, lemon juice, salt, sumac, and red pepper flakes.
- Using clean hands, gently massage the onion mixture until slightly softened. Garnish with parsley.
- When ready to assemble your Adana kebab, grab a lavash (or pita bread), place the meat on top, and garnish with sumac onions. Roll and serve right away.


Video
Notes
- Yields: This recipe serves six adults and the nutritional information below is per serving.
- Using beef instead of lamb: You can make this recipe with beef or with a mixture of beef and lamb, but it is important that you use a cut that is high in fat or ask your butcher to incorporate some beef trimmings to your ground beef.
- Keep a close eye while grilling: Because the meat is rich in fat, you may see flare-ups as it is grilling. That’s expected, but it’s essential to stay close to the grill while they’re cooking.
- Storage: Bring your kebabs to room temperature and store in the fridge for up to 3-4 days.
- Reheating: Warm in a low oven set to 300°F (150°C) for about 10 to 15 minutes, or until warmed through. Cover loosely with foil to prevent it from drying out.
Nutrition
Nutrition information is automatically calculated, so should only be used as an approximation.
Storing, Reheating and Freezing Instructions:
While freshly grilled Adana Kebab is always best, leftovers can be stored, frozen, and reheated with good results. Here’s how I handle it:
Storage: Let the kebab cool to room temperature, then place it in an airtight container. Store it in the fridge for up to 3 to 4 days.
Freezing: Wrap the leftover meat tightly in parchment paper, then wrap again with aluminum foil to keep everything in place. Transfer to the freezer and store for up to 1 month. When ready to use, thaw overnight in the fridge.
Reheating: Reheat in a low oven set to 300°F (150°C) for about 10 to 15 minutes, or until warmed through. Cover loosely with foil to prevent it from drying out.
Can You Make Adana Kebab Without a Grill? (Oven & Stovetop Alternatives)
While many online sources suggest you can easily cook Adana Kebab in the oven or on the stovetop, the truth is, the very essence of true Adana Kebab comes from cooking it over an open flame.
To be perfectly honest, that signature smoky flavor and crisp exterior are incredibly difficult to replicate without a grill.
However, I understand not everyone has a grill, and /or weather conditions may not cooperate to grill kebabs on the outside.
In that case, you can adapt this recipe, but it’s important to know you’ll likely be missing out of the signature smokey flavors. These alternatives are best thought of as Adana-style ground lamb kebabs, not a substitute for the real thing.
Cooking in the Oven
Step 1: Line a quarter sheet pan with a wire rack. This helps the meat cook evenly and allows air to circulate underneath. Preheat your oven to 400°F (204°C).
Step 2: Spread the meat mixture onto the rack in an even layer. Using a knife or spatula, divide it into 6 to 8 portions to mimic the shape and size of skewers.
Step 3: Bake for 20 to 23 minutes. Finish with 1 to 2 minutes under the broiler to develop a bit of char on top.
Cooking on the Stovetop
To be completely honest, I don’t recommend trying to cook full skewers on a skillet. It’s just too difficult to manage the thickness and shape. Instead, I suggest turning the meat mixture into Adana Kofte-style meatballs, which are easier to handle and still delicious.
Step 1: Form meatballs. Use a small cookie scoop or tablespoon to portion out the meat. Roll and gently flatten each one in the palm of your hand, then set them aside on a plate.
Step 2: Heat the pan. Add about a tablespoon of oil to a cast-iron or heavy-bottomed skillet. Heat it until it’s shimmering and very hot-this ensures you get a nice sear rather than steaming the meat.
Step 3: Cook in batches. Add the meatballs to the skillet, being careful not to overcrowd the pan. Cook them on all sides until nicely browned and cooked through, working in batches and adding more oil if needed.
FAQs
It depends. The heat in Adana Kebab comes mainly from the red peppers and Urfa chili used in the recipe. The level of spiciness can vary based on how many pepper seeds you include and how hot your red pepper flakes are.
If you want a milder version, simply remove all the seeds from the peppers and use less Urfa chili or substitute with a milder variety. If you like it spicy, keep some of the seeds and use more chili to dial up the heat.
You can, but keep in mind that it won’t be considered authentic Adana Kebab anymore. The traditional version is very simple and doesn’t include aromatics like onion or garlic.
That said, if you’d like to experiment with your own version, you can absolutely add them. Just make sure to grate them finely (or use a food processor to chop it finely) and strain out any excess liquid before mixing them into the meat. This helps keep the mixture from getting too wet and falling apart on the grill.
You will know that it is fully cooked when it is nicely browned with grilled marks on the outside, is firm to touch and juicy when cut open.
Wide, flat metal skewers are essential for shaping and grilling Adana Kebab properly. If you don’t have them, you can try doubling up bamboo skewers or flattening them slightly, but keep in mind that the results won’t be quite the same.
You’ll likely lose the traditional look, and there’s a higher chance the meat won’t stay in place during grilling.
Other Authentic Turkish Recipes You Might Like:
If you’ve landed on this page, I suspect you’re a fan of Turkish food and maybe looking for even more foolproof, beginner-friendly recipes from my home country. Below are a few more classics you might also enjoy:
- If you’ve ever been to a kebab restaurant and looked over the menu, chances are you’ve seen Turkish Red Lentil Soup on the list. It’s a simple 30-minute soup that’s just as beloved and familiar as Adana Kebab.
- And if you’re in the mood for something cozy and quick, Turkish Pasta is another weeknight favorite that’s gone viral for a reason. It’s easy to make and loaded with comforting flavors.
- Treat yourself to Türkiye’s most famous breakfast dish with my Turkish Eggs (Çılbır), poached eggs nestled on garlicky yogurt, drizzled with spicy butter, and ready in minutes. It’s truly a unique and satisfying experience!
Photos by Tanya Pilgrim.


This is hands down the best Adana Kebab recipe I have tried at home. I loved that the instructions are clear and easy to follow, which made cooking these authentic Turkish kebabs so simple. The tips on shaping the skewers and grilling were spot on. I especially loved the sumac onions and lavash serving suggestions because they made the meal taste just like the Adana kebabs I have had in Turkey.
The kebabs came out juicy and tender, and it truly felt like an authentic Turkish lamb kebab. My family was so impressed and I am making it again tonight for dinner. If you are looking for an authentic Adana Kebab recipe that actually works, this is it.
This is music to my ears Victoria. Thank you SO much for coming by and taking the time to leave a review.