
Whether you use them in a sandwich recipe or over a piece of steak, a simple and easy caramelized onions recipe is a great way to enhance any of your favorite meals. In this post, we show you everything you need to know.
Ingredients
You only need three simple ingredients to make this gourmet-level condiment, also known as jammy onions. Below, you’ll find expert ingredient tips, including the best onions for caramelizing, what oils to use, and how to season your recipe.
- Onions: If you’re wondering, “What are the best onions to use for caramelized onions?” I have good news: Nearly any type of onion will work in this simple recipe—white onions, red onions, scallions, and more. Remember, though, that each kind of onion has a slightly different flavor profile, with some lending sweeter notes and others offering a somewhat more astringent taste.
- Yellow onions: A caramelizing classic, yellow onions boast a delectable balance between sweet and bitter flavors, giving your caramelized onions a deeply sweet base that resolves in a mild brightness.
- Sweet onions: If you want the most decadent caramelized onion taste, I highly recommend using sweeter varieties, such as Vidalia or Walla Walla onions. These onions’ higher sugar content gives the recipe a milder onion taste with a more luxurious, sweet browning.
- Red onions: Though less common than yellow and sweet onions, caramelized red onions are an excellent choice for those who prefer a less sweet, more bitter, and more robust onion taste.
- White onions: Pungent and sharp, caramelized white onions aren’t as sweet as more sugar-rich varieties. However, when you cook them low and slow, white onions still caramelize, giving you a deliciously bittersweet profile.
- Shallots: Shallots are a must for those who want their caramelized onions recipe to have a balance of sweet, bright, and mildly bitter flavors.
- A mixture: Want to give your recipe a broader, more level flavor profile? You can even use a mix of different onions to fill out your dish—a convenient tip for those who don’t have enough onions of a single type on hand.
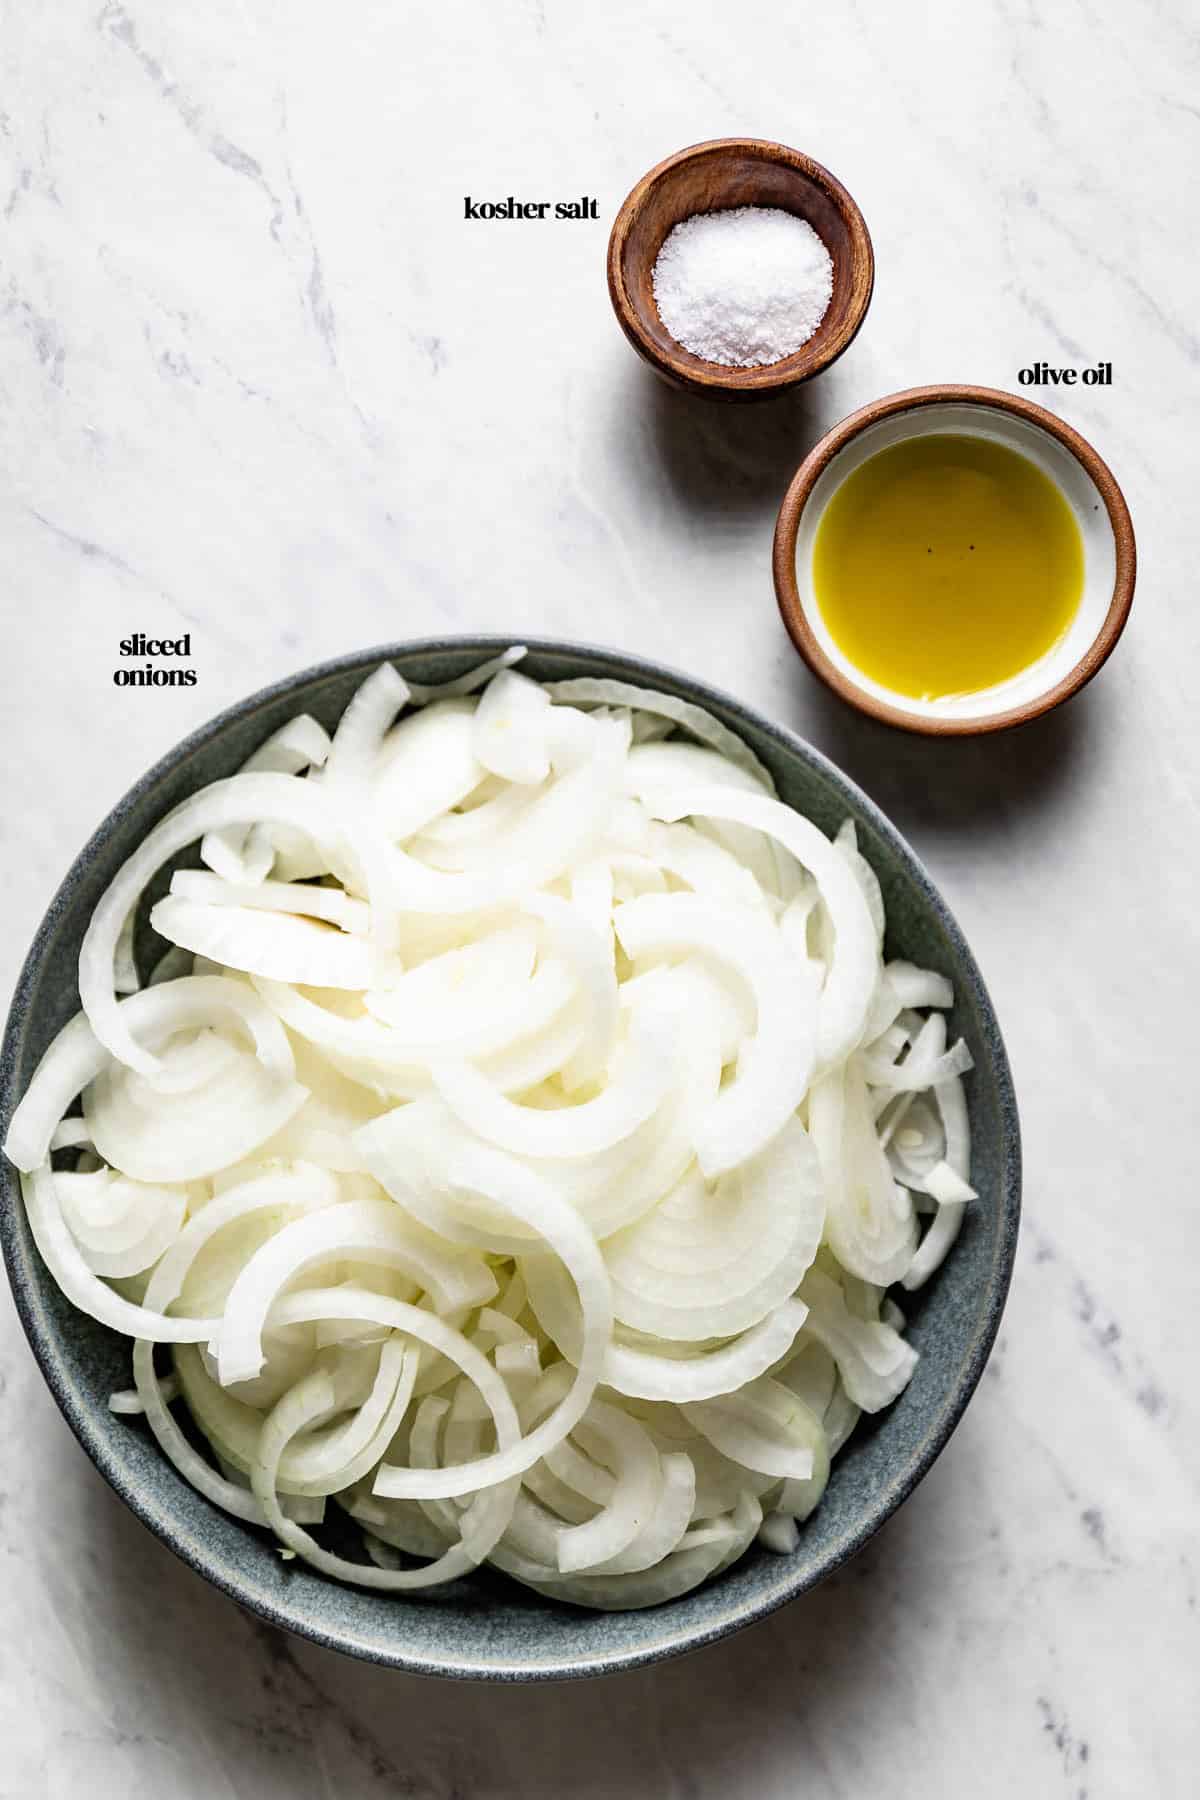
- Oil: You can use olive oil (or any other vegetable oil) or unsalted butter when making caramelized onions. Or, if you want to round out your dish with a more mellow richness, you can use a combination of the two. Whatever oil you choose, remember that a little goes a long way. For instance, you only need two tablespoons of olive oil to caramelize a pound of onions.
- Kosher salt
Optional Add-Ins
You only need three basic ingredients to make this recipe. However, you can easily take this recipe to the next level by making recipe-attuned variations, from a stock-based deglazing liquid to a herby, caramelized side.
- Deglaze liquid: Though not necessary to make jammy onions, deglazing your pan is an easy way to take care of two birds with one stone. Deglazing adds an extra layer of flavor to your recipe and helps loosen the browned bits from the bottom of your cooking pan. To deglaze onions, simply add a splash of liquid to the skillet, such as water, chicken stock, veggie stock, white wine, or balsamic vinegar.
- Seasonings and herbs: This basic caramelization method only uses salt to bring out the onions’ naturally tender, full-bodied taste. However, once your onions are thoroughly browned, you can add more complex flavors with a dash of black pepper and/or fresh herbs, such as thyme. Just be sure to choose seasonings that match the dish you’re making.
How to Make Caramelized Onions
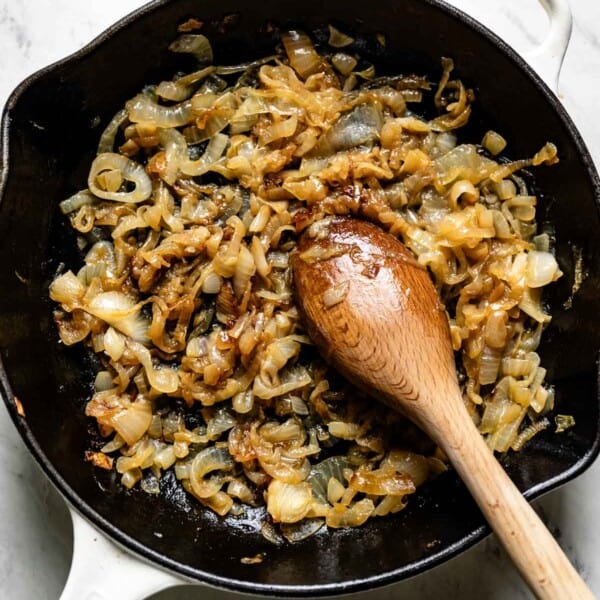
While you may know how to soften onions in a snap, this step-by-step guide will show you how to properly caramelize onions, transforming this everyday veggie into an irresistibly rich, savory-sweet condiment.
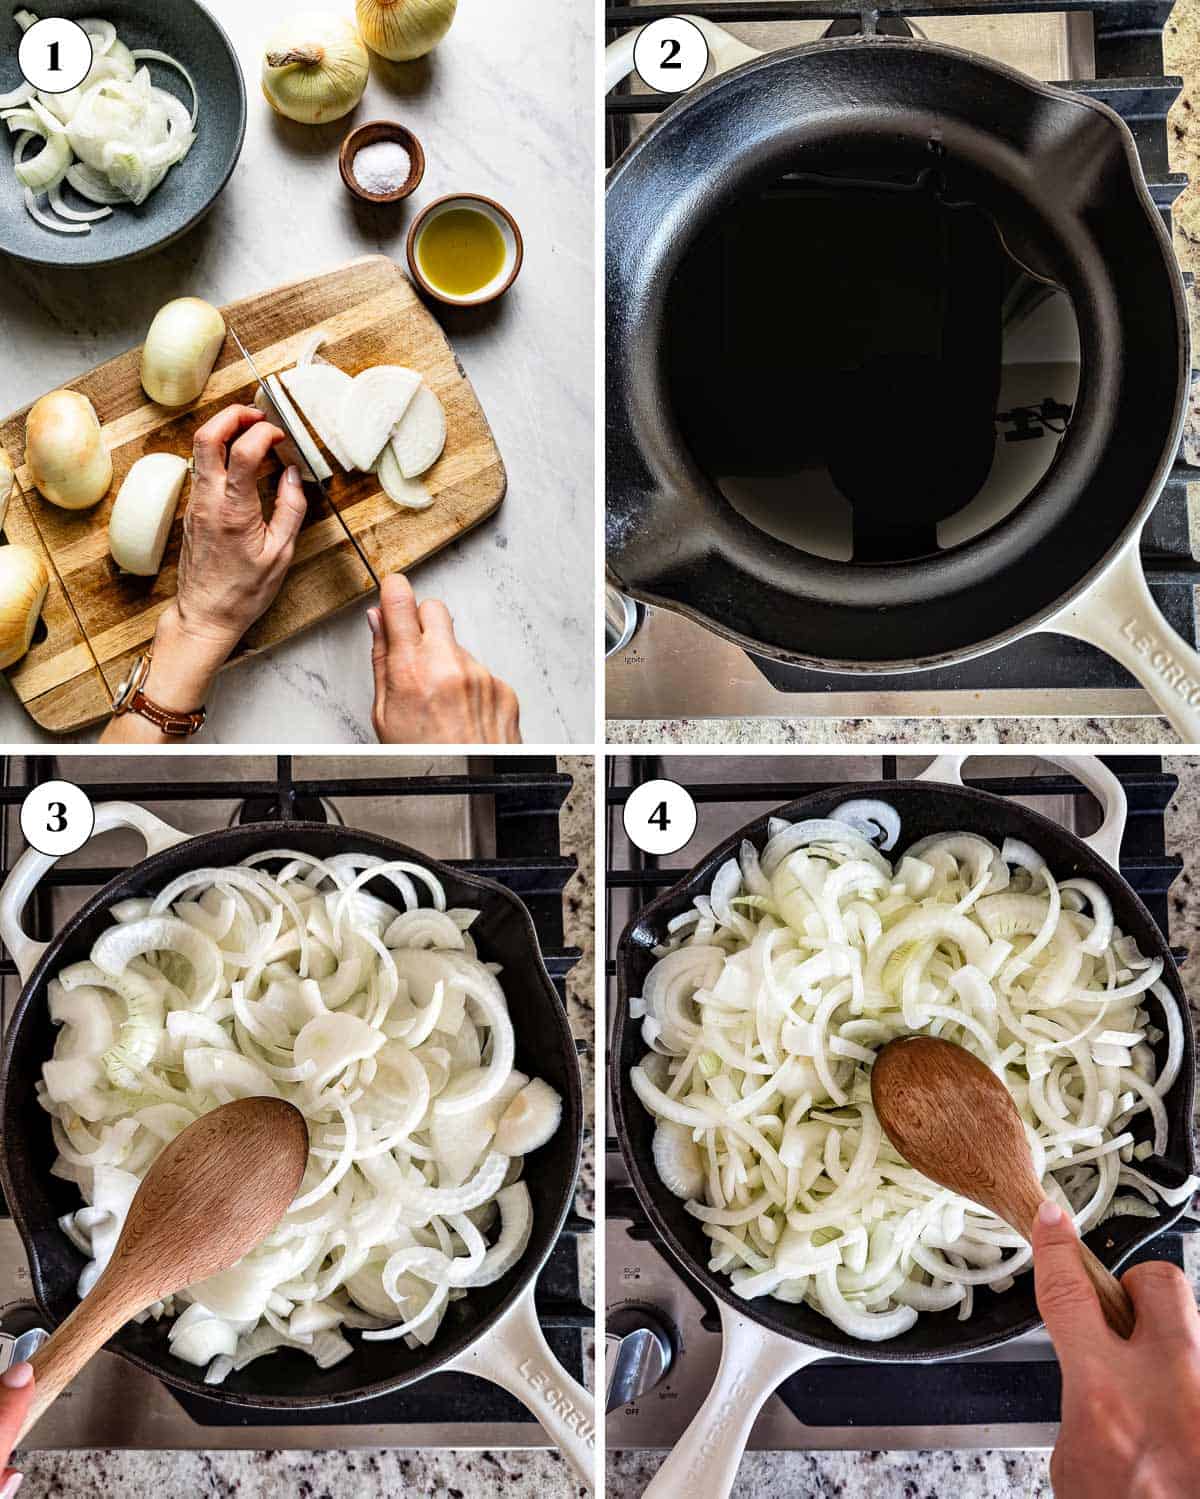
- Trim and peel the onions: Trim off the ends of your onions, then peel off their outer layers. Slice each onion in half, cutting through their roots and top ends. Then—one at a time—place the onion halves with their flat, newly cut sides face down on the cutting board. Thinly slice each half.
- Heat the olive oil: Add the olive oil to a large skillet (a cast-iron skillet or a stainless steel pan would work). Then, heat the oil over medium heat.
- Saute the onions: Transfer the onion slices to the hot oil and saute them for two minutes, stirring constantly.
- Cook uncovered: After sauteeing the onions, lower the heat and cook them uncovered for one hour. Try not to stir the onions too frequently during the first 25-30 minutes, as too much movement will prevent them from browning. However, you should still watch them and stir when necessary to avoid burnt caramelized onions.
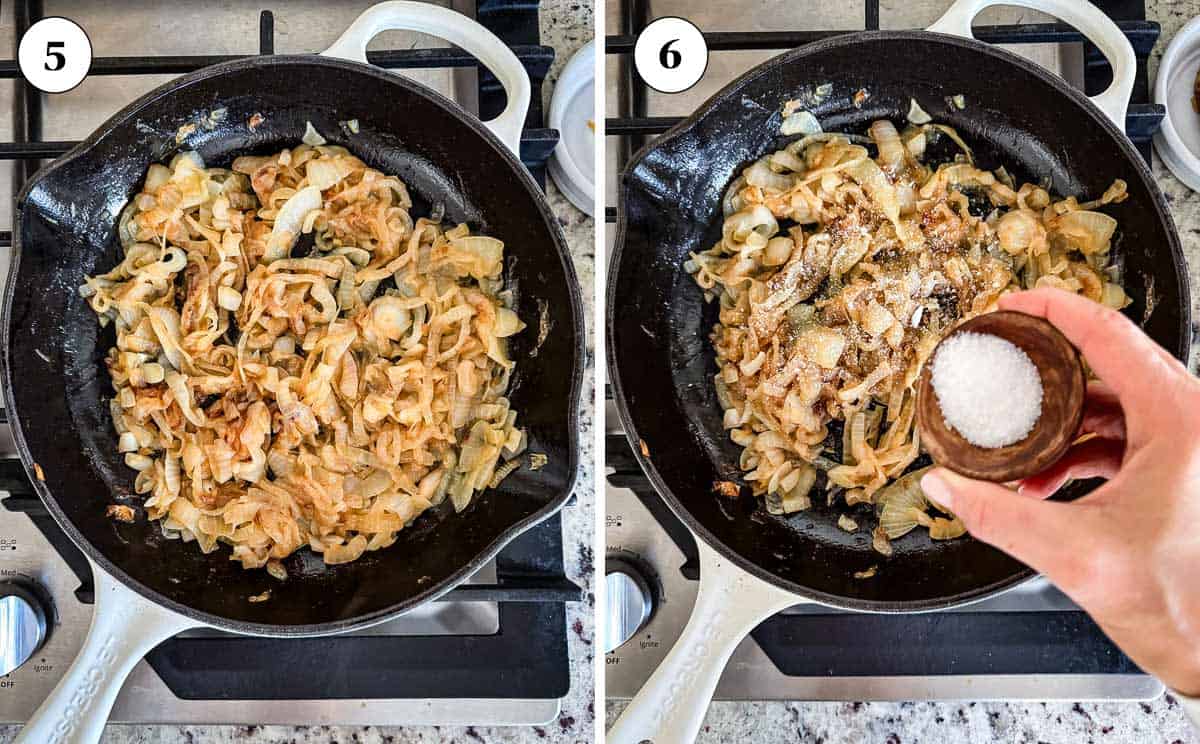
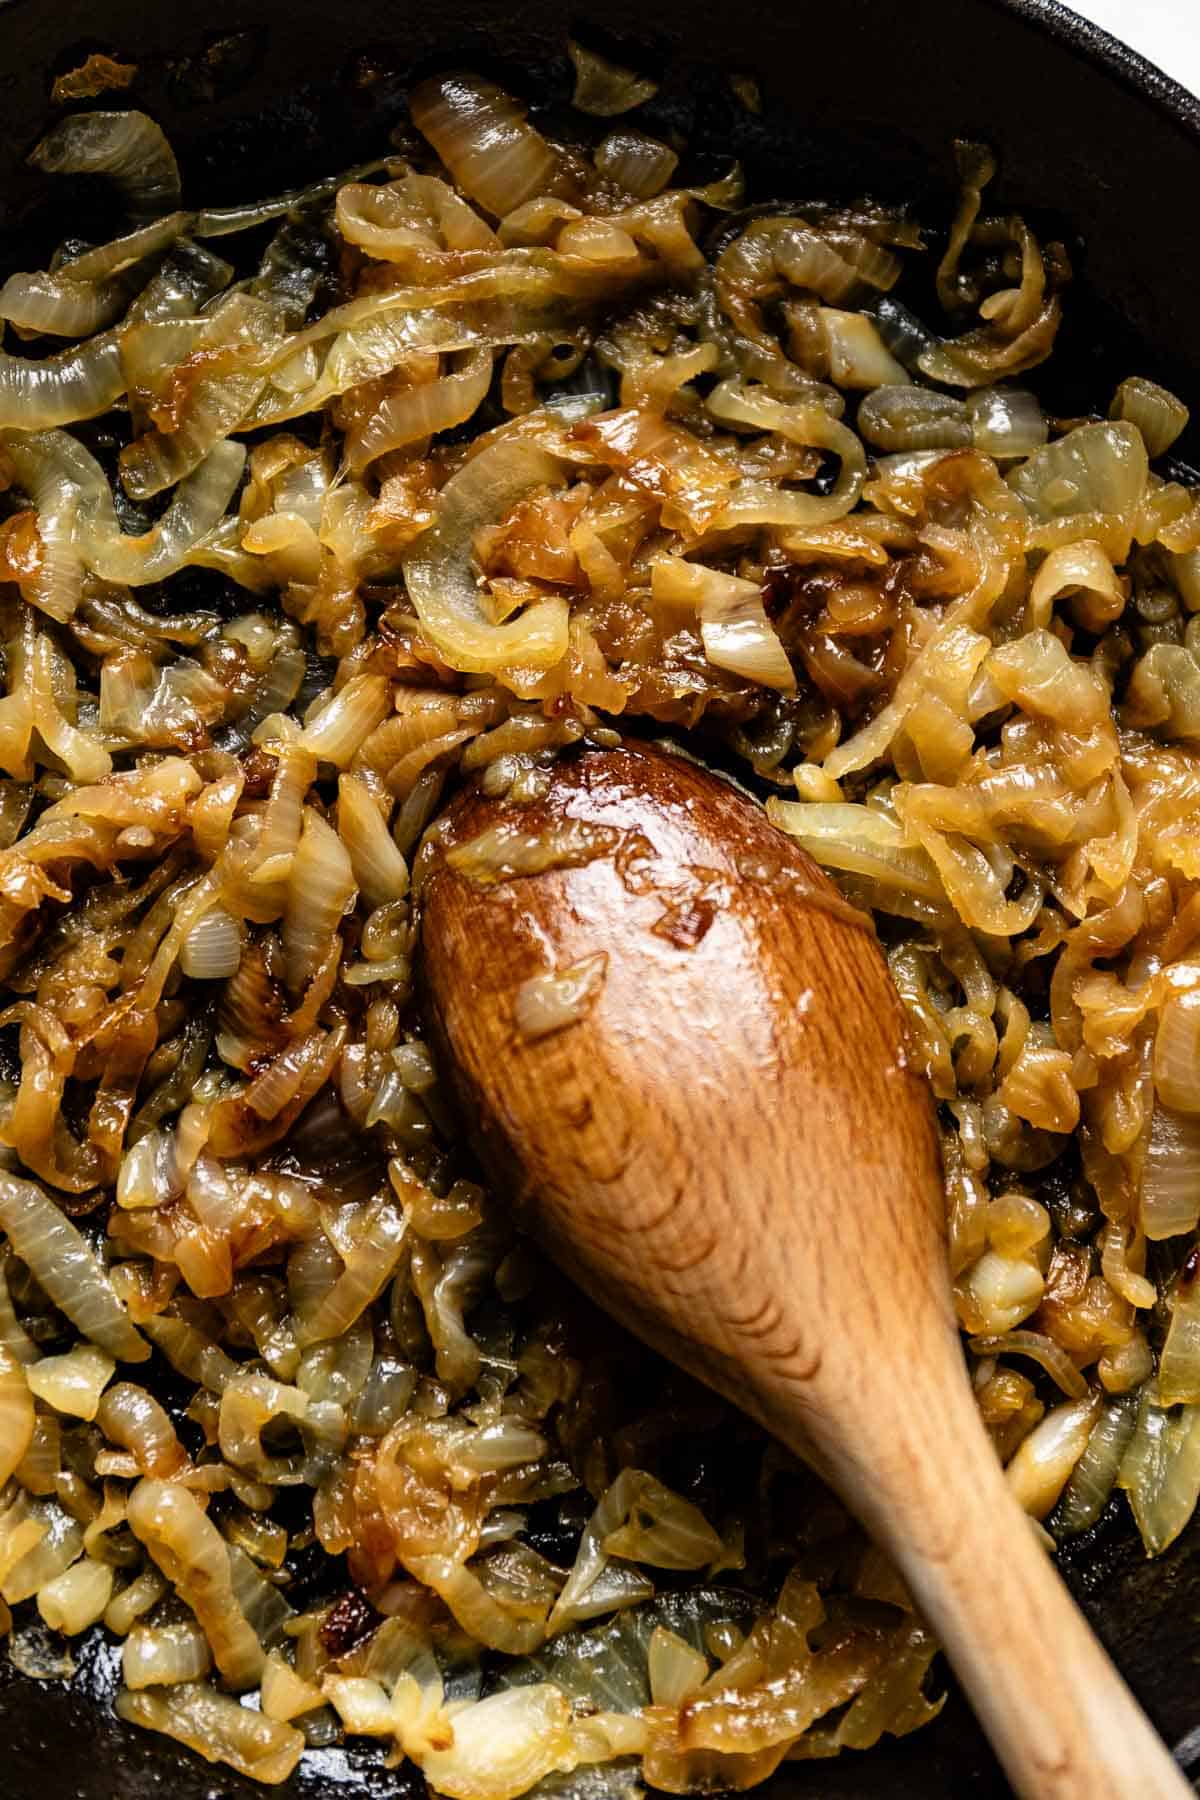
- Increase stirring frequency: After 25-30 minutes, you may have to stir your onions more frequently to keep them from burning. I usually use a wooden spoon to scrape the brown bits at the bottom of the pan.
- Add salt: When the onions turn soft and caramelized, add the salt and mix to distribute it among the slices evenly.
- Serve: When finished caramelizing the onions, remove them from the heat and serve them as an accompaniment to your favorite dish.
How to Store and Freeze?
You won’t want to sacrifice a single bite after making this caramelized onion recipe. With these pro storage tips, you can store this dish for days, using it to bring sophisticated flavor to all your favorite meals.
- Store: After browning the onions, let them reach room temperature. Then, transfer them to an airtight container and place them in the refrigerator for up to one week.
- Freeze: To freeze caramelized onions, begin by letting them come down to room temperature. Then, you have two options:
- For bulk storage, you can transfer your onions to a freezer-safe bag, remove as much air as possible, and lay your onions flat before freezing.
- For portioned storage, you can transfer your caramelized onions into ice cube trays for perfectly portioned servings later on—a great way to kick off weeknight recipes when you’re in a pinch.
- Thaw: Frozen caramelized onions can be thawed in the fridge overnight. Or, if you are using smaller amounts, you can thaw it on the counter an hour before using it in your recipe.
Caramelized Onions Uses
After caramelizing onions on the stove, I guarantee you’ll want to eat them straight out of the pan. However, this deliciously versatile recipe makes an excellent condiment for dozens of other dishes, whether you want to caramelize onions for pizza or add them to a fan-favorite dip.

- As a topping: Looking to make the ultimate meaty menu? You can easily enhance any cookout meal by using your sweet caramelized onions for brats or burgers—a combination that expertly balances the meats’ smoky, savory flavor. I especially love topping my Avocado Bacon Burger with this deluxe recipe to bring out its fresh, creamy layers. Not in the mood for a burger? You can also use caramelized onions to top pizza and pasta recipes, such as Butter Garlic Pasta, to add a luxurious finish that will have you licking your plate clean.
- Sandwiches and wraps: Caramelized Vidalia onions make the perfect addition to any protein-packed sandwich, bringing out the complex flavors of everything from hearty roast beef to a tender prime rib sandwich. Or, you can add caramelized onions to a Chicken Pita Wrap or Spinach Quesadilla if you’re in the mood for a more herby, cheesy, or diverse cuisine.
- Salads: Flavorful, tender, and rich, these golden brown onions can turn any salad into a fancy main course. My Butter Lettuce Salad has a tangy, crisp mix of fresh veggies that will add a gorgeous pop of color to any table. Or, you can add your onions to a Kale Avocado Salad for a zesty yet filling side you won’t be able to resist.
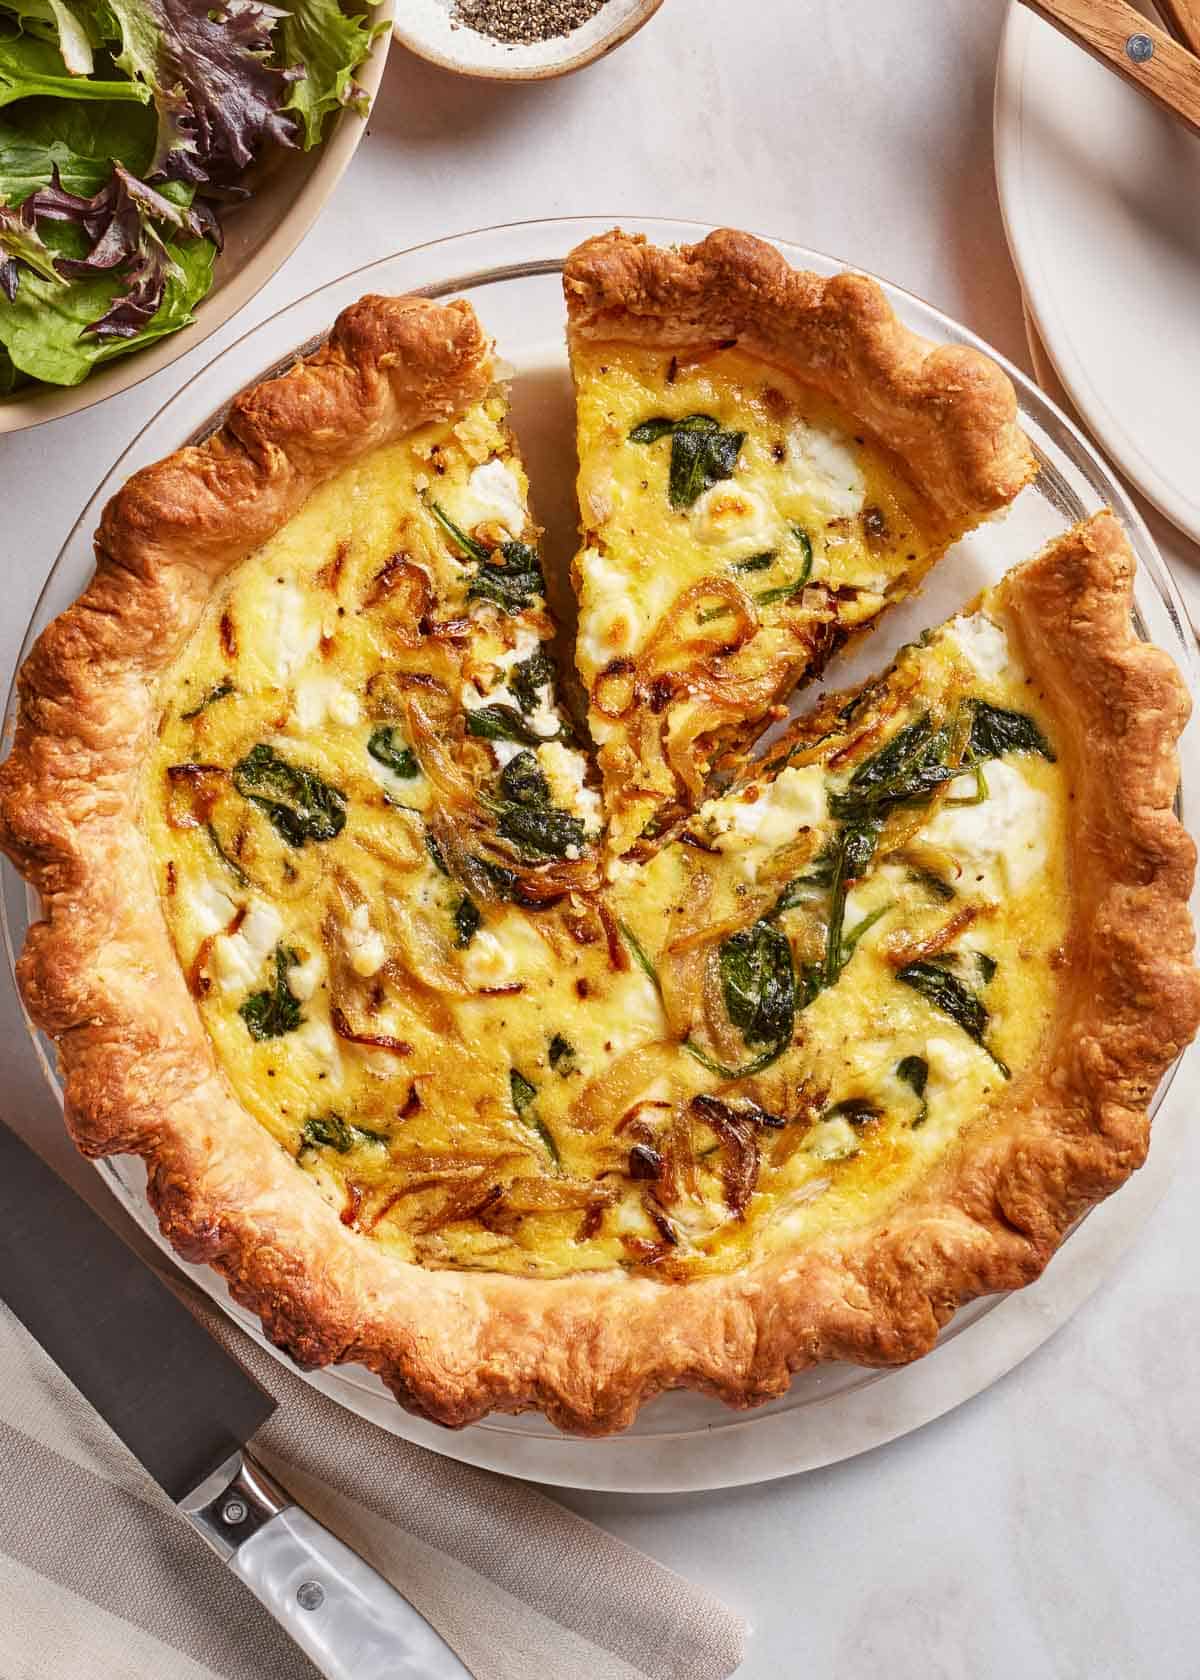
- Quiches and tarts: With a buttery base and a tangy finish, creamy dishes like my Goat Cheese Quiche and Asparagus Tart taste out of this world when you add a helping of caramelized onions.
- With meat: When it comes to using caramelized onions, no one can resist a classic. The complexly sweet, tender notes of caramelized onions enhance the savory richness of countless beef dishes, including steak, Reverse-Sear Beef Tenderloin, Reverse-Sear Prime Rib, and more. Serve your meaty main alongside a serving of Au Jus, Horseradish Sauce, or Yogurt Horseradish Sauce, and your guests will think they’re eating at an expensive steak house.
- Dips and spreads: If you’re like me, you love transforming every day dips into gourmet recipes. These jammy onions add a tasty layer of bold sweetness to creamy staples (such as Yogurt French Onion Dip) and herby Mediterranean classics, like Hummus.
- Omelet and egg dishes: Take your brunch game to the next level by topping your favorite egg dishes with a batch of garlicky caramelized onions. I especially love using this savory-sweet condiment on cheesy bakes, like my 20-minute Feta and Spinach Frittata and veggie-packed Mexican Breakfast Casserole.
- Use it as a base for soups and stews: Chances are when you think of “caramelized onions,” your brain automatically goes to “French Onion Soup.” Though an undeniably iconic pairing, I love using caramelized onions in other soup and stew bases, providing any basic dish an exquisitely deep and rich undertones.
Tips For Caramelizing Onions
The easiest way to cook caramelized onions is by using these chef-approved tips. Below, I share my top pointers on onion caramelization, from must-have tools to heat modulation.
- Skillet: A large, heavy bottom skillet—cast iron or stainless steel—is ideal when cooking caramelized onions, as they best retain heat throughout the cooking process. A Dutch oven also works well due to its thick walls and large base. Though you could use nonstick pans in this recipe, remember that they may not retain heat quite as well, and you still have to watch its bottom to avoid scorching—especially as you near the end of your cooking time.
- Slice onions evenly: As with any cooked vegetable, you must slice your onions into an even thickness to ensure even cooking. This equal slicing will ensure no pieces come out undercooked or burnt after cooking.
- Adjust the heat: As the onions cook and reduce, you may have to adjust the heat to avoid burning. Even though caramelization takes a long time, you must keep an eye on your onions so that you can adjust the heat accordingly.
- Stir occasionally but not constantly: During the first 25-30 minutes of cooking, try not to stir your onions too much, as too much stirring will prevent proper browning. However, this doesn’t mean you can leave your onions alone. Keep watch over them throughout the cooking process, as you’ll still have to stir the slices occasionally to prevent burning—likely with increasing frequency after the 25-minute mark.
- Deglaze the pan: If you want to, you can add a splash of liquid to your skillet when the onions’ jammy brown bits (also known as the “fond”) begin sticking to the bottom of the pan. Depending on your dish, consider using a liquid with a complementary flavor profile, adding a splash of water, chicken or veggie stock, white wine, or balsamic vinegar to the pan.
- Don’t rush it: Though you may see online tips for cutting your cooking time in half, there’s no real way to cook caramelized onions quickly. Shortcuts often taint the onions’ flavors or get in the way of the caramelization process—especially when adding quickening agents to the pan. Therefore, you must be patient and let your onions cook for the full 45-60 minutes for best results.
- Watch for the color: The best way to know when onions are caramelized is by watching their texture and color. The color of the perfect caramelized onions is a deep brown or a rich golden brown with a soft and jammy texture.
- Adding baking soda: Using this foolproof technique for making caramelized onions, you don’t need to add any baking soda to your slices. Instead, the low-and-slow method will naturally release the onions’ sugars over time. However, America’s Test Kitchen’s faster caramelized onions use baking soda to chemically speed up the browning process, thereby caramelizing onions quickly. Though a scientifically sound addition, remember that making caramelized onions with baking soda will negatively affect their texture and taste, giving them a mushy consistency and a harsh bitterness.
FAQs
Using this easy way to caramelize onions, you can elevate any dish into a five-star meal. This handy FAQ will ensure anyone—whether you’re a home cook or a professional chef—can whip up this condiment with ease.
Caramelized onions—sometimes referred to as “stewed onions” or “jammy onions”—are a type of prepared onions that uses slow-cooking methods to bring out the onions’ natural sugars, resulting in a savory-sweet caramelized exterior, rich brown color, and a tender texture. Cooking them low and slow triggers the Maillard reaction, which brings out their natural sugars and provides them with a rich browned exterior.
The main difference between caramelized and sauteed onions lies in their cooking process. Caramelized onions come from a low and slow cooking technique, often taking 45-60 minutes over low heat to bring out their natural sweetness and get a soft, almost jam-like consistency. Meanwhile, sauteed onions take less time to cook over a higher heat, and they come out with a mellowed onion flavor, translucent color, and tender texture.
You can cut your onions any way you want for this recipe, whether you prefer caramelized diced onions, ringed onions, onion strings, or beyond. However, professional chefs usually cut their onions into julienned half-moons. To make this cut, trim off the onions’ root ends, then cut them in half. After removing the outer skin, place the onion halves flat on the cutting board and cut them into thin half-moons.
When you’re slow-cooking onions, you’ll need to modulate your heat throughout the process. For best results, I recommend starting with medium-high heat until the onions saute (about two minutes). Then, reduce your burner to low heat and cook until caramelized.
Though I don’t cover the onions in my caramelization recipe, if desired, you may start the cooking process by covering your onions. Then, once the initial sauteeing is complete, uncover them for the remaining cooking time.
The time it takes to caramelize onions depends on how much onion you wish to prepare. In general, it will take between 45 minutes and one hour to caramelize one pound of onion.
Caramelized onions should develop a rich brown color, ranging from golden to deep brown. They also have a soft, jam-like texture, though the onion slices should maintain their basic shape.
When you store your caramelized onions in an airtight container, they can last for up to one week in the fridge.
Absolutely! To freeze your onions, let them come to room temperature, then transfer them to a freezer-safe bag. Remove as much air as possible, ensuring the onions lay flat, then store them in the freezer until ready to use.
Though technically possible, I don’t recommend making caramelized onions with sugar. The natural sugars in the onions are enough to develop a sweet flavor profile, and adding more sugar may result in an overly sweet, almost syrupy taste.
If you try this How to Caramelize Onions recipe or any other recipe on Foolproof Living, please take a minute to rate the recipe and leave a comment below. It is a great help to others who are thinking of making the recipe. And if you took some pictures, be sure to share them on Instagram using #foolproofeats so I can share them on my stories.

How To Caramelize Onions
Equipment
Ingredients
- 4 yellow onions, about 1 lbs.
- 2 tablespoons olive oil, or unsalted butter
- 1/2 teaspoon kosher salt, or more to taste
Instructions
- Trim off the ends of the onion, then peel off the outer layer. Cut the onion in half through the root and top ends. Place the flat side of the onion on a cutting board and thinly slice all halves.
- Heat olive oil in a large skillet (a large cast iron skillet or stainless steel pan would both work) over medium heat.
- Once the olive oil is hot, add all the onion slices and saute for 2 minutes, stirring constantly.
- Lower the heat to low and cook, uncovered, for 1 hour. The important thing here is to leave them alone to brown (especially in the first 25 minutes), but keep a close eye on them and stir as needed. If you stir them too often, they won’t brown. Alas, if you don’t stir them, they will burn.
- After the first 25 minutes, as the onion slices start to brown, you can stir more frequently and even use a wooden spatula to scrape the brown bits at the bottom of the pan.
- Optionally, if needed, you can deglaze using a few tablespoons of water.
- Once caramelized and soft, add the salt and stir to thoroughly distribute.
- Remove the now-caramelized onions from the heat. Serve as an accompaniment to your favorite dish!
Notes
- Yields: We used one pound of raw onions (about 4 cups of sliced onions), which yielded approximately a cup of caramelized onions.
- Type of Onion to use: We used yellow onions, but you can make this recipe with sweet onions (such as Vidalia or Walla Walla), red onions, white onions, and even shallots. Alternatively, you can use a combination of them.
- Deglazing liquid: Though optional, deglazing onions can be done using water, stock, or a splash of balsamic vinegar. I typically choose a liquid that complements the recipe for which I’m using these onions. Remember, only a small amount is needed, as it goes a long way.
- Store: Let browned onions reach room temperature. Then, transfer them to an airtight container and place them in the refrigerator for up to a week.
- Freeze: To freeze, begin by letting them come down to room temperature. Then, you have two options:
- For bulk storage, you can transfer them to a freezer-safe bag, remove as much air as possible, and lay your onions flat before freezing.
- For portioned storage, you can portion them out using ice cube trays to kick off any recipe when you’re in a pinch.
- Thaw: Frozen onions can be thawed in the fridge overnight. Or, if you are using smaller amounts, you can thaw it on the counter an hour before using it in your recipe.
Nutrition
Nutrition information is automatically calculated, so should only be used as an approximation.